Paywalls
The Paywall sidebar group (Products, Offerings, Paywall Templates) is a self-contained feature area for building and selling in-app subscriptions and one-time purchases without writing any paywall UI in code. The three pieces build on each other in a fixed pipeline: a Product is a single store SKU (a subscription base plan, an offer, or a one-time purchase) imported from Google Play, the App Store, or Amazon, or entered by hand; an Offering bundles several Products for one app into a named group, with one product marked as the default selection; and a Paywall Template is the actual screen design — built visually in the Portal — that presents an Offering's products and fires the purchase. Once a template is published, it's connected to real placements in your app back under App Details → Paywalls for App Placeholders, described earlier in this guide.
Products
The Products page (/paywall-products) is a flat table across every app you manage: #, Title, App (icon, name, and package), Store (a platform icon — Google Play, Apple App Store, or Amazon Appstore — or a gray dash if the app has no recognized store), Store identity (the store-side product/SKU string, shown in monospace), Time Period, a Status pill (Active/Inactive), Created At, and row actions. A search box matches title, SKU, description, app name, or package, and App, Status, Store, and Time Period filters narrow the list further, with the same pagination footer used throughout the Paywall pages.
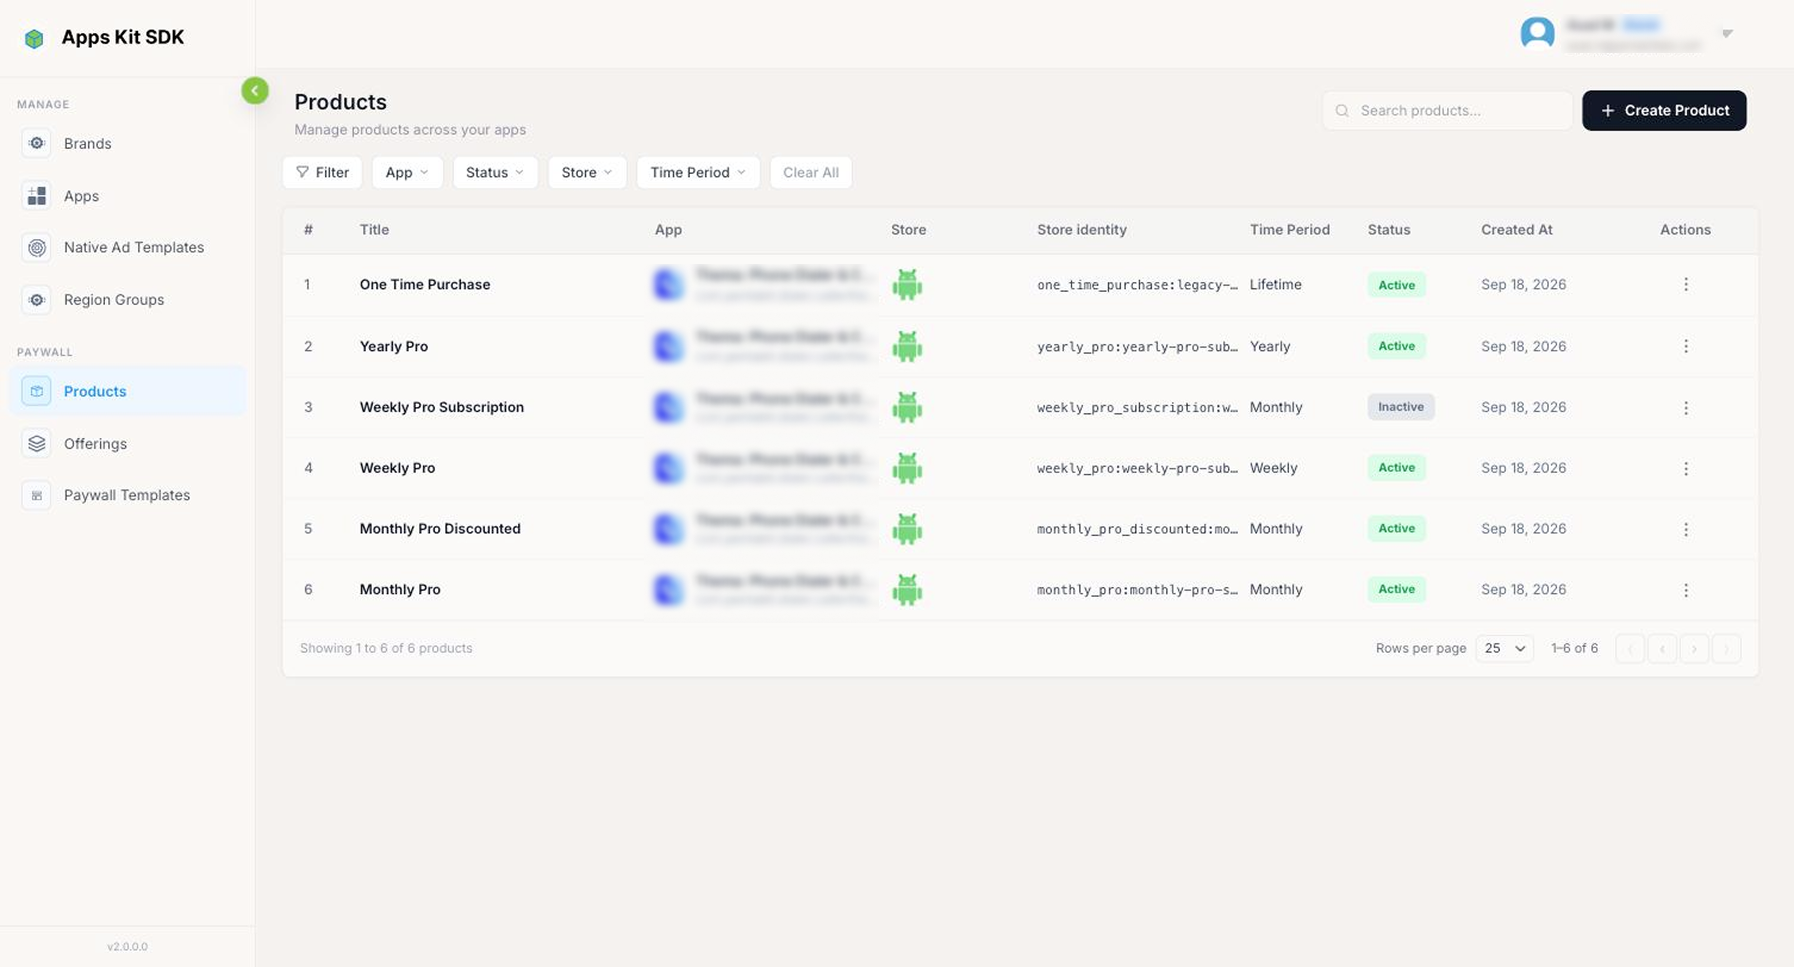
Click Create Product (top right) to start a new one, or click an existing row to edit it. Either way you land in a two-panel editor: pick the App the product belongs to first (nothing else is enabled until you do), then either Import from that app's store or Add product to build one by hand.
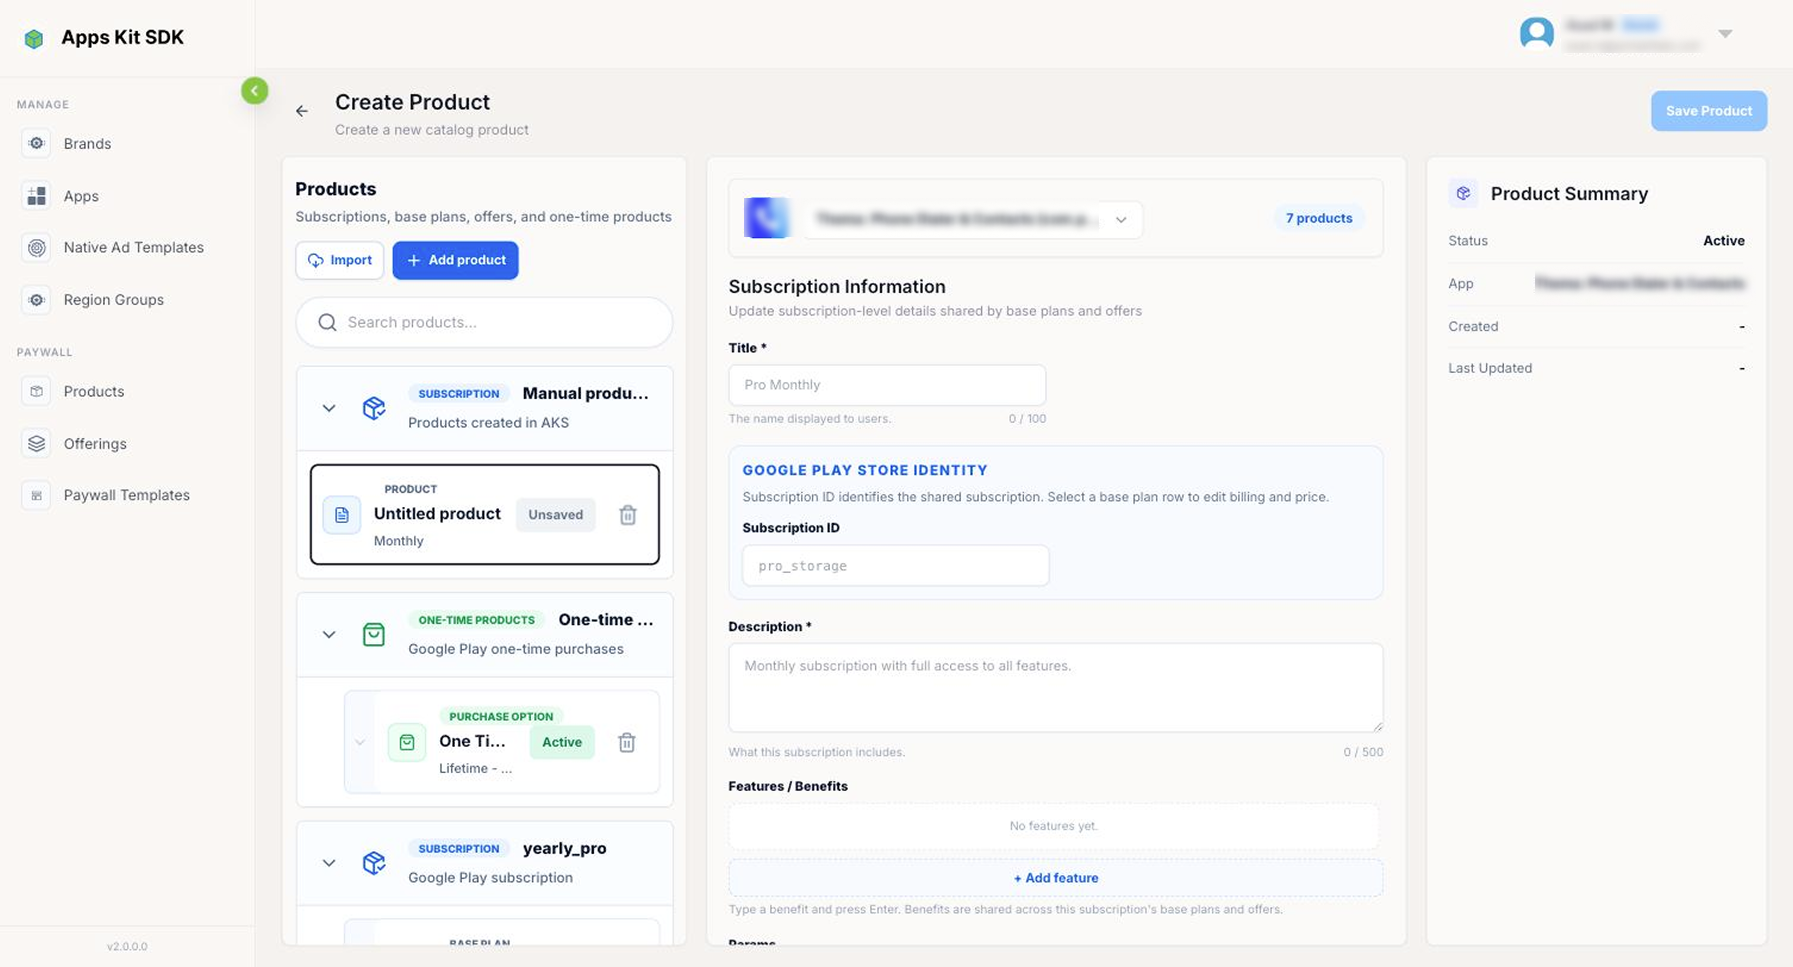
Once an app has products, the left panel groups them by kind — Manual products (created directly in the Portal), One-time products, and each Subscription, which expands to show its Base plans and any Offers nested under each base plan (a base plan is the store's unit of billing/price under one shared subscription — e.g. a "Weekly Pro" and a "Monthly Pro" base plan can both live under the same subscription).
Importing from Google Play (Android). For a Google Play app, Import → Connect Google Play walks you through a one-time, two-part setup rather than a bare form:
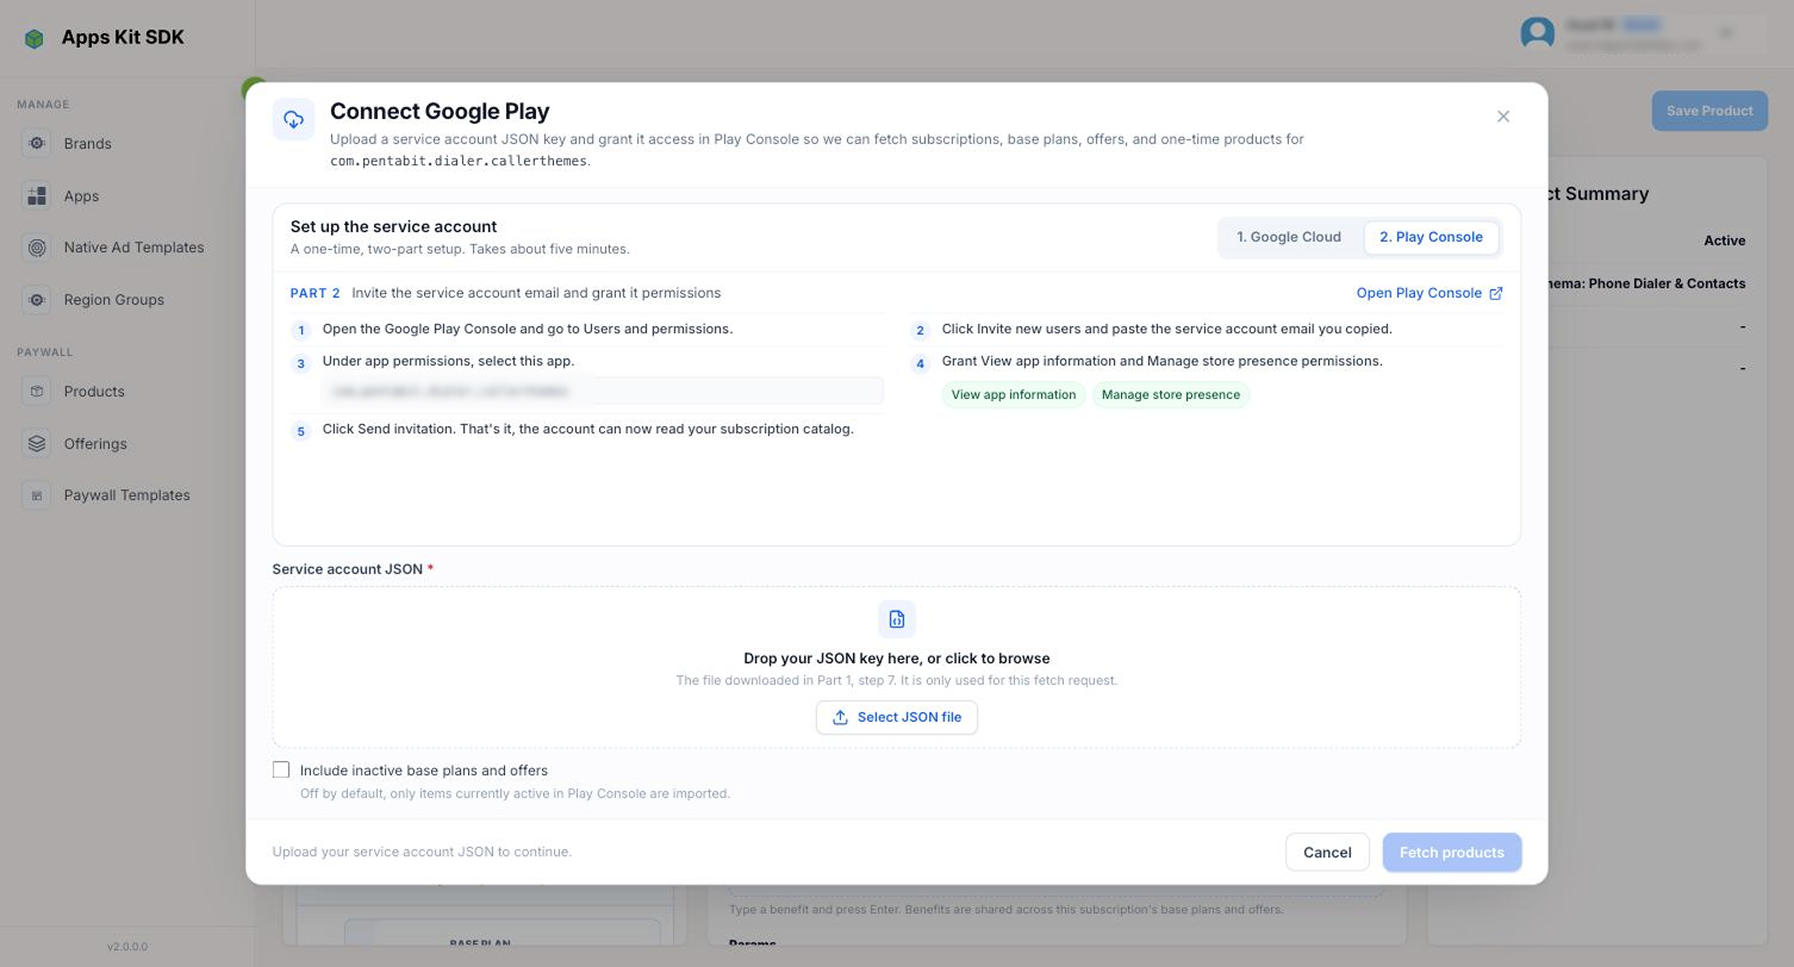
- 1. Google Cloud — create a service account in Google Cloud Console, enable the Google Play Android Developer API for it, and download its JSON key.
- 2. Play Console — invite that service account's email into Play Console with View app information and Manage store presence permissions (the modal shows you the email to copy, and links straight to both consoles).
Upload the downloaded service account JSON key, optionally check Include inactive base plans and offers (off by default — only what's currently active in Play Console is imported), then click Fetch products. Each result becomes a draft product prefilled with title, description, a price preview, status, and — uniquely for Google — its full base plan/offer tree (subscription ID, base plan ID, and every offer's type, pricing, phases, and eligibility). Re-running the import refreshes your unsaved drafts from Play Console without touching anything you've already saved.
Importing from the Apple App Store (iOS). For an App Store app, Import App Store products asks for the app's Bundle ID (pre-filled), Key ID, Issuer ID, and an uploaded In-App Purchase key (.p8) file — all three come from App Store Connect's Users and Access → Integrations → In-App Purchase page, which the modal links to directly. Fetch products stays disabled until Key ID, Issuer ID, and the .p8 file are all present. Apple's own hierarchy (subscription group → product) means imported products don't get the same base-plan tree Google's do; status is derived from Apple's real review state, so only a subscription that's actually APPROVED comes in as Active — anything still in review, needing developer action, or rejected comes in Inactive.
Importing from Amazon Appstore. Amazon's flow is file-based rather than credential-based: upload a Product catalog JSON (an Amazon App Tester product export) and click Import products. Items with item type SUBSCRIPTION become subscription products; ENTITLED and CONSUMABLE items become one-time products. Amazon has no base-plan concept, so each imported product carries its Amazon Product ID/SKU directly rather than a base-plan tree.
Creating a product by hand. Clicking Add product builds a draft whose store identity you type yourself instead of importing it — useful if you haven't set the product up in the store console yet, or want to stage it in the Portal first. The identity fields shown depend on the app's store: Google Play asks for a Subscription ID, Base plan ID, and Billing period; the App Store asks for a Subscription group and Product ID; Amazon asks for a Product ID and product type. A product can also be flagged as one-time instead of a recurring subscription.
Once a field has been populated by a successful import, it becomes read-only with the tooltip "Imported from store. Edit this in Google Play / App Store / Amazon, then import again" — you make the change in the actual store console and re-run the import rather than editing it here directly.
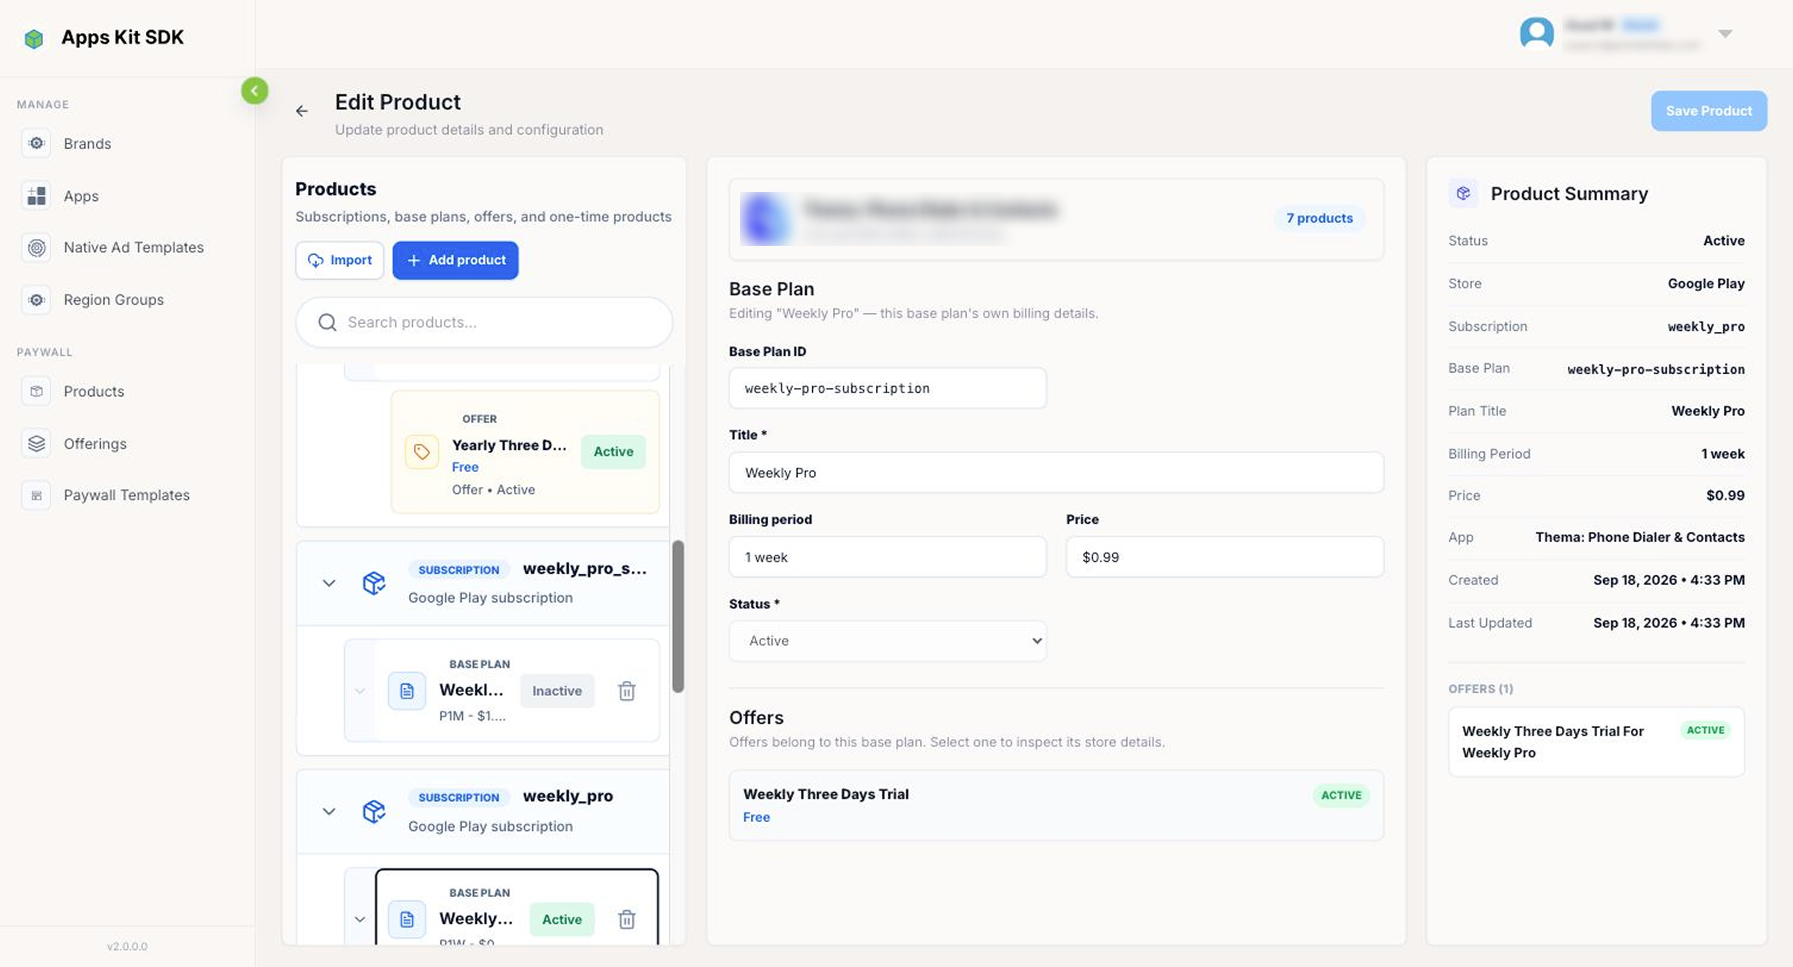
Regardless of store, every product has a Title (100 characters), a required Description (500 characters), optional Features / Benefits tags, custom key/value Params, and a Status (Active/Inactive) you can toggle even on an imported product. Time Period is weekly, monthly, 3-months, 6-months, annually, lifetime, or a free-text Custom Period. Saved products are what get attached to an Offering next.
Deleting a product that's still referenced by an Offering or a Paywall Template doesn't fail silently — the Portal shows a second confirmation naming exactly what it's still attached to, and requires you to explicitly check a box acknowledging it'll be removed from those places too before it lets the delete through.
Offerings
An Offering groups several Products from one app into a single named bundle that a Paywall Template can then present — this is the layer that decides which products a given paywall is allowed to sell, and which one is preselected.
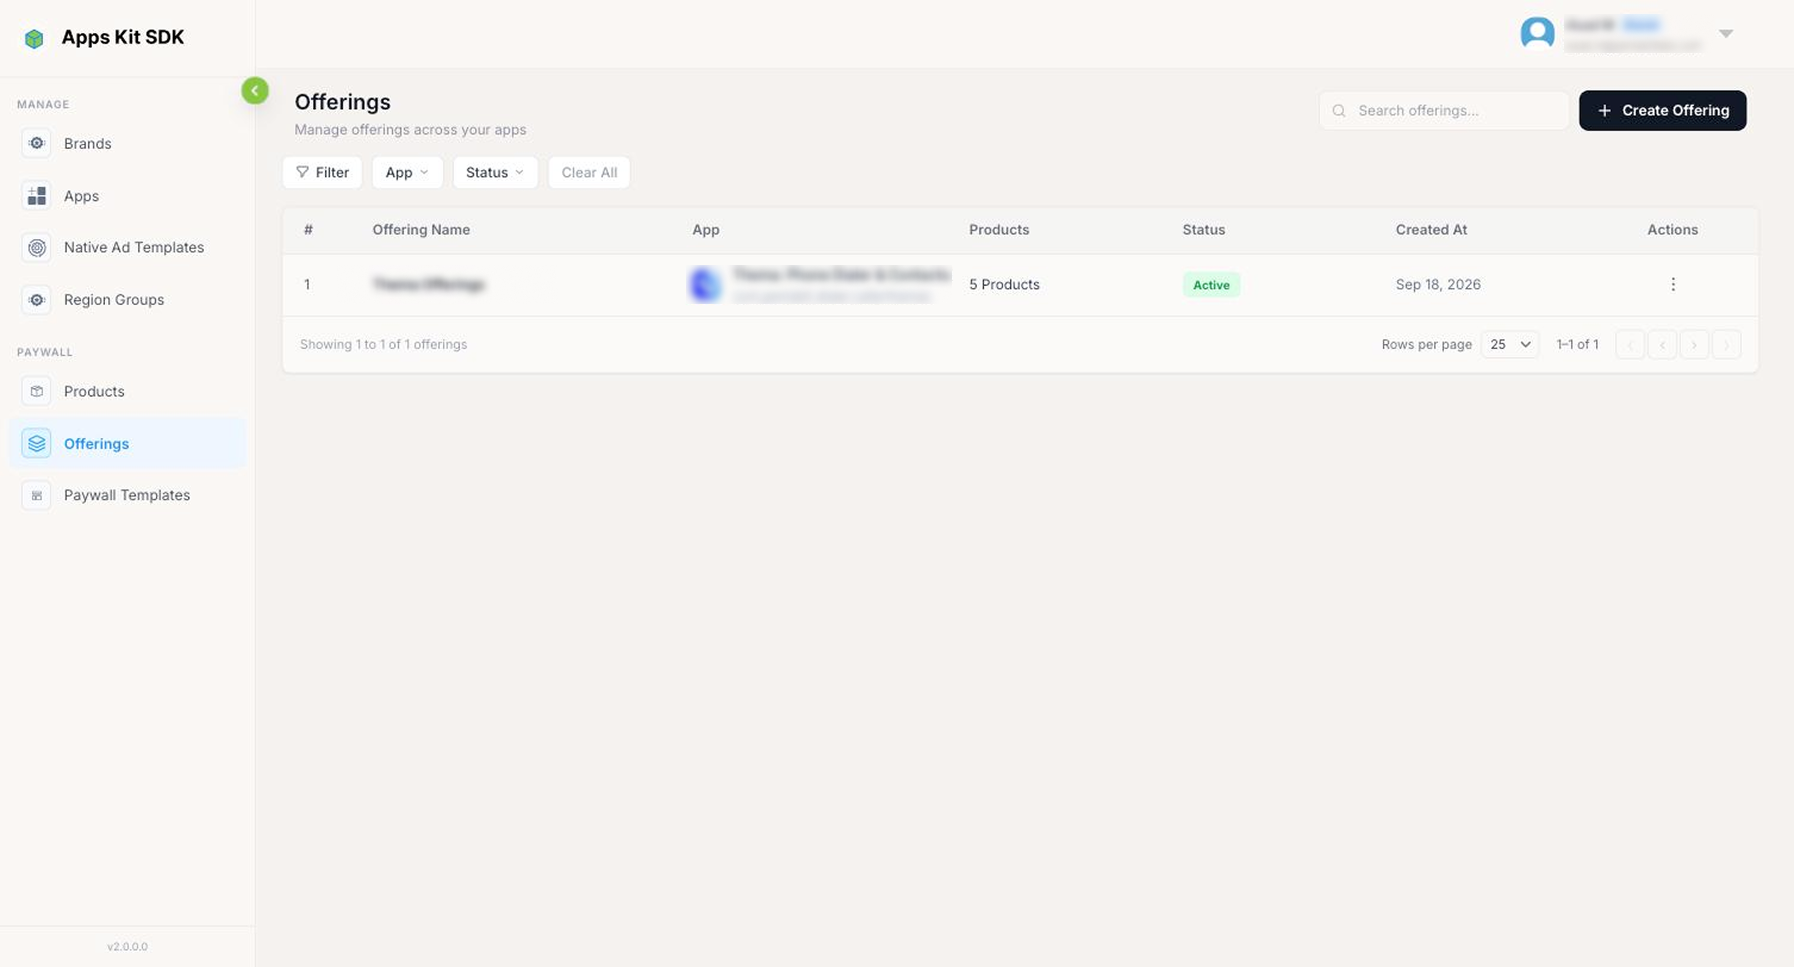
The Offerings page (/paywall-offerings) lists #, Offering Name, App, a Products count, Status, Created At, and actions, with the same search-plus-App/Status-filter pattern as Products. Click Create Offering to start one.
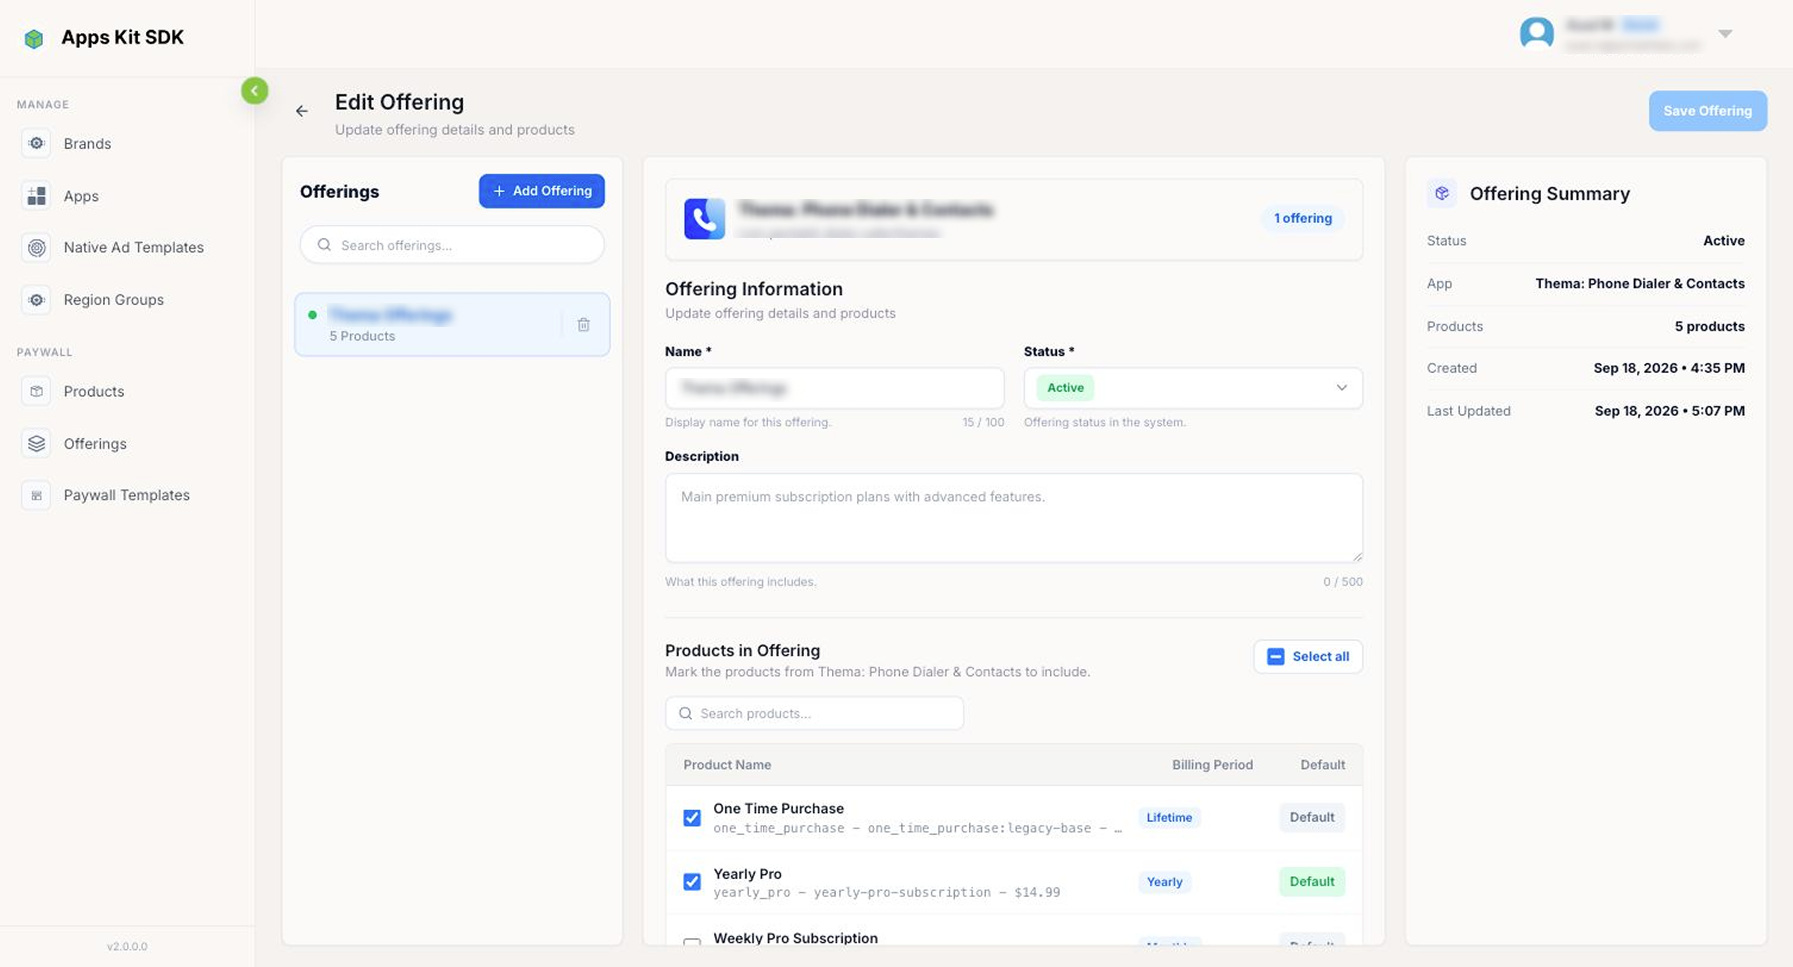
Every Offering belongs to exactly one App — pick it first, since it determines which products are available to select (changing the App afterward resets your in-progress selection). Fill in a Name (100 characters) and an optional Description (500 characters), then use the Products in Offering checklist to mark which of that app's products (including individual base-plan variants) belong to this Offering — a Select all shortcut and its own search box are provided. Each checked product has its own Default button; clicking it marks that one product as the Offering's default/preselected package, automatically un-marking whichever product was previously the default, so there's always exactly one default per Offering. At least one product must be selected before you can save.
A Paywall Template is linked to exactly one Offering (set in the template's Configure App dialog, described next) — every price card you place on that template's canvas is then bound to one specific product pulled from the linked Offering, which is what actually determines which products and prices a given paywall can show.
Paywall Templates
Paywall Templates is where you visually design the actual paywall screen — no native UI code required. A template is built once, bound to one app and one Offering, and can be translated into multiple languages; publishing it makes it available to be wired up to real placements back in App Details.
The Templates List
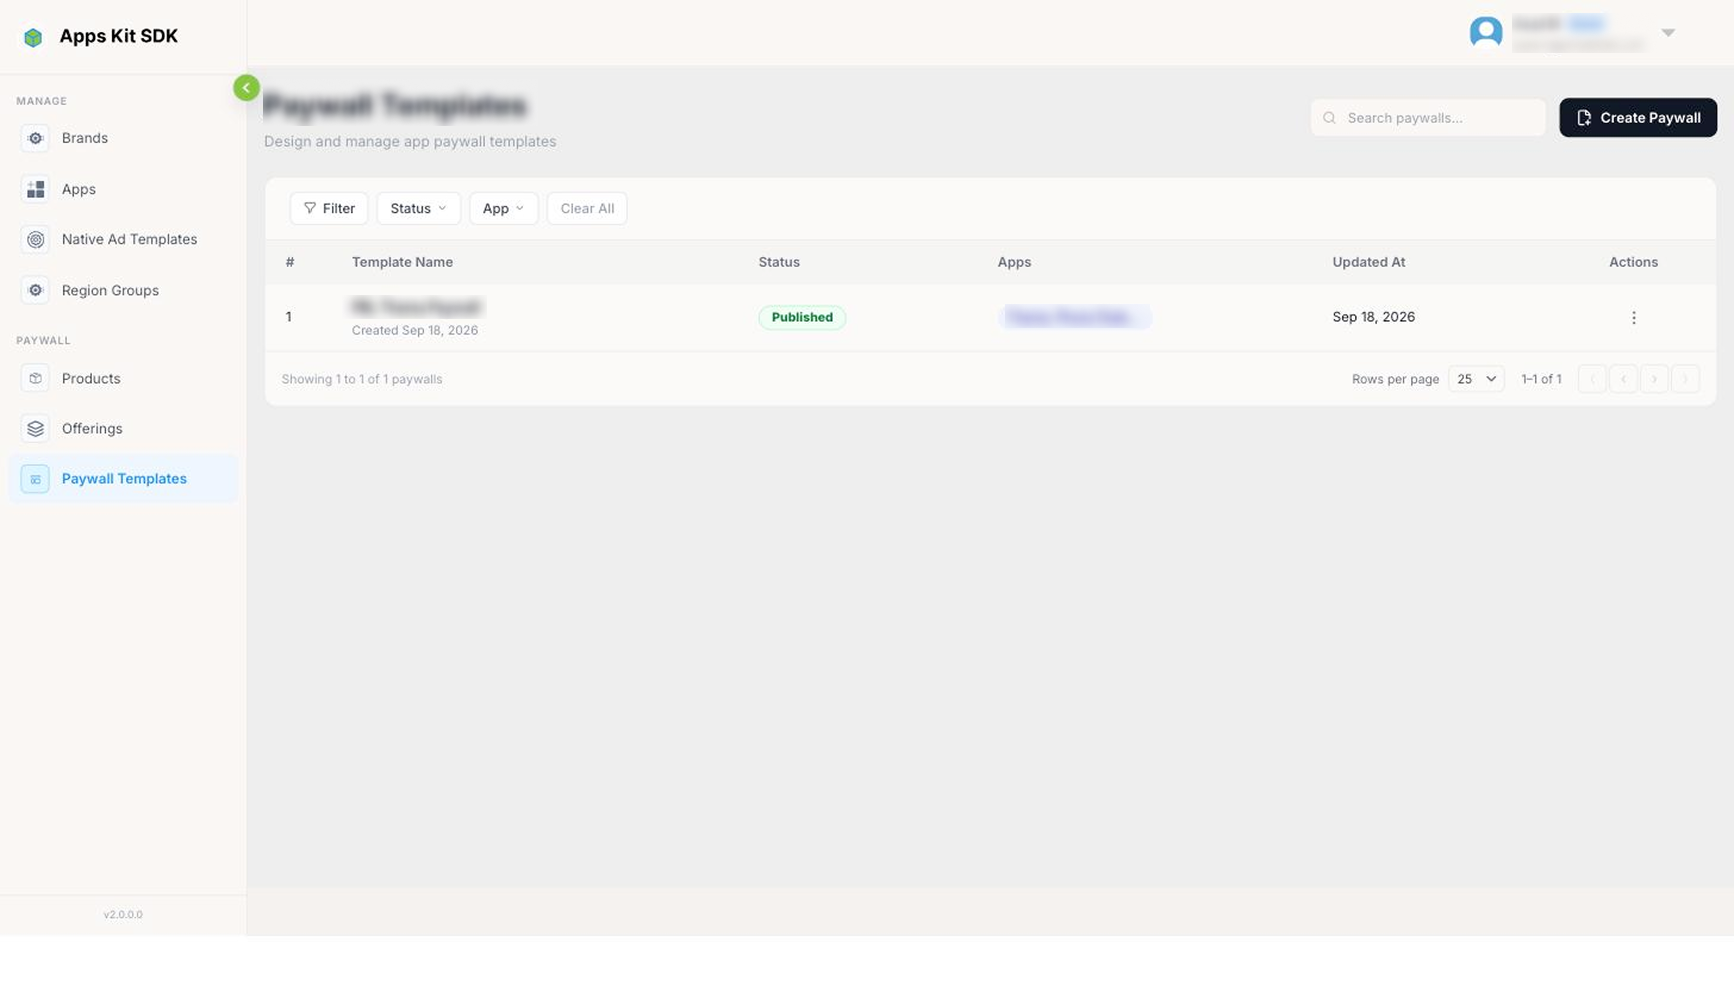
The Paywall Templates page (/paywall-templates) lists every paywall you've created: #, Template Name, Status (Published/Draft), the Apps it's assigned to, Updated At, and actions. Status and App filters narrow the list, and a search box matches by name.
Starting a New Paywall
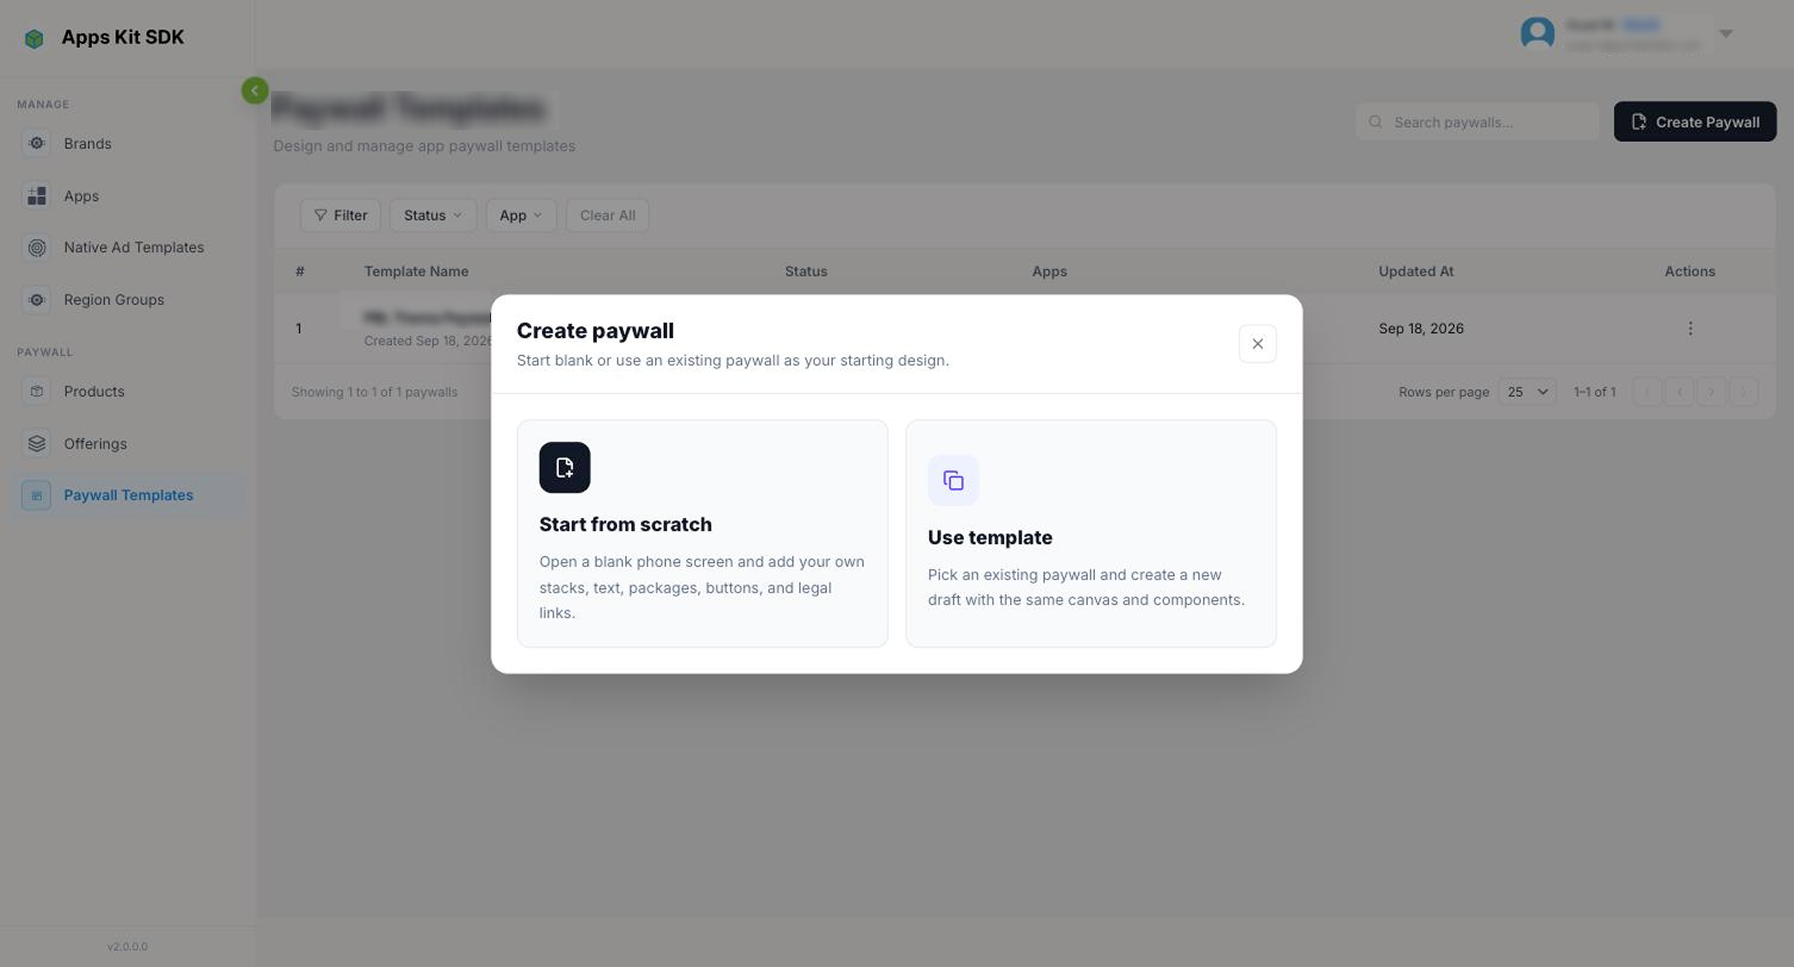
Clicking Create Paywall offers two starting points: Start from scratch ("Open a blank phone screen and add your own stacks, text, packages, buttons, and legal links") or Use template ("Pick an existing paywall and create a new draft with the same canvas and components").
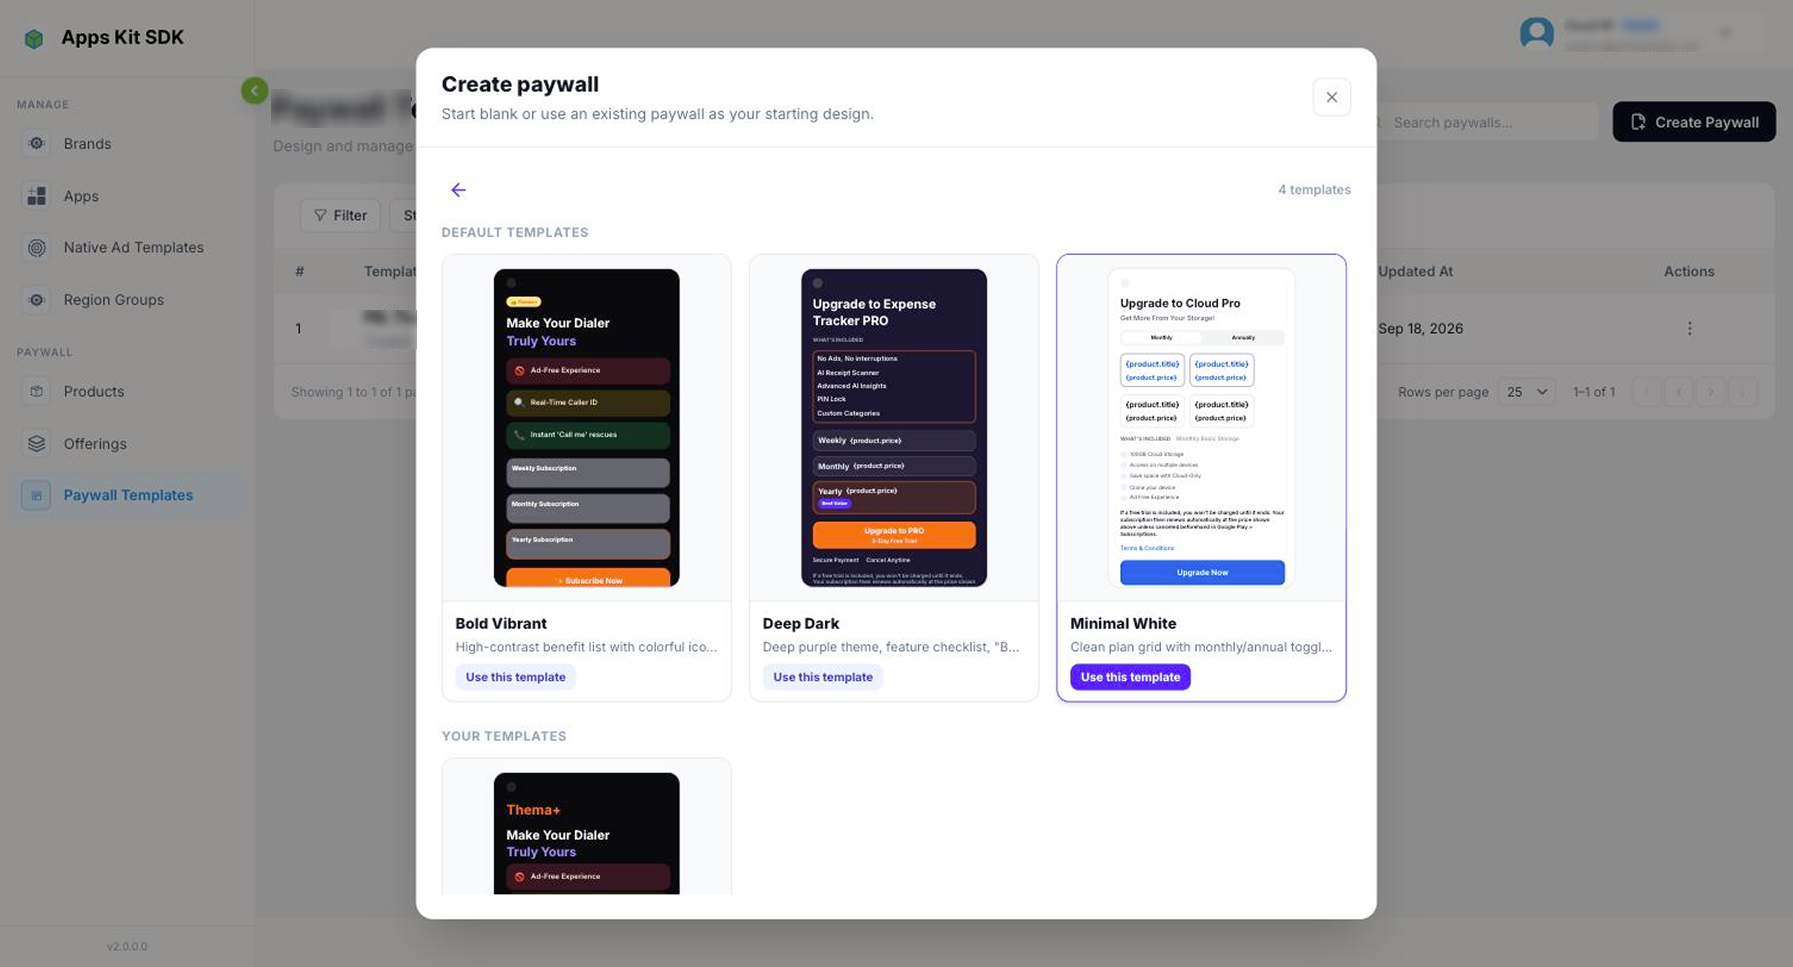
Use template opens a gallery split into Default Templates — a handful of built-in starter designs (each with its own name and description) you can start from and fully customize — and Your Templates, previously saved templates already in your account. Picking any card duplicates that template's canvas and components into a new draft; because product bindings don't carry over, you re-map each price card to your own Offering afterward. Start from scratch instead opens a completely blank canvas.
Designing a Paywall (the Canvas)
Opening a template — new or existing — takes you into the builder.
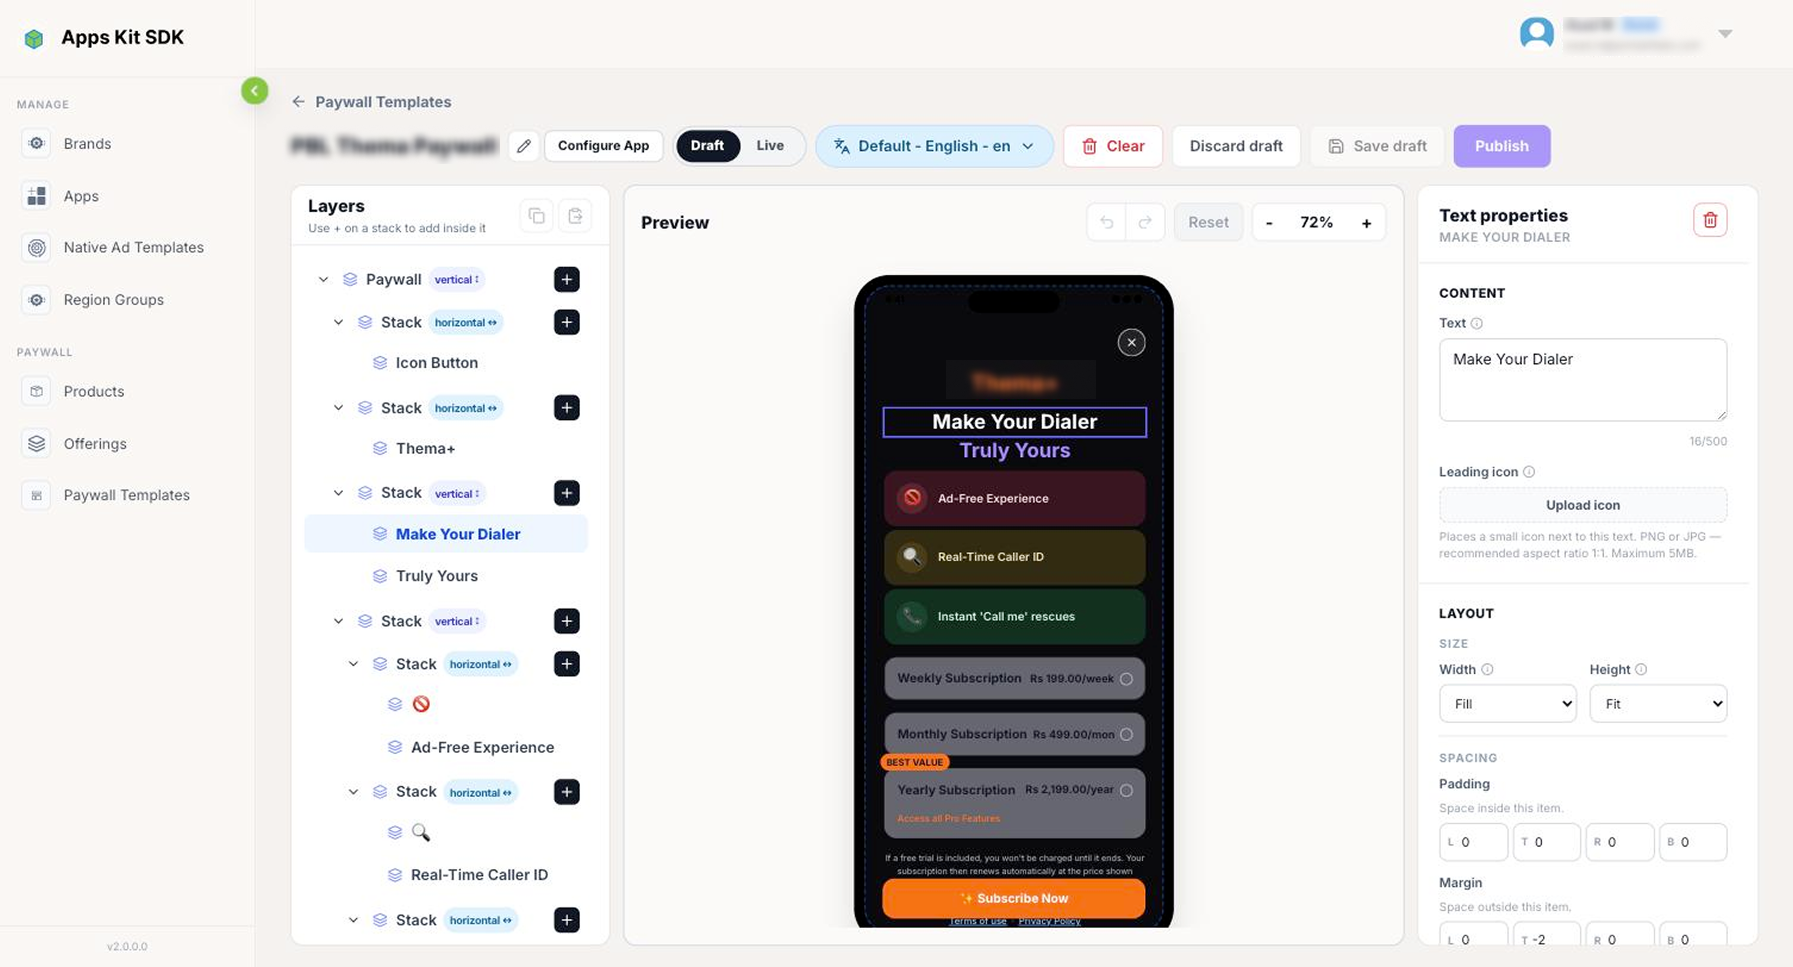
The header (title, an inline pencil to rename it, Configure App, a Draft / Live toggle, a language selector, and Clear / Discard draft / Save draft / Publish) sits on a single row above the workspace. The left panel toggles between Layers — a tree of every element currently on the canvas, with copy/paste-stack controls — and, once you click + on any stack, Add Components — the block palette you insert from. The center panel is a live phone-frame preview at actual size; the right panel is an Inspector for whatever's selected, organized into Content, Layout, Layer Order, Appearance, and Actions.
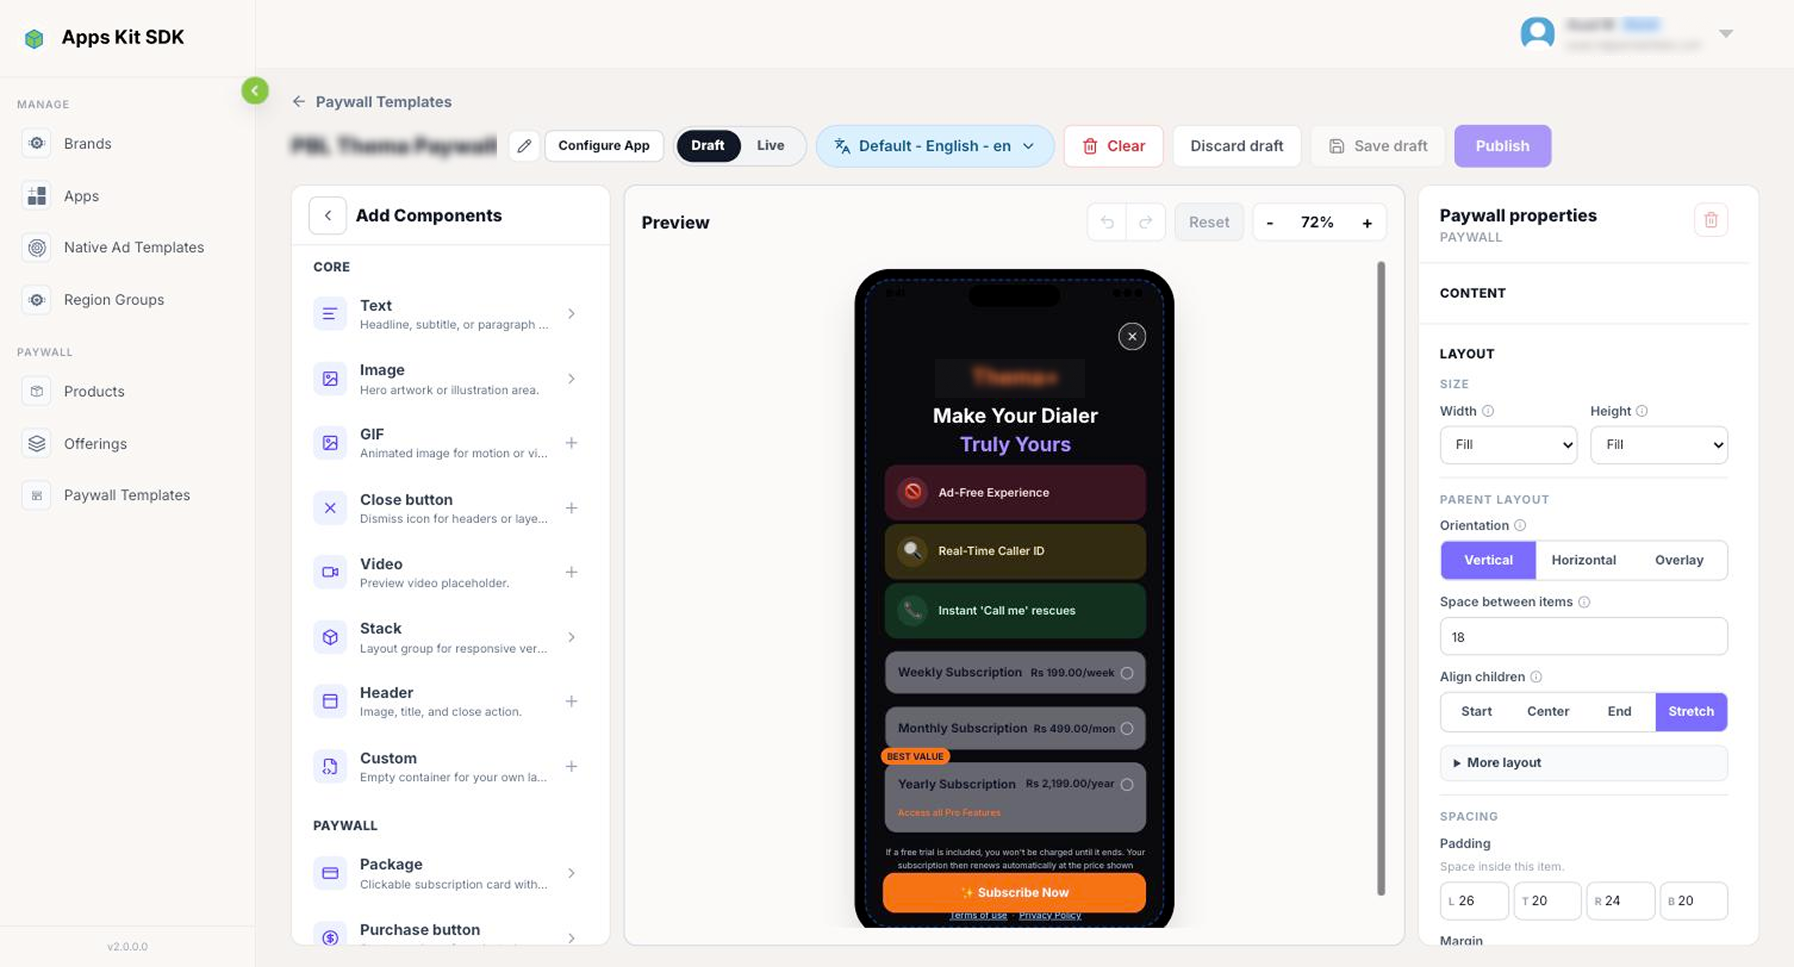
The component palette is grouped by purpose: Core blocks (Text, Image, GIF, Close button, Video, and Stack containers — vertical, horizontal, or layered — plus a combined Header block and a blank Custom container); Paywall blocks (Package — clickable price cards in seven variants: Simple, Featured, Compact, Free trial, Percentage discount, Fixed discount, and Intro price — a Purchase button, a One-time purchase button, and Express checkout buttons); Interactive blocks (Tabs, for switching between plan groups like Monthly/Annual; Switch; Button; Carousel); and Content blocks (a Social proof quote, a Feature list, a Badge, an "Award"/best-offer badge, and a Legal link for Terms/Privacy).
Wiring Up Pricing
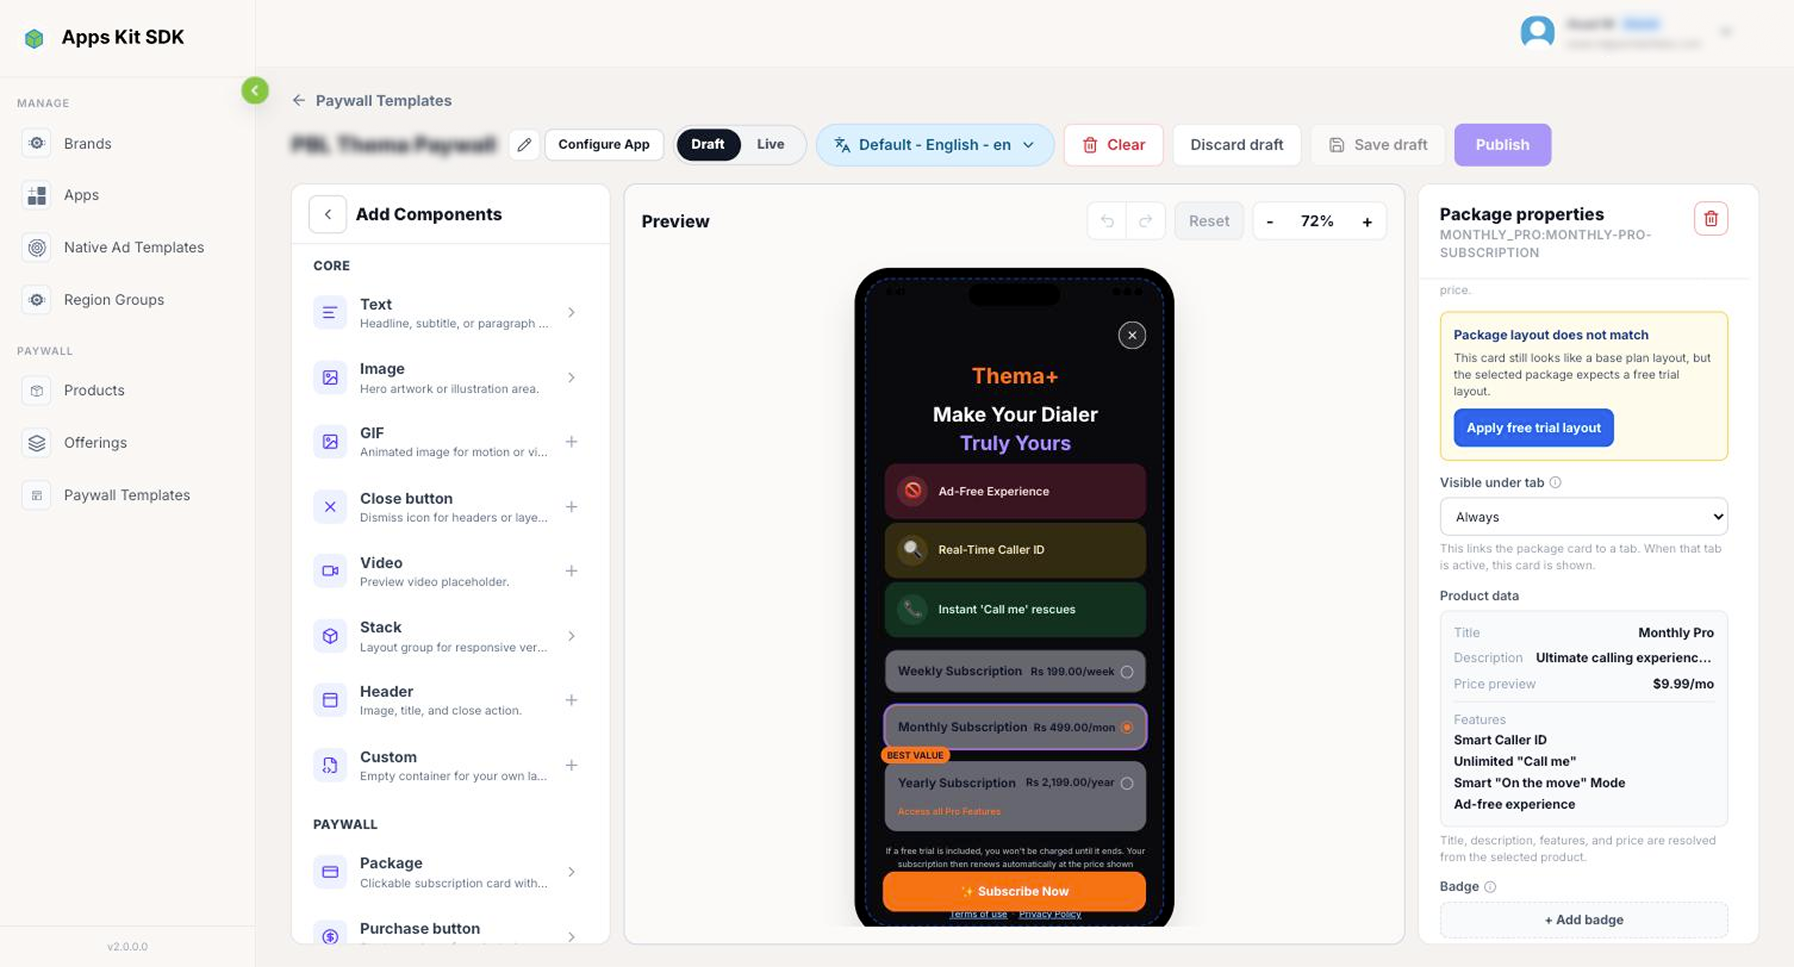
Every Package card has an Offering package dropdown in its Content section, populated only with products from the Offering set in Configure App (Subscription → Base plan → Preferred offer, in that order) — selecting one binds the card to that exact product. The Inspector then shows a live, read-only Product data preview (title, description, price preview, and features) pulled straight from that product, plus a hint that you can also reference it elsewhere on the canvas with price tokens like {planKey.price}. If a card's visual layout doesn't match what the selected package actually needs (for example, a plain price card bound to a product configured with a free trial), the Inspector flags it with an Apply [x] layout shortcut so the two stay consistent. Purchase buttons and price cards can also be scoped to Visible under tab, so a card only shows while a matching Tabs option is selected.
Configure App is what actually sets which app and Offering a template's products come from:
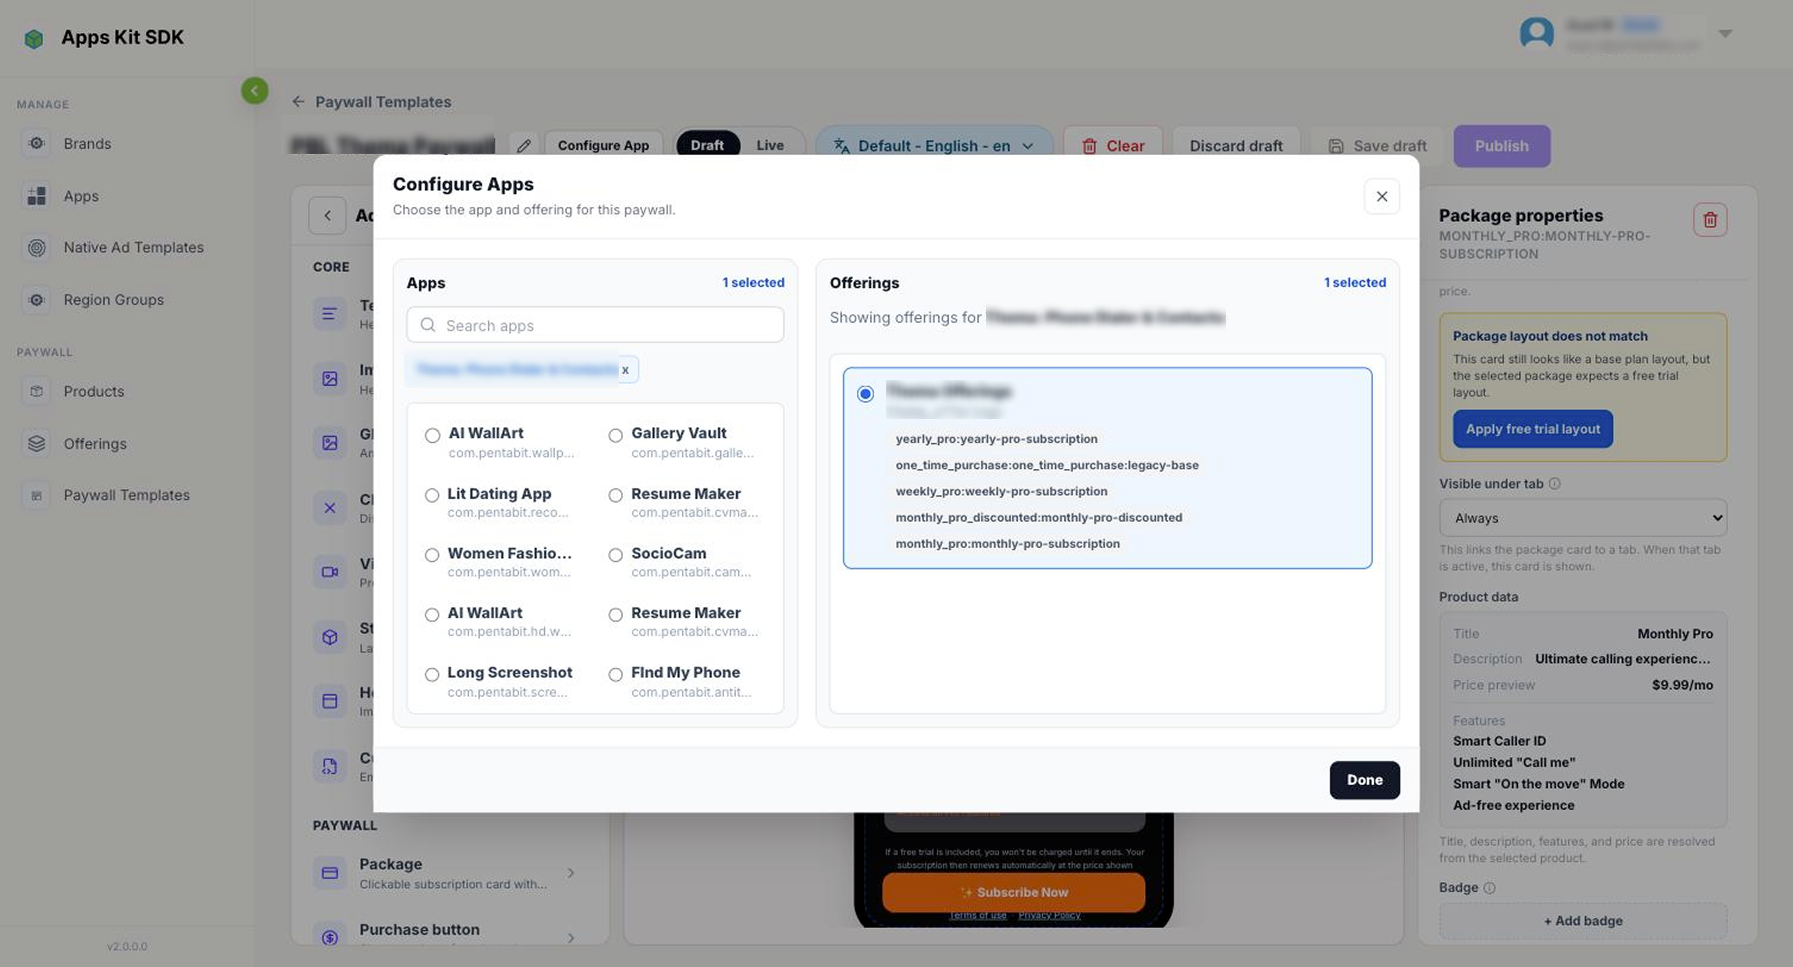
Pick one App on the left, then one of that app's Offerings on the right (each option previews its key and up to five of its product package keys) — a template targets exactly one app and one Offering at a time.
Languages & Translations
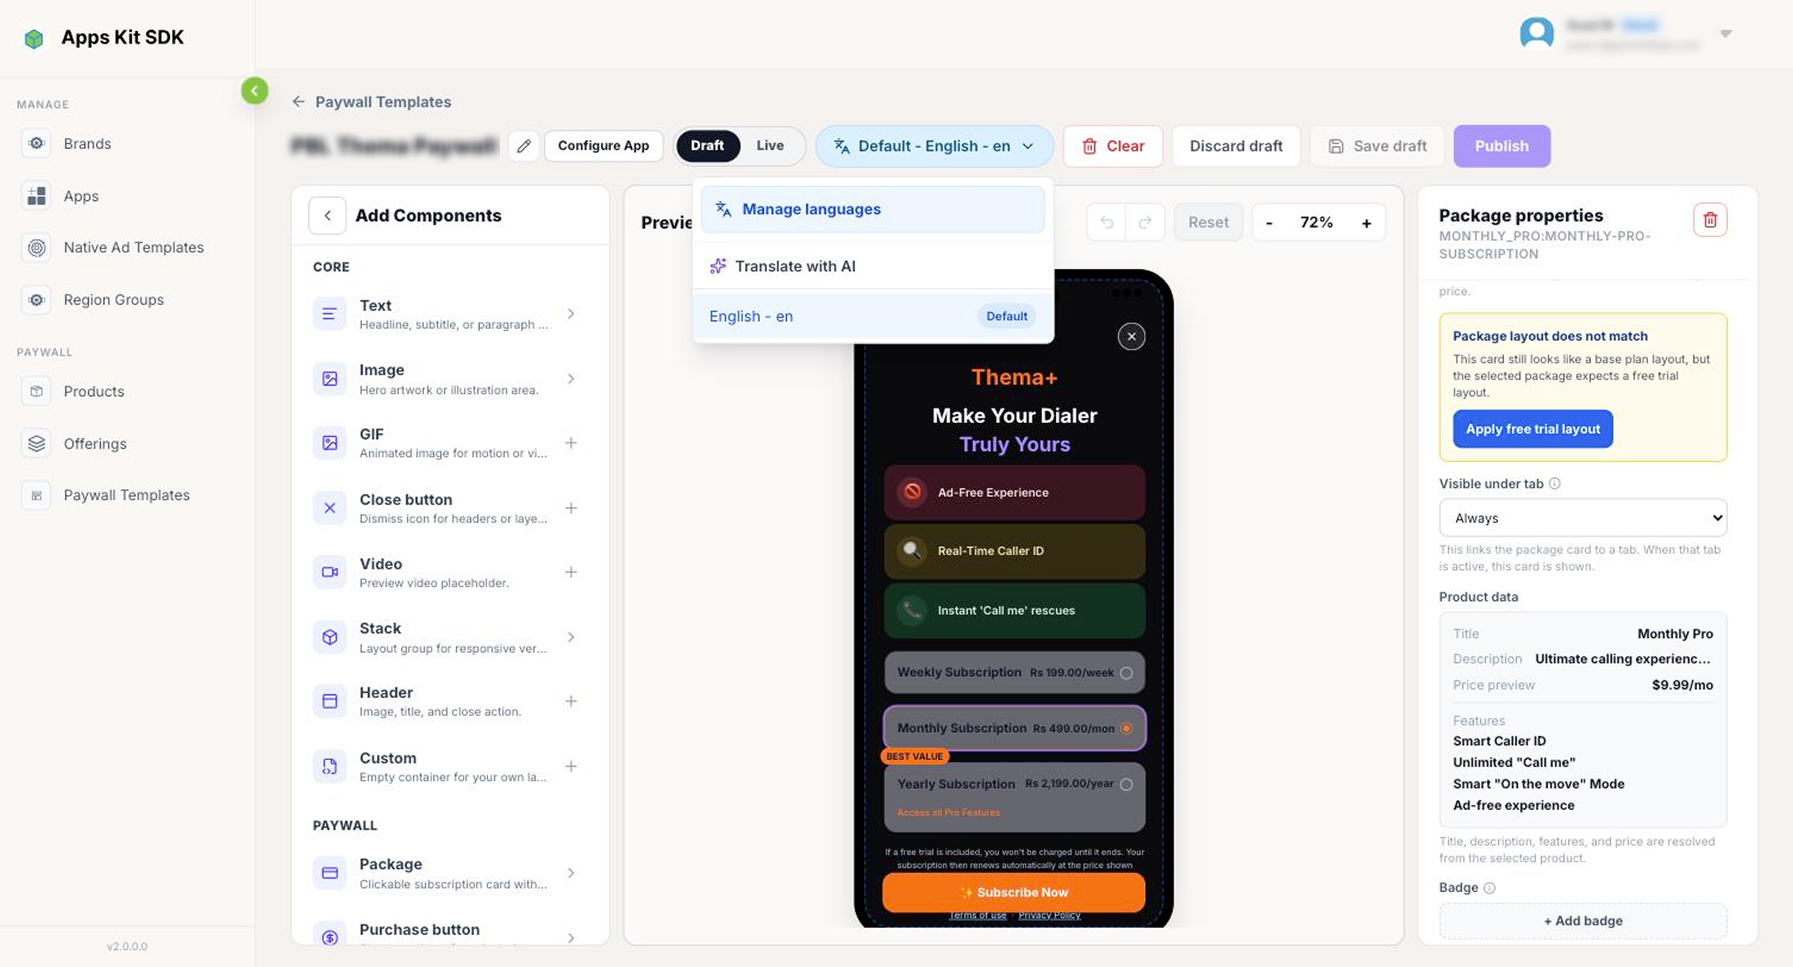
The language dropdown in the header lists your default language plus every language you've added, each tagged Default, Translated, Needs update, or Draft. Manage languages adds or removes languages (capped by your plan); Translate with AI machine-translates the selected languages (also rate-limited by plan, hourly/daily). A translation isn't a separate copy of the layout — it's an overlay of text replacements on top of your one default-language design. That's why selecting a non-default language switches the canvas into "Translation text editable, style locked" mode: you can't add, move, resize, or restyle anything while translating, but every text field's Inspector switches into translation-entry mode, and typing there saves just that language's text.
Draft, Live, and Publishing
The Draft / Live toggle switches which version of the template you're viewing — Live is read-only, so you switch to Draft before making changes. Clear wipes the canvas back to blank locally (nothing is deleted on the server until you save). Discard draft permanently removes your unsaved draft and reloads the last published version. Save draft persists your current canvas as the draft, without touching what's currently live. Publish stays disabled until exactly one app and Offering are configured and every Package card is actually bound to a real product; once those checks pass, it promotes the current draft to the new published/live version — which is what makes it eligible to be assigned to an app placeholder, back under App Details → Paywalls for App Placeholders.