Campaigns (Cross Promotion)
Campaigns is the cross-promotion engine: it lets you advertise one of your own apps inside another of your apps, using the "Ad Units for Ad Placeholders → Cross Promotion" mapping described in App Details.
The Campaigns List
The Campaigns page (/campaigns) lists every campaign you've created as a table: a row number, Title, the Target App (name and package, shown on two lines), Campaign Type (currently always "Cross Promotion" — Network Advertising exists as a concept in the type selector but isn't actually offered as a choice), Status and Priority (both shown as colored pills and sortable), Start Date, End Date, Created At, Updated At (the latter two also sortable), and Actions (Edit and Delete).
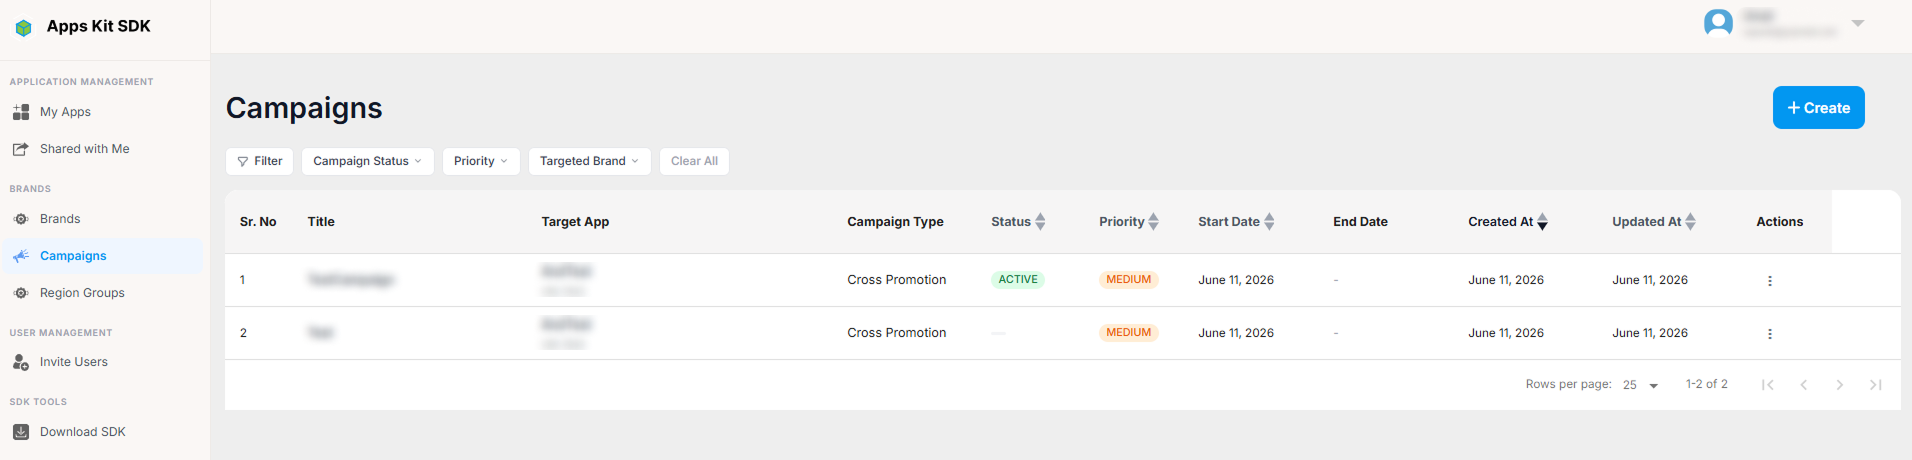
You can filter the list by Campaign Status, Priority, or Targeted Brand, each a dynamic multi-select. Editing a campaign (the pencil action) takes you into the wizard described below in edit mode; deleting asks for confirmation first and cannot be undone.
The + Create button is only available if your plan still allows another cross-promo campaign (canCreateCampaign()). If you're at your plan's campaign limit, it's replaced with a usage readout ("X/Y campaigns used") and a "🔒 Upgrade" link to Subscription.
Creating or Editing a Campaign — the Wizard
Clicking + Create (or editing an existing campaign) launches a step-by-step wizard. The wizard has five steps, not four — it's easy to undercount because the first step is skipped automatically when you're editing an existing campaign (its type can no longer be changed once a campaign exists). Each step's "draft, then save" pattern is consistent throughout the wizard: as you fill in a step, your edits live only in that step's local component state. Nothing is written to the wizard's shared context — and nothing is persisted to the server — until you click a Save-type button and the corresponding API call succeeds. If you navigate away with unsaved edits, a "You have unsaved changes. Are you sure you want to leave?" confirmation (Yes, leave / Stay) protects you from losing work.
Step 1 — Select Campaign Type
A single selectable card: Cross Promotion ("Promote your own apps to users of your other apps"). This is the only real option — a second "Network Advertising" type exists in the underlying code as a placeholder for future use but is not currently selectable in the UI. Clicking Next moves on; this step doesn't call the server by itself, since nothing is created until Step 2. In edit mode, this entire step is skipped — the wizard opens directly on Step 2 with the existing campaign's type already fixed.
Step 2 — Campaign Settings
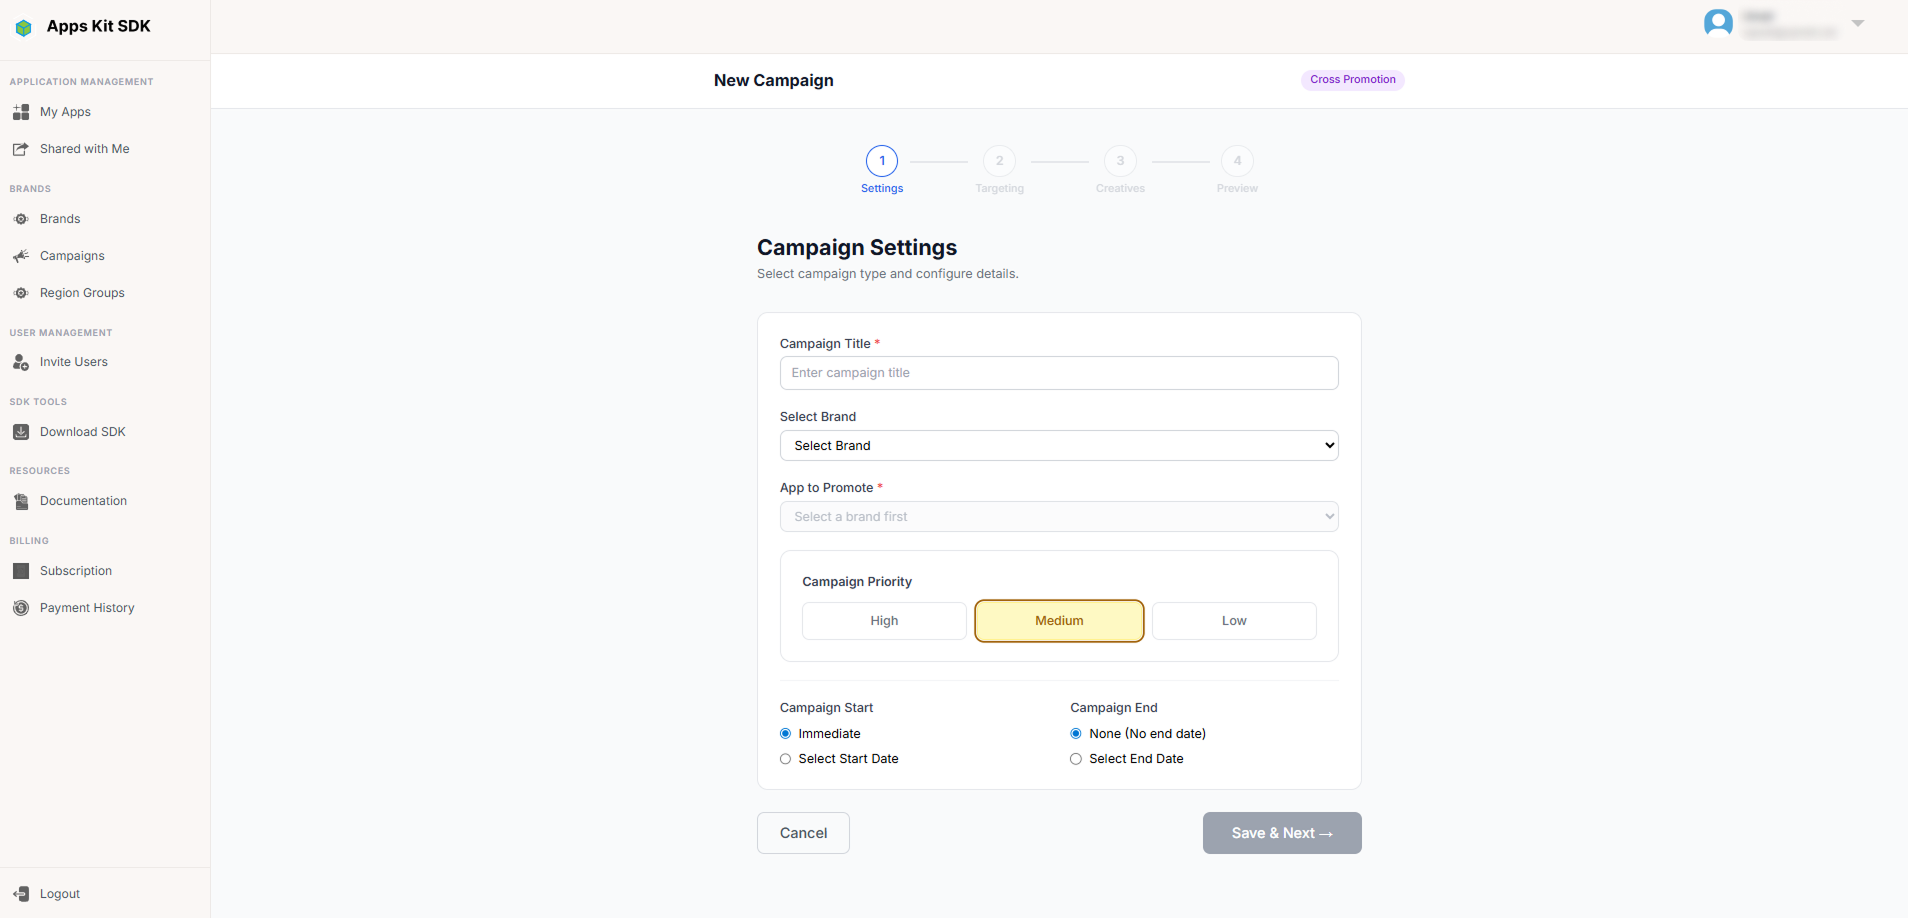
This step both creates the campaign (on first save, in create mode) and edits its core settings (in edit mode). Fields:
- Campaign Status toggle — edit mode only. A switch between Active and Paused (with a confirmation dialog either way: "Activate Campaign?" / "Pause Campaign?"). Trying to activate a campaign checks, before saving, that the campaign has at least one creative and that at least one of those creatives is itself active — if not, you'll be blocked with "Campaign cannot be activated — please add at least one creative first" or "...at least one creative must have active status," and the toggle won't take effect.
- Campaign Title — required text field.
- Select Brand — required dropdown of your brands. Changing the brand clears whatever app was selected for "App to Promote," since the app list depends on the brand.
- App to Promote — required dropdown, populated based on the selected brand; disabled until a brand is chosen.
- Campaign Priority — High / Medium / Low, shown as three selectable pill buttons; defaults to Medium.
- Campaign Start — either "Immediate" or a specific date. If you pick a date, it can't be in the past (checked against today's date), except this past-date check is skipped in edit mode if you haven't actually changed the date from what was already saved.
- Campaign End — either "None (No end date)" or a specific date, with the same not-in-the-past rule, plus a check that the end date is after the start date.
Field locking while active: once a campaign is Active, you can no longer change its Brand, App to Promote, or Start date/Immediate setting — those fields become disabled with a small explanatory note ("...cannot be changed while campaign is active"). You can still change the title, priority, end date, and (via the toggle) pause it.
Saving (in create mode, Save & Next; in edit mode, Save) sends the title, target app, campaign type, priority, computed start/end dates, and — in edit mode — status, to the server. On first creation, the response's existing publishing/region data (if any) is used to pre-populate Step 3's starting state. Only after the API call succeeds does any of this get written into the wizard's shared context.
Step 3 — Targeting
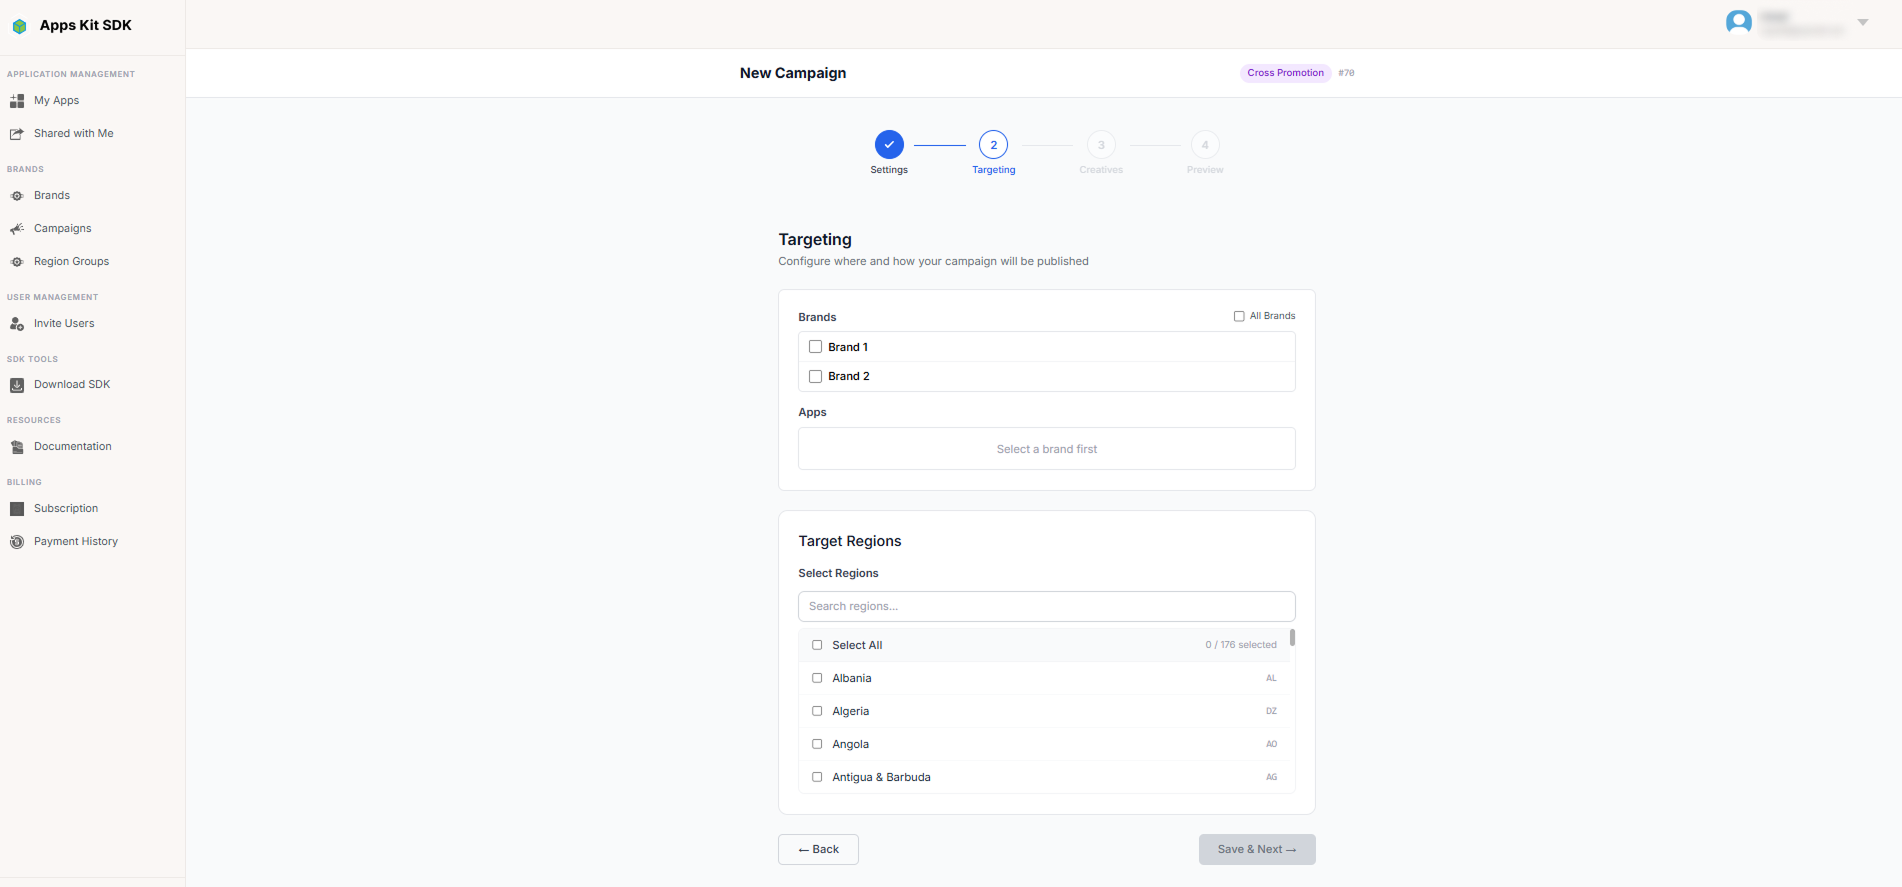
Targeting is really two independent sub-sections sharing one step and one Save button: Publishing (which of your brands/apps should show this campaign) and Regions (which countries it should run in).
Publishing. You choose, via checklists, either:
- All Brands — a single master checkbox that means the campaign can appear across every brand and app you own, including any added later.
- Specific brands — picking one or more brands from a scrollable list, each with its own apps sub-list. Within a selected brand you can either check individual apps, or check that brand's own "All (incl. future)" box to include every app under that brand (current and future) without picking them one by one.
A running summary of "Selected Brands" and "Selected Apps" is shown as chips above the checklists so you can see your current targeting at a glance.
Regions. A country multi-select with a "Select All" shortcut, used to restrict (or not restrict) which countries the campaign serves in. If you don't restrict it, the campaign runs in all regions. This region picker is intentionally separate from the named Region Groups feature described later in this guide — it is a simple, per-campaign, unnamed country selection, not a saved/reusable group. (If the dynamic country list fails to load from the server, a smaller 16-country fallback list is used here, which is why this picker's fallback options look shorter than the one in Region Groups.)
Both sub-sections share the same draft/save behavior as the rest of the wizard: edits stay local until you click Save (or Save & Next), at which point Publishing and Regions are each persisted with their own API calls, and only then merged into the wizard's shared state.
Step 4 — Creatives
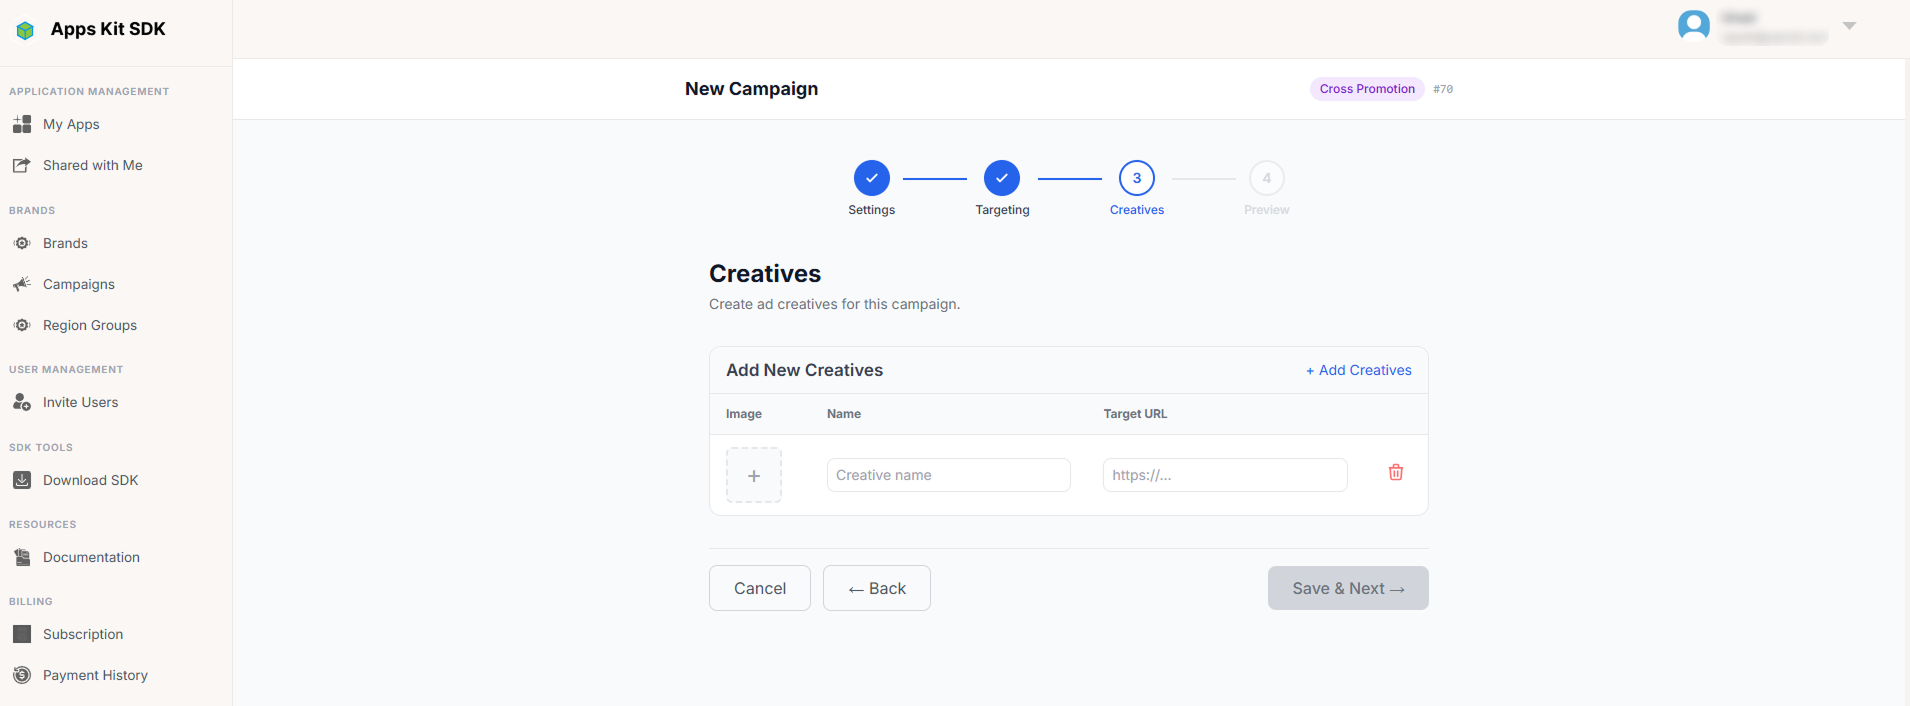
This is where you upload the actual ad creative(s) shown when the campaign serves.
Adding new creatives. A table-style "Add New Creatives" form lets you add one or more rows at once (a + Add Creatives link adds another blank row; a trash icon removes one). Each row has:
- Image — click the empty square to upload one. Accepted formats: JPEG, PNG, JPG, GIF, WebP; maximum size 10MB. Files outside that are rejected inline with a specific error (wrong format, or "Max 10MB (X.XXMB)" showing the actual size).
- Name — required text.
- Target URL — required; must be a valid
http://orhttps://URL, checked live as you type. - Ad Type — interstitial, banner, native, rewarded, or appOpen (this is the same set of five formats used elsewhere for ad units).
Clicking Save & Next (create mode) or Save (edit mode) validates every non-empty row, uploads each image, then creates each creative via the API. Only creatives that actually succeed are added to the saved list; if any fail to save you'll see how many failed and can retry. At least one creative is required before you can leave this step in create mode.
Saved creatives list. Already-saved creatives appear above the add-new form as a list of cards, each showing a thumbnail (click to enlarge), name, ad type, target URL, an Active/Inactive status pill with a toggle switch, an edit (pencil) button, and a delete (trash) button.
- Toggling a creative's status off is blocked if it's the campaign's only active creative ("At least one creative must remain active") — every other case asks for a simple "Activate/Deactivate Creative?" confirmation.
- The edit (pencil) button opens an inline edit form for that one creative (name, image, target URL — ad type is fixed), with its own Save/Cancel.
- Delete asks "You won't be able to revert this!" before removing the creative permanently.
Step 5 — Review Campaign
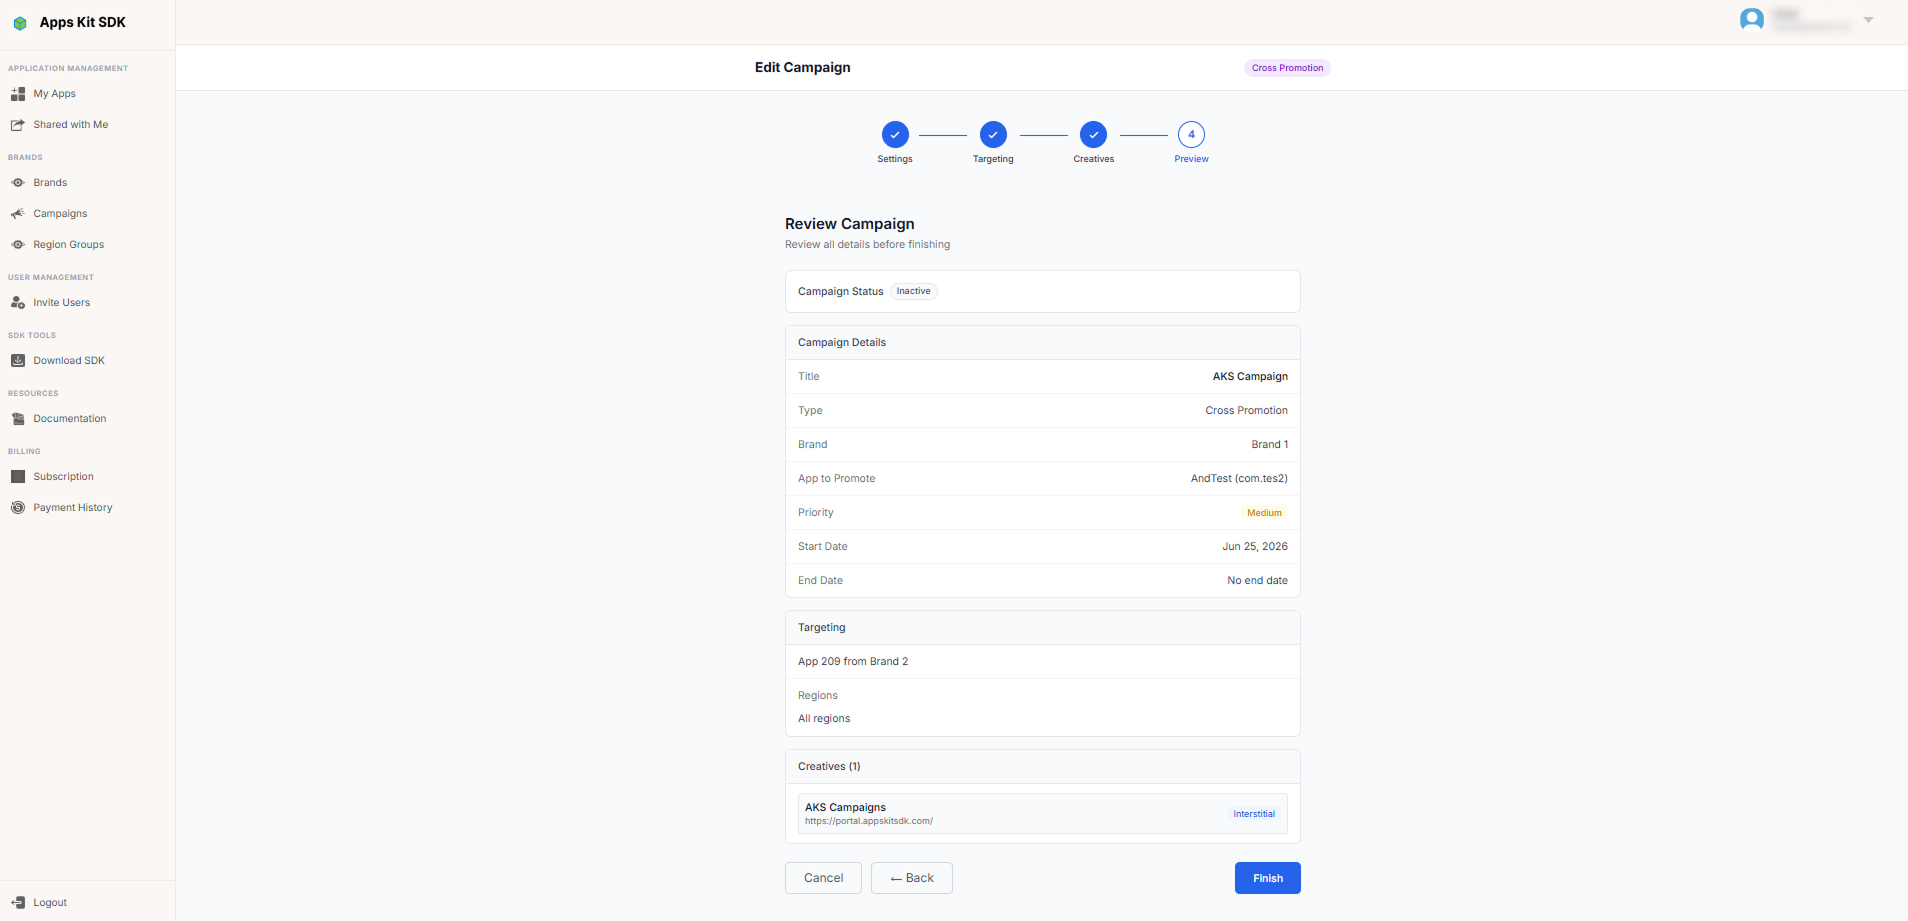
A read-only summary of everything entered in Steps 2–4: Campaign Status, Title, Type, Brand, App to Promote, Priority, Start Date, End Date, a one-line Targeting summary (e.g., "All brands · All apps," or a per-brand breakdown) plus the selected Regions (chips, or "All regions"), and the full list of Creatives with their thumbnails, names, target URLs, and ad-type badges.
In create mode only, this step also has a live Status toggle (Active/Paused) right at the top — the same activation rules apply here as in Step 2 (it will refuse to activate a campaign with zero creatives or no active creative, showing "Cannot Activate Campaign"). In edit mode, the status is shown as a read-only badge instead — you change status from Step 2's toggle, not from here.
Clicking Finish returns you to the Campaigns list. In edit mode you'll see a brief "Campaign has been saved successfully" confirmation first; in create mode it navigates straight back without an extra confirmation, since each step already saved as you went.