


Introduction
Welcome to The Apps Kit SDK documentation! The Apps Kit SDK is a comprehensive toolkit designed to empower developers it provides the easy management tools and resources you need to enhance your app's functionality, user experience, and monetization potential.
Getting Started
This documentation will help you integrate The Apps Kit SDK to effortlessly control your ad management strategies and increase your ad match and show rates helping maximize your revenue potential.
Adding App
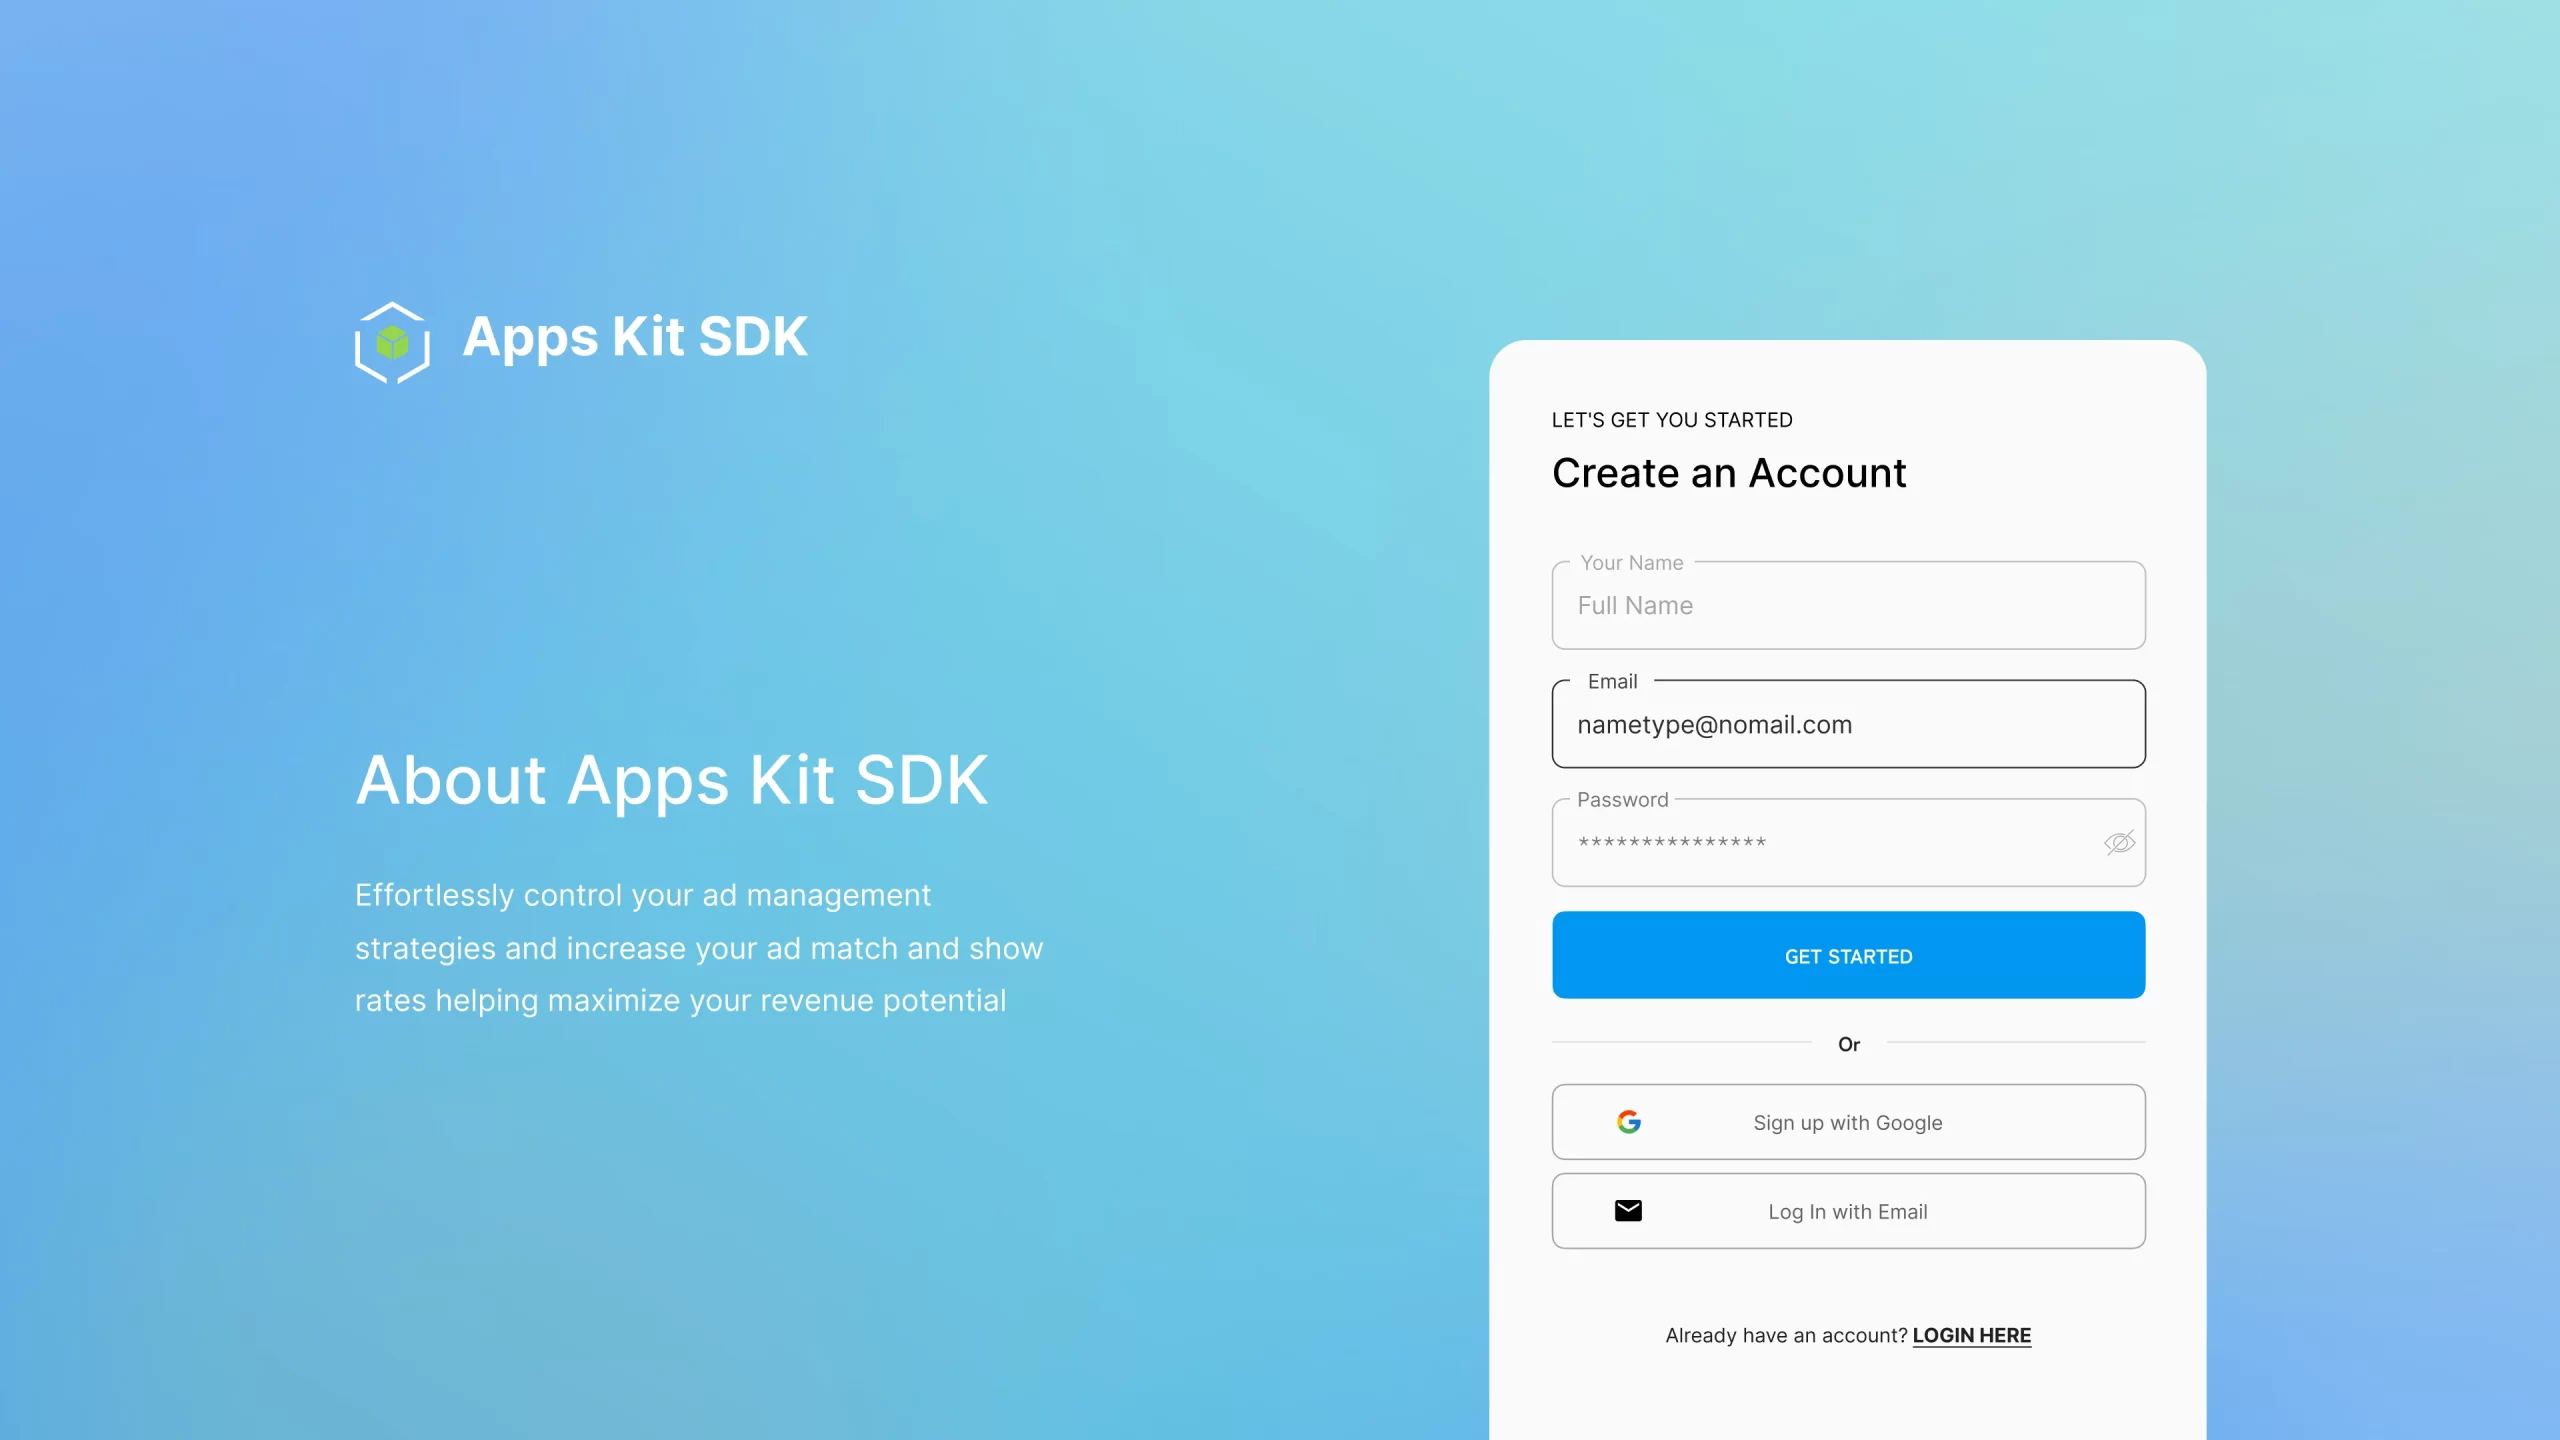
Get started by signing up on The Apps Kit SDK portal. Create your account using your email or sign up instantly with your Google account.
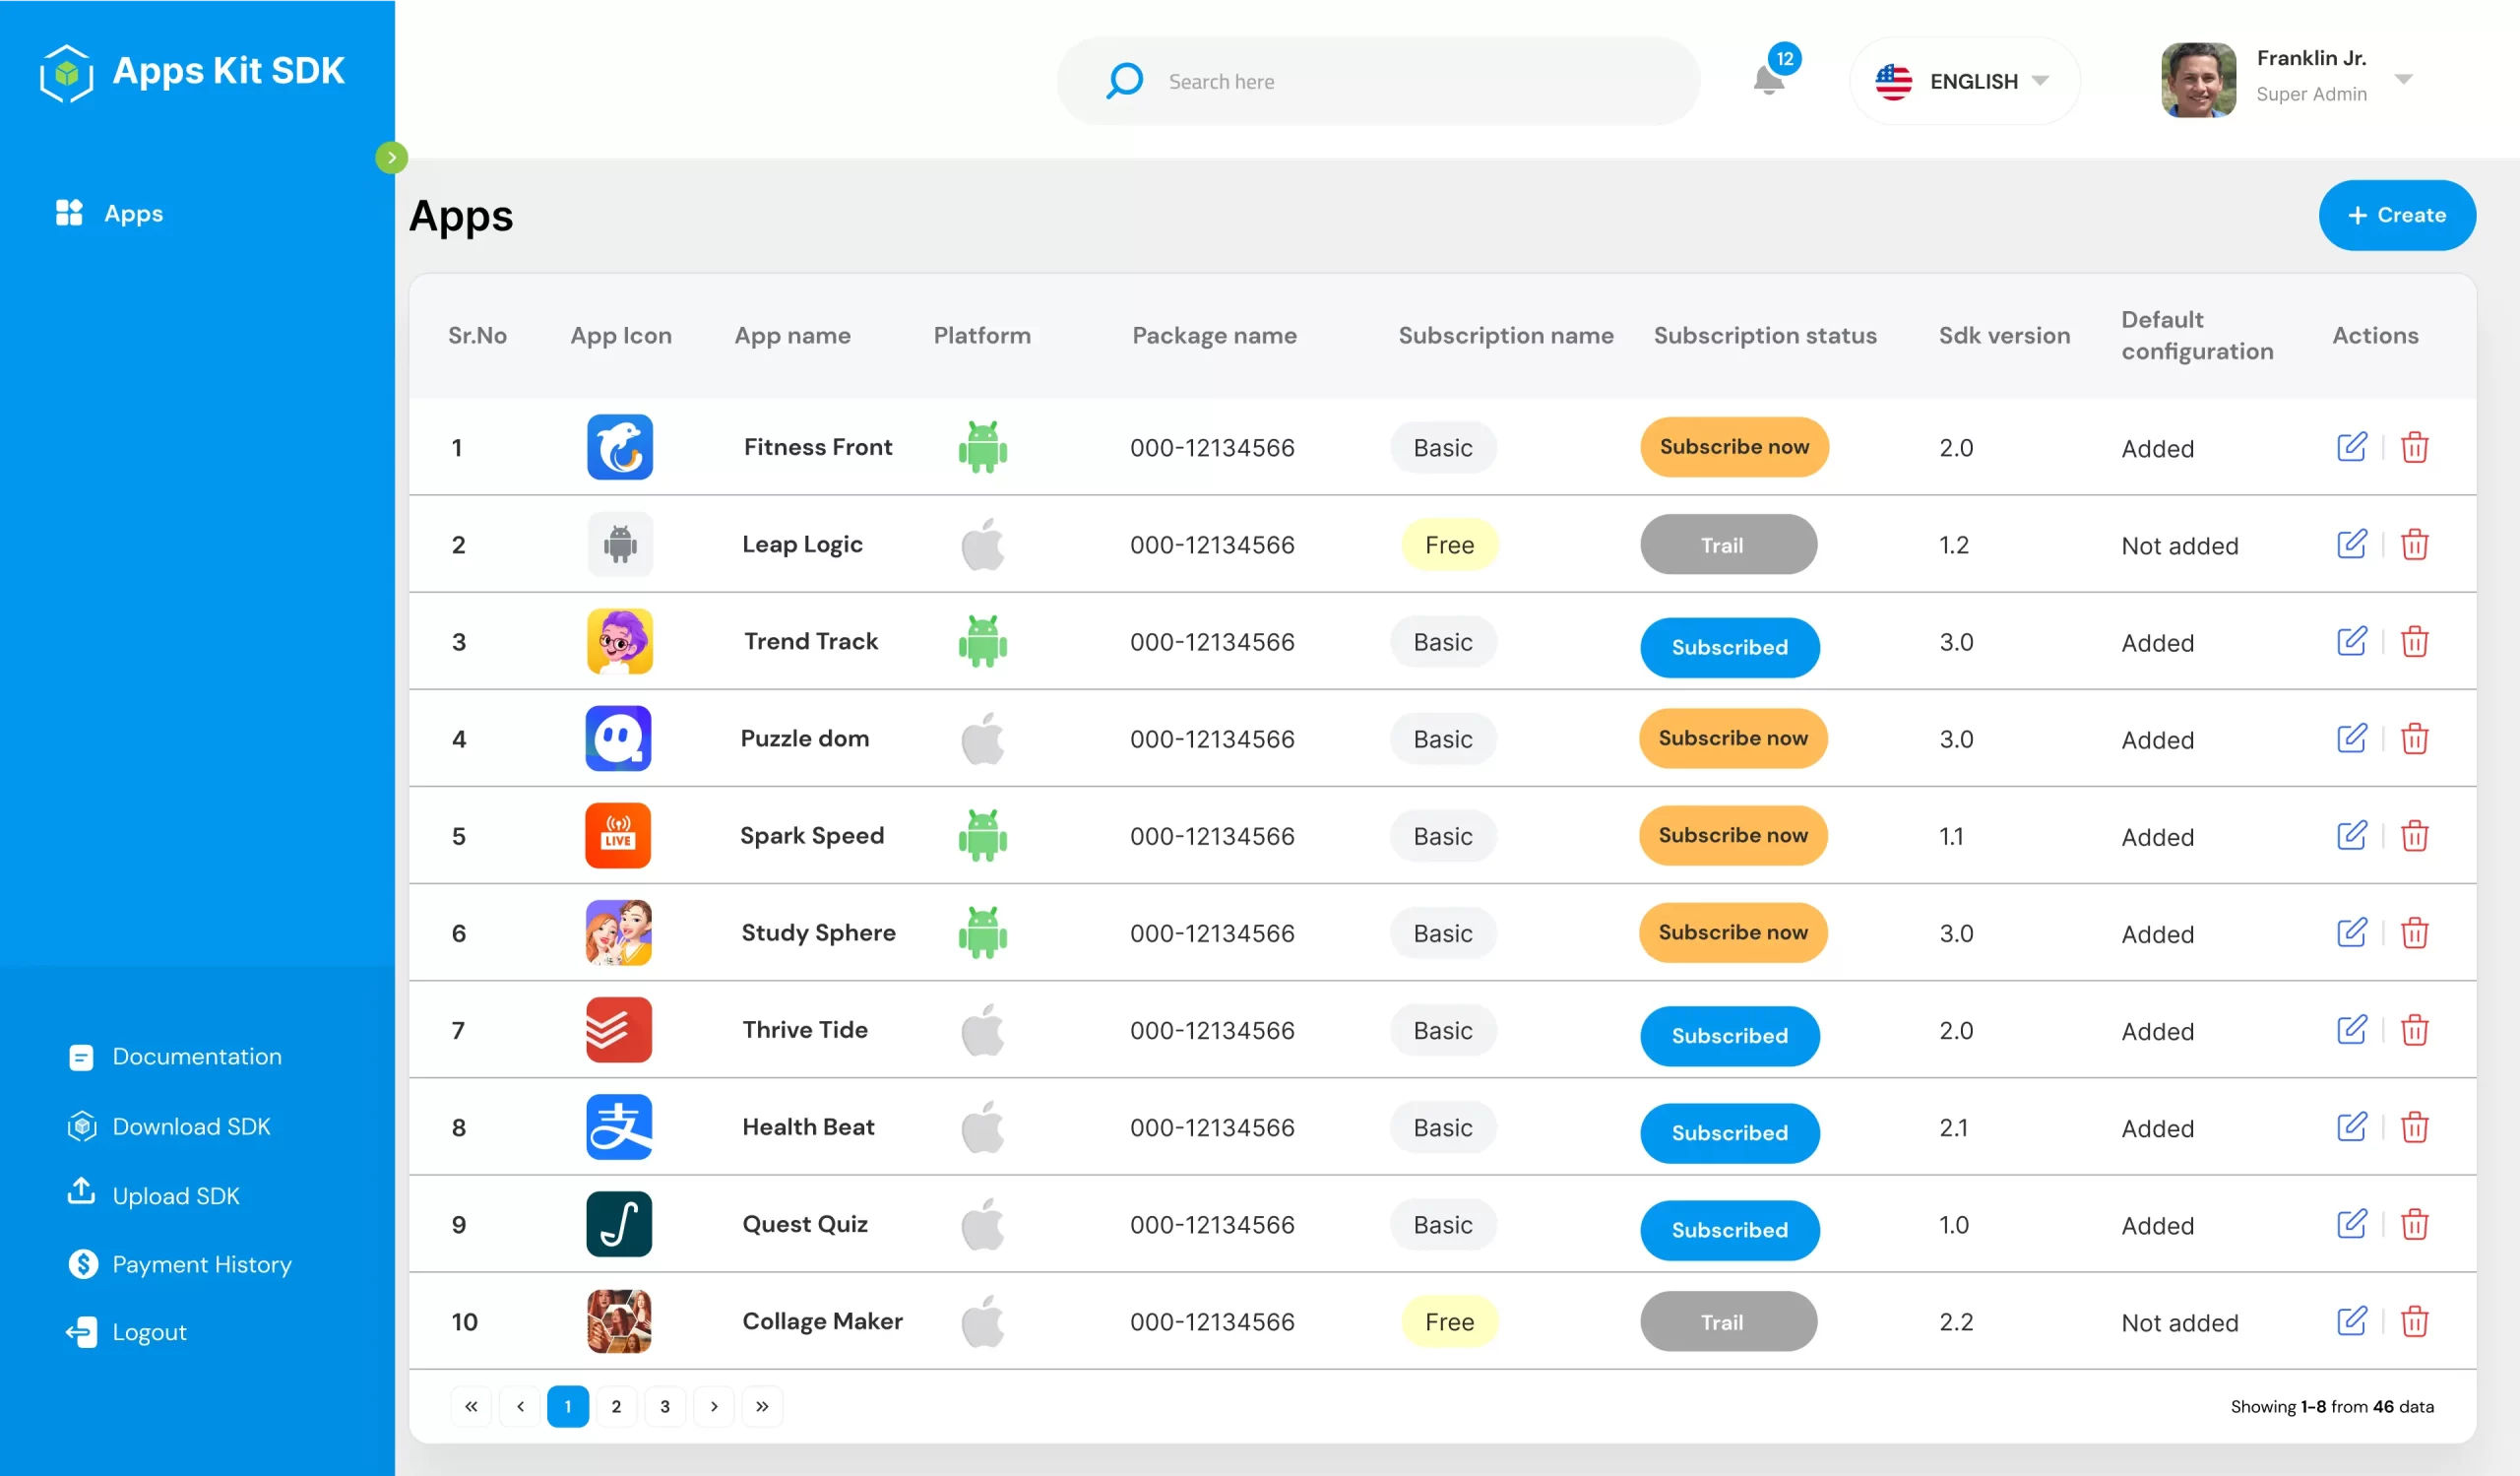
After signing up, you'll land on the main page displaying details of your apps. The page starts empty, prompting you to add your app by clicking the create button.
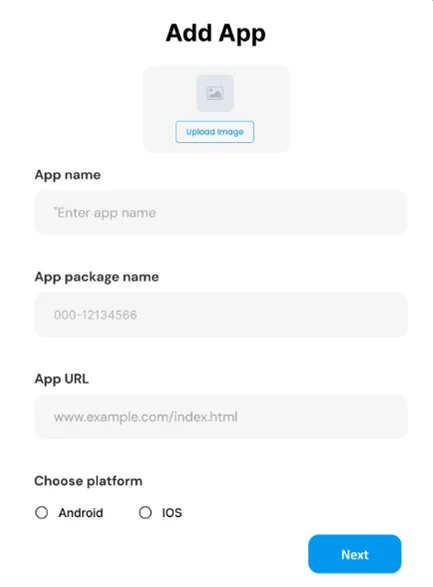
Next, easily add your app by entering its name, package name, and other basic information.
After adding the app, proceed to set up additional information. We'll guide you through each step.
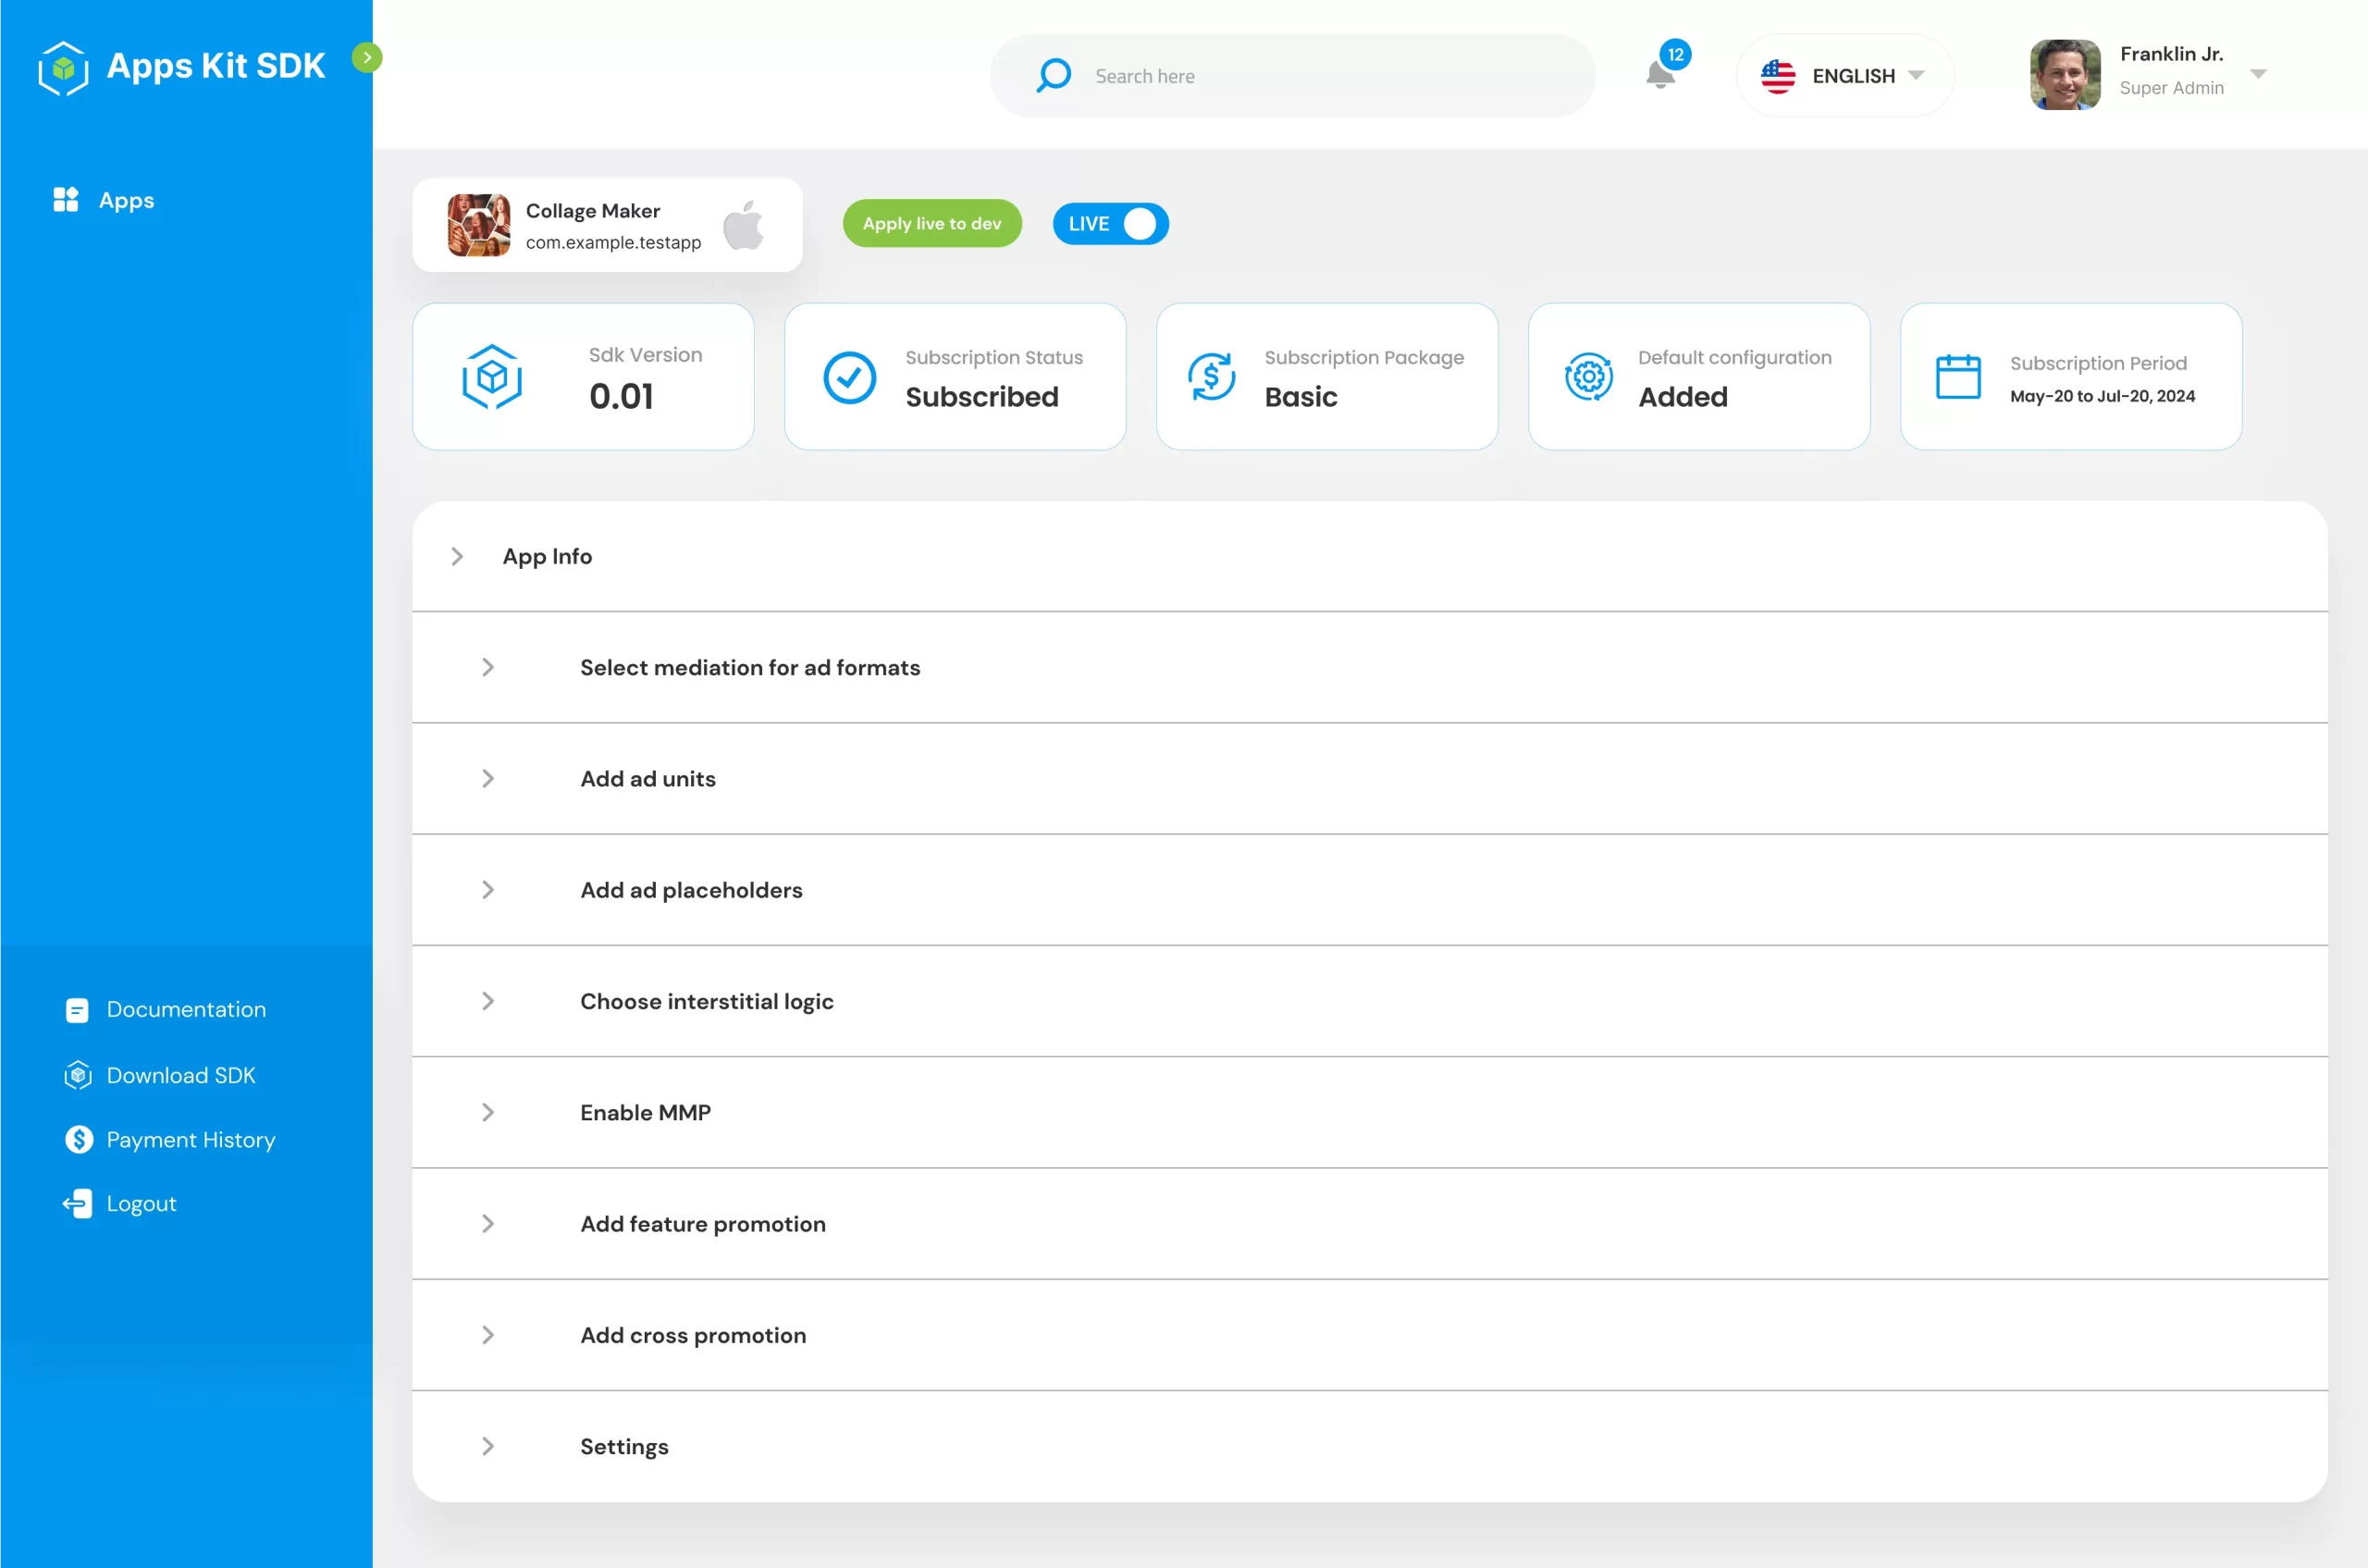
Choose a mediation network for your ad formats from the dropdown menu. If your app is child-directed, you can enable the option and also enable or disable GDPR as needed. You can enable or disable ad formats based on your requirements (if disabled, no ads will appear for that format). You must set the Helium App ID and App Signature, Max SDK Key, and ironSource App ID for Helium, AppLovin Max, and ironSource respectively if you select these mediation networks. Once done, proceed to the next step.

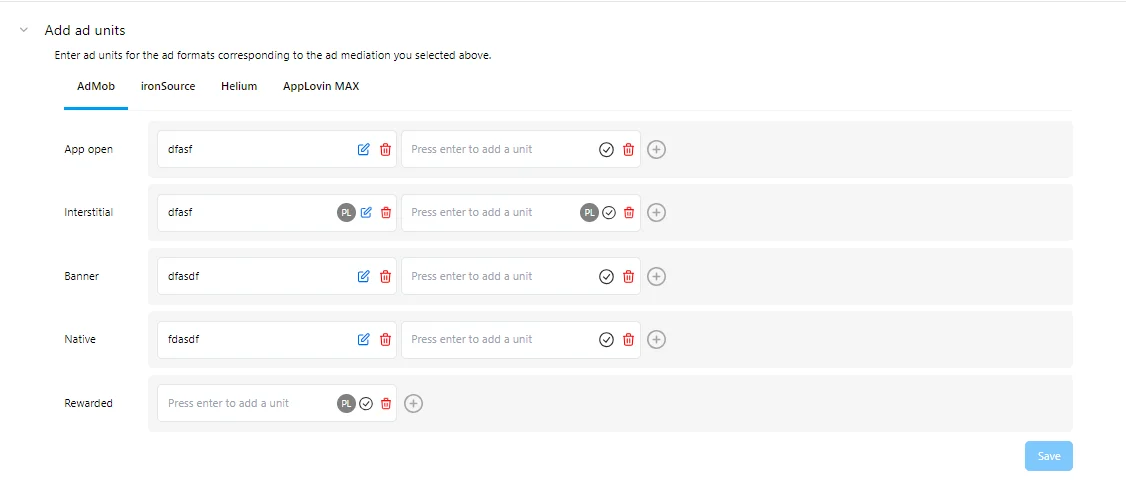
After selecting the mediation network, proceed to add ad units for the chosen ad formats. Only ad formats corresponding to the selected ad mediation network will be displayed.
- Pre-loading: By enabling pre-loading, you can pre-load ad unit at the start of the session.
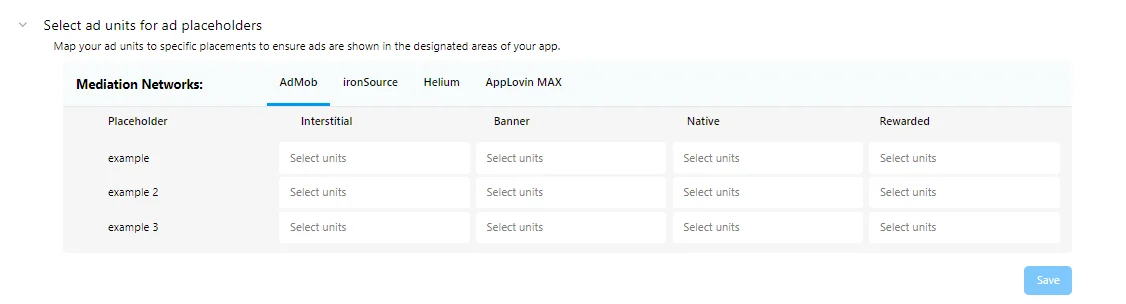
Next, add placeholders where ads should appear, which can be easily modified or replaced as needed.

Next, map ad units to specific placements to ensure ads are shown in the designated areas of the app.
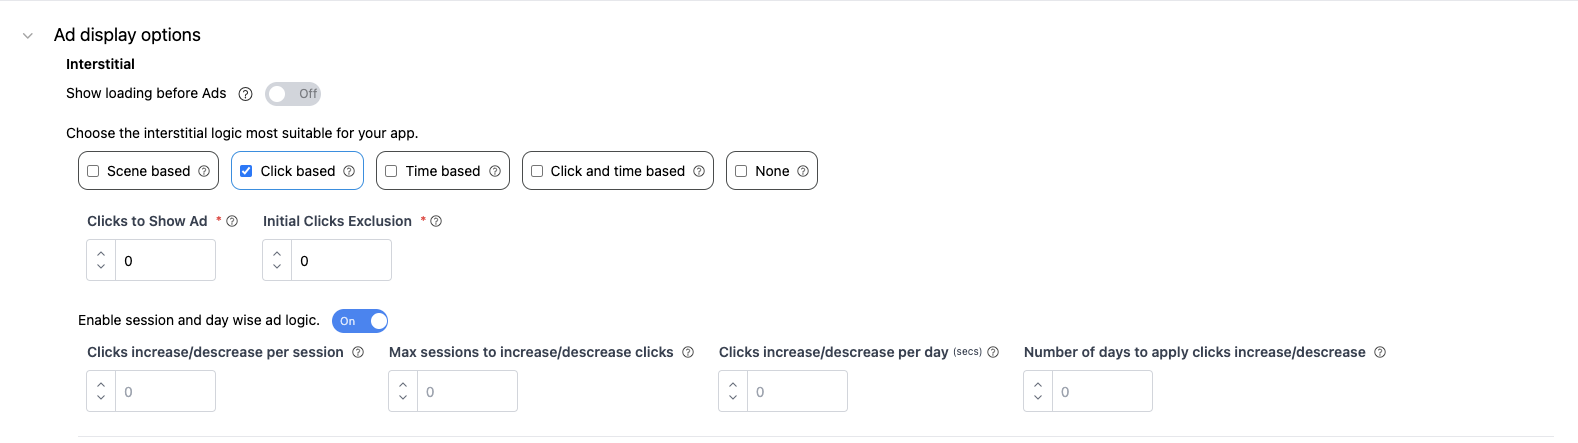
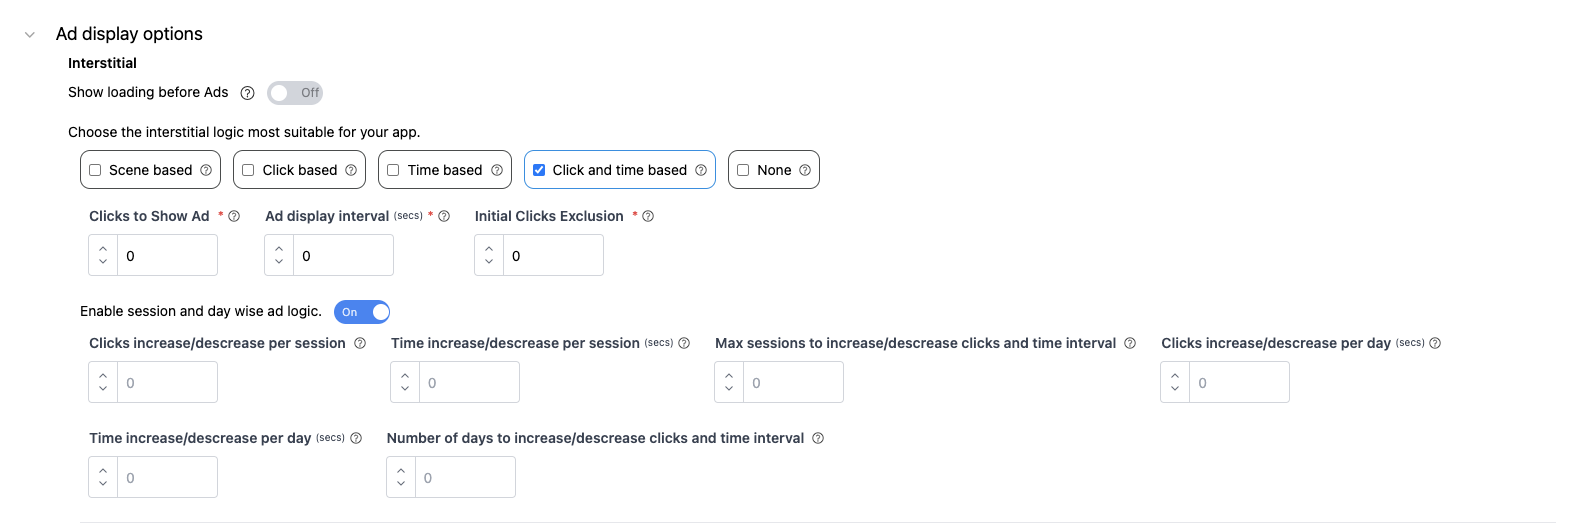
Next, in the Ad Display Options for Interstitial ads, you can choose from different display methods such as Click-based, Click and Time-based, Time-based, or Scene-based. For each option, you can configure additional parameters that best suit your app or game for optimal performance. You can also enable a loading screen before showing the ad if needed.
- Scene based: Interstitial ads displayed at specific placeholders that are selected.
- Click based: The number of clicks between two consecutive interstitials to show an ad.
- Time based: The time in seconds between two consecutive interstitials to show an ad.
- Click and time based: The time in number of clicks between two interstitials to show an ad.
- Click to show ad: The number of clicks after which an ad will be displayed. For example, setting this to 3 means an ad will appear after every 3 clicks.
- Ad display interval: It determines how frequently ads are shown. For example, setting it to 30 seconds will display an ad every 30 seconds.
- Initial clicks exclusion: The number of initial clicks to be excluded before ads start displaying. For example, setting this to 5 means the first five clicks from the users will not be counted.
Enable session and day wise ad logic: if you want to gradually increase or decrease interstitial ad on the basis of sessions or days you can set the following values after enabling it.
- Clicks increase/ decease per session: exclude or include the number of clicks from Clicks to Show Ad on basis of sessions (to exclude use negative value and to include use positive value)
- Time increase/ decease per session:exclude or include the time in seconds from Ad display interval on basis of sessions (to exclude use negative value and to include use positive value)
- Clicks increase/ decease per day:exclude or include the number of clicks from Clicks to Show Ad on basis of days (to exclude use negative value and to include use positive value)
- Time increase/ decease per day:exclude or include the time in seconds from Ad display interval on basis of days (to exclude use negative value and to include use positive value)
- Max sessions to increase/ decease click and time interval:you can set the max sessions to perform include or exclude in the initial value of Clicks to Show Ad and Ad display interval, values will be included or included till that number of session
- Number of days to increase/ decease click and time interva:you can set the max days to perform include or exclude in the initial value of Clicks to Show Ad and Ad display interval, values will be included or included till that number of day
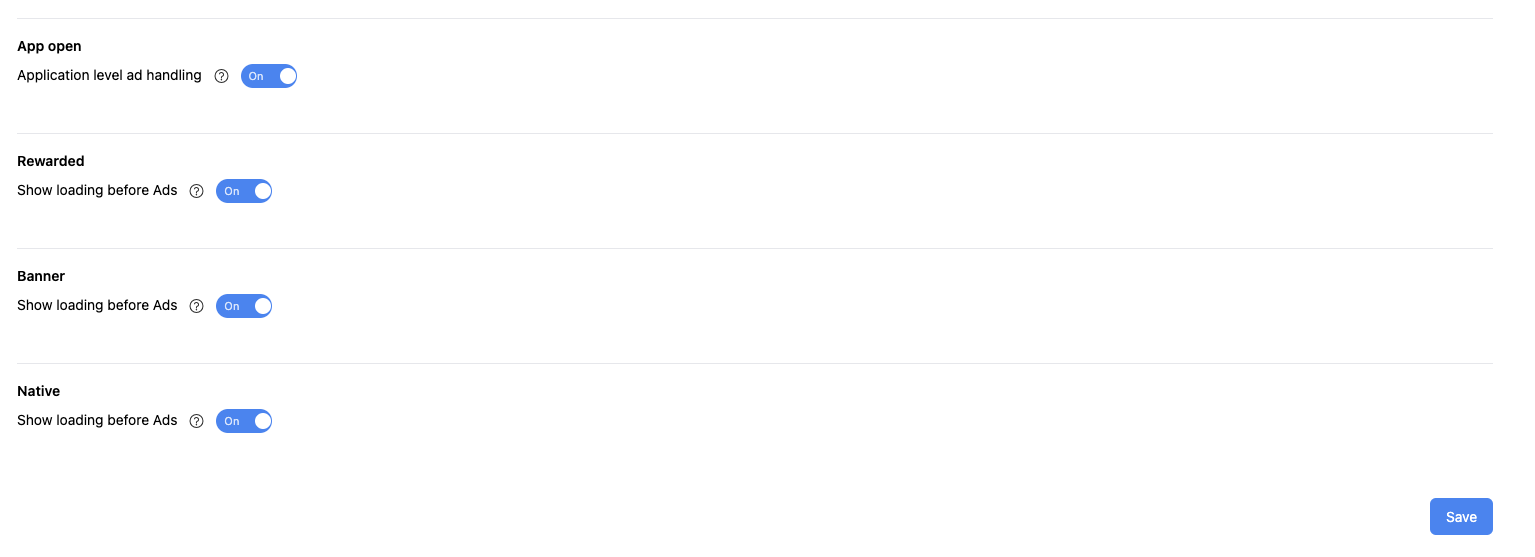
- Application level ad handling:if you want AKS to handle the App Open ad on Application level enable it.
- Show loading before rewarded ad:if you want to show the loading dialog before rewarded enable it.
- Show loading before banner ad:if you want to show the loading effect while banner is loading enable it
- Show loading before native ad:if you want to show the loading effect while native is loading enable it
Activate the Mobile Measurement Partner (MMP) of choice from the available options.
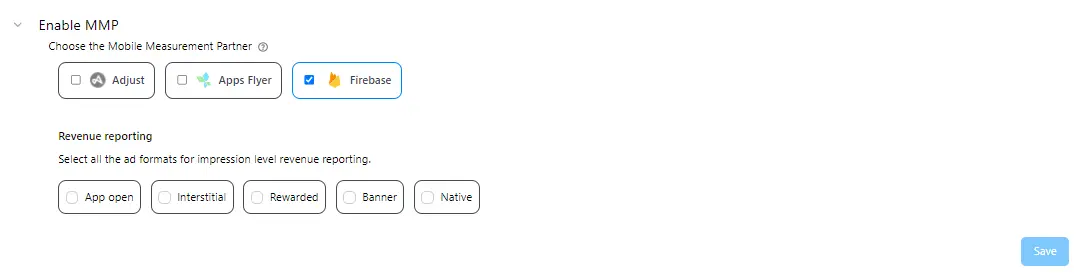
In the settings,provide additional information according to the preferences to maximize the app's potential.
- Enable console logs: Enable console logs in the development environment.
- Enable ad event: Enable the AKS (Apps Kit SDK) custom e_AD event to trigger it in analytics events.
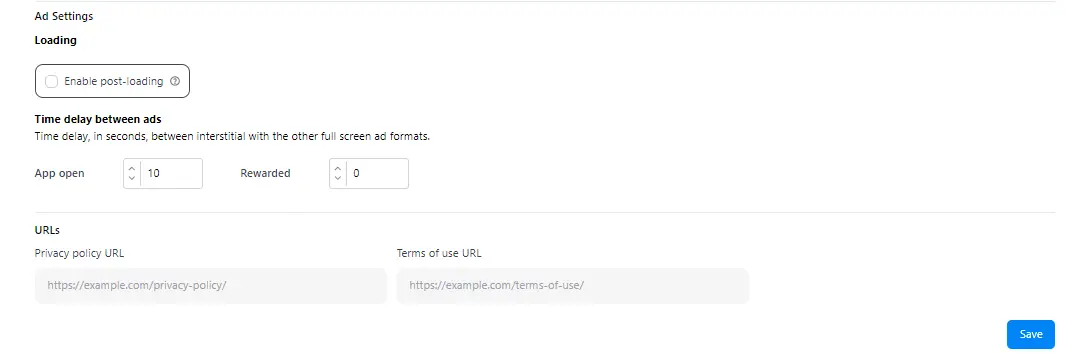
- Enable post-loading: By enabling post-loading, the next full-screen ad will automatically load as soon as the previous ad is closed.
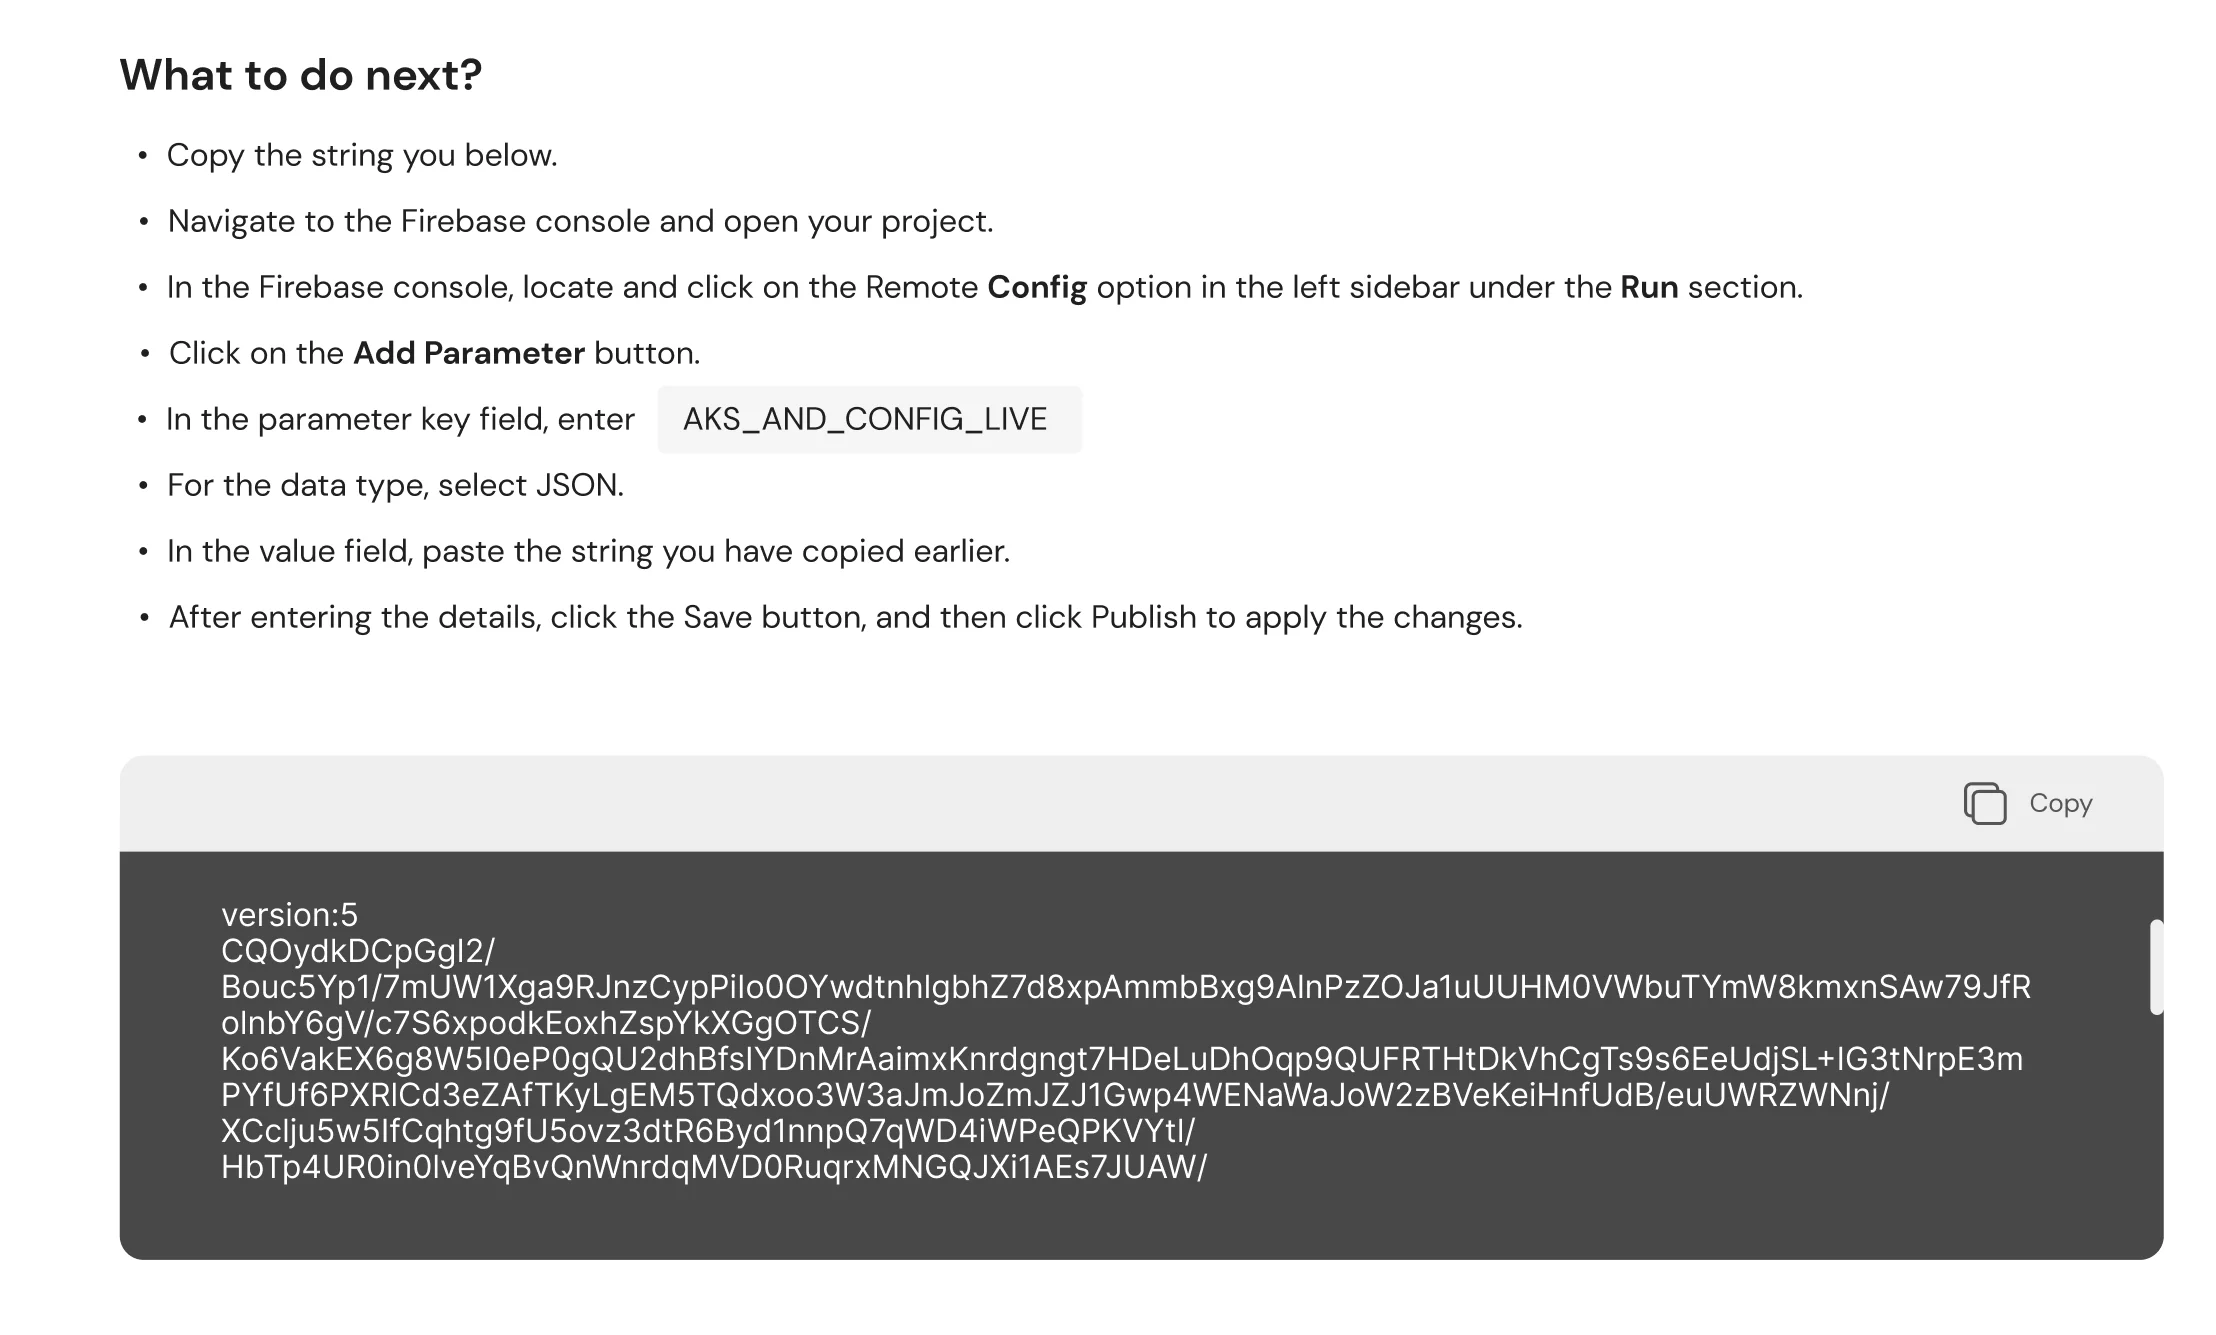
Once all the parameters are added, press configuration and follow the following steps.
Once you've configured your app settings and preferences in the portal, refer to our integration guides and documentation for step-by-step instructions on integrating The Apps Kit SDK into your app.
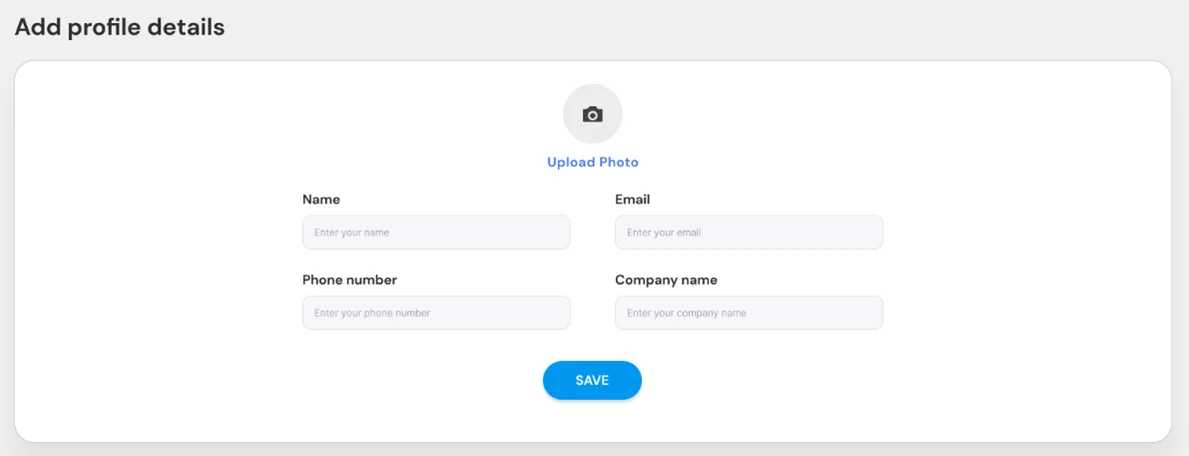
Profile and Payments
In the Profile Section, input basic details and upload a profile photo.
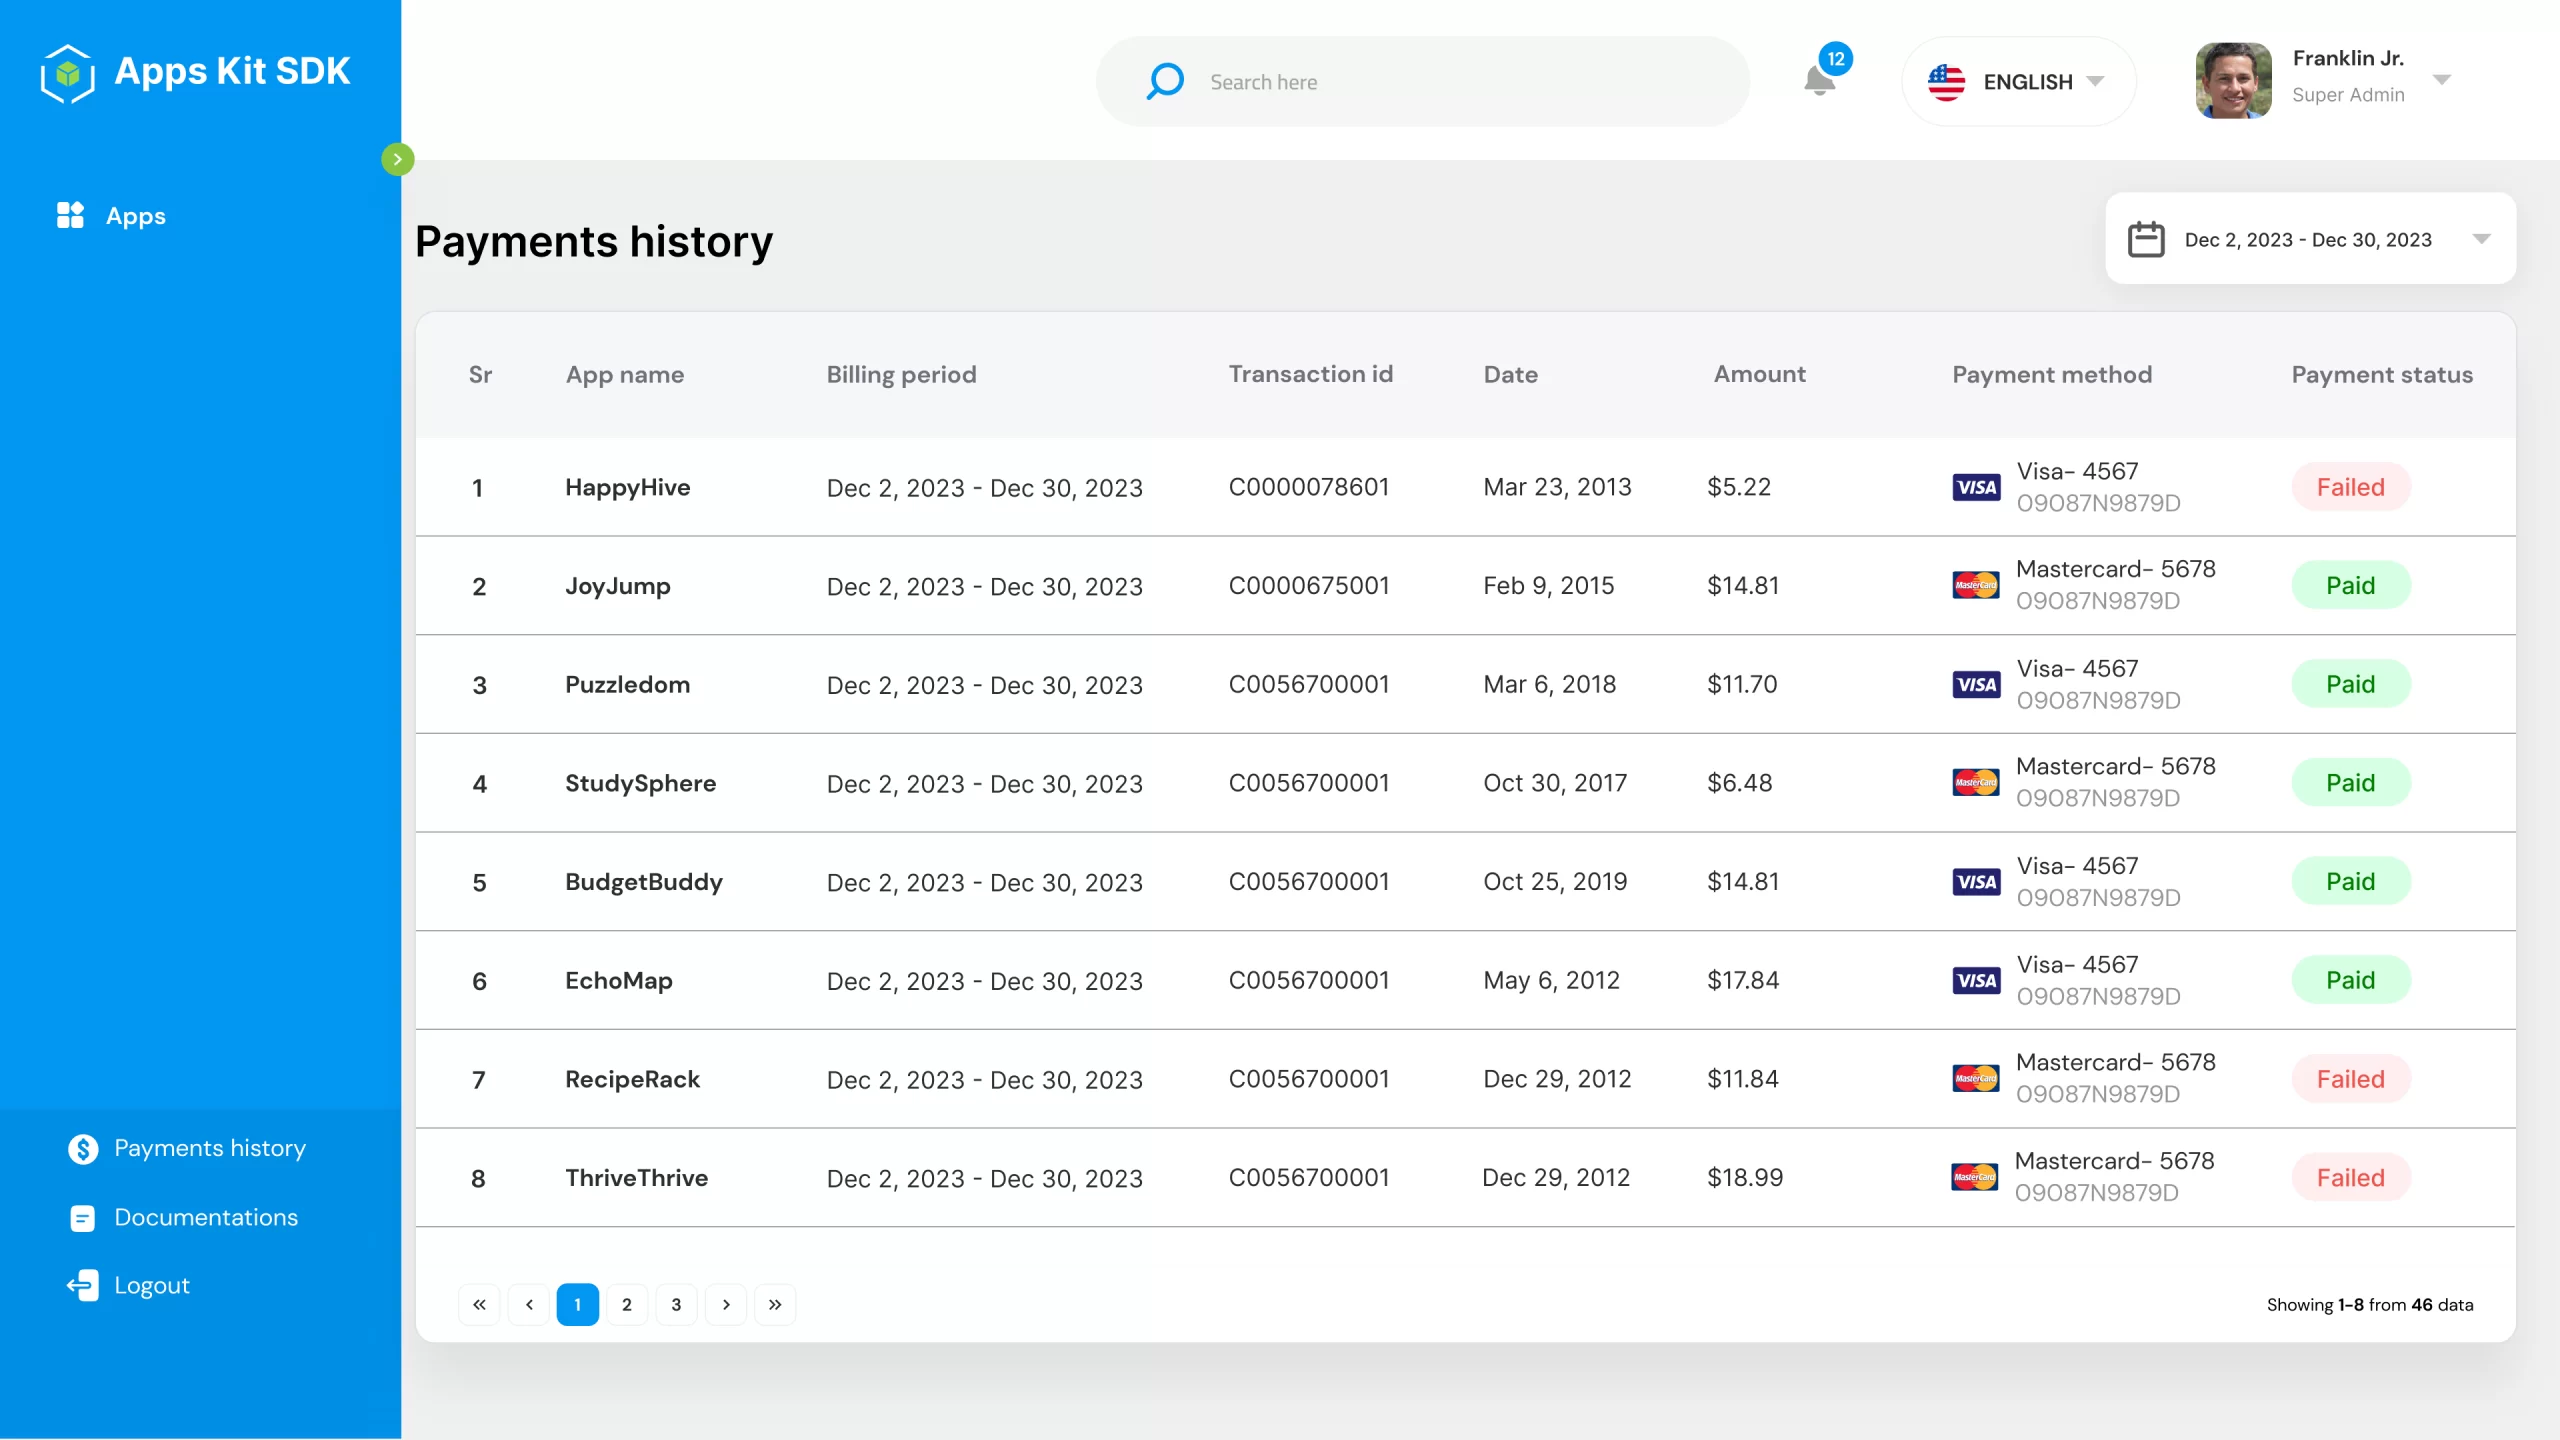
In the Billing History section, past payments can be easily viewed and reviewed. The details include:
- App Name: The name of the app associated with the payment.
- Billing Period: The duration for which the billing applies.
- Transaction ID: A unique identifier for each transaction.
- Date: The date when the payment was processed.
- Payment Method: The method used for the payment, such as type of credit or debit card.
- Payment Status: The current status of the payment, such as paid or failed.
This organized layout allows for quick access and tracking of all payment-related information.
Integration Guide Android
After configuring your app settings and preferences in the portal, refer to our integration guides and documentation for step-by-step instructions on integrating The Apps Kit SDK into your app.
Adding Dependencies:
Once you've configured your app settings and preferences in the portal, refer to our integration guides and documentation for step-by-step instructions on integrating The Apps Kit SDK into your app.
SDK Initialization
You can download the AppsKitSDK_v:x.x.xx.aar from the Apps Kit SDK portal. Create a libs folder in your app directory and add the SDK AAR file to this folder. Next, add the following dependencies to your app-level build.gradle file.
Add the following dependencies in your app level build.gradle file
implementation files ('libs/AppsKitSDK_:x.x.xx.aar')
implementation 'androidx.appcompat:appcompat:1.6.1'
// for Gson
implementation 'com.google.code.gson:gson:2.9.1'
// Retrofit
implementation "com.squareup.retrofit2:retrofit:2.9.0"
implementation
"com.squareup.retrofit2:converter-gson:2.9.0"
// For AdMob add the below dependency,
implementation implementation
'com.google.android.gms:play-services-ads:24.4.0'
// you can also add the dependencies of mediation adapter you want to add
for AdMob
// Helium Mediation
implementation 'com.chartboost:chartboost-mediation-sdk:4.7.1'
// Chartboost Mediation SDK Dependencies
implementation 'com.jakewharton.retrofit:retrofit2-kotlinx-serialization-converter:1.0.0'
implementation 'com.squareup.okhttp3:logging-interceptor:4.10.0'
implementation 'com.squareup.okhttp3:okhttp:4.10.0'
implementation 'com.squareup.retrofit2:converter-scalars:2.9.0'
implementation 'com.squareup.retrofit2:retrofit:2.9.0'
implementation 'org.jetbrains.kotlinx:kotlinx-coroutines-android:1.7.1'
implementation 'org.jetbrains.kotlinx:kotlinx-serialization-json:1.5.1'
// you can also add the dependencies of mediation adapter you want to add
for Helium
// iron source Mediation
implementation 'com.ironsource.sdk:mediationsdk:8.5.0'
// you can also add the dependencies of mediation adapter you want to add
for ironSource
// MAX (Applovin) Mediation
implementation 'com.applovin:applovin-sdk:13.3.0'
// you can also add the dependencies of mediation adapter you want to add
for MAX (Applovin)
// AppsFlyer
implementation 'com.appsflyer:af-android-sdk:6.13.0'
implementation 'com.appsflyer:adrevenue:6.9.0'
implementation "com.miui.referrer:homereferrer:1.0.0.6"
// shimmer effects
implementation ('com.github.ethanhua:Skeleton:6dc07d6a9f'')
implementation ('io.supercharge:shimmerlayout:2.1.0')
//Adjust
implementation 'com.adjust.sdk:adjust-android:4.38.3'
implementation 'com.android.installreferrer:installreferrer:2.2'
implementation 'com.google.android.gms:play-services-ads-identifier:18.0.1'
implementation 'com.google.android.gms:play-services-appset:16.0.2'
implementation 'com.github.ome450901:SimpleRatingBar:1.5.1'
// firebase
implementation platform("com.google.firebase:firebase-bom:32.0.0")
implementation 'com.google.firebase:firebase-crashlytics'
implementation 'com.google.firebase:firebase-analytics'
implementation 'com.google.firebase:firebase-messaging'
implementation 'com.google.firebase:firebase-config'
Add the following Gradle repository declaration in your settings.gradle file
maven {
name "Chartboost's maven repo"
url 'https://cboost.jfrog.io/artifactory/chartboost-ads'
}
maven {
url 'https://android-sdk.is.com/'
}
maven {
name "Chartboost Mediation’s maven repo"
url "https://cboost.jfrog.io/artifactory/chartboost-mediation"
}
Manifest
Add the following code in your manifest:
<activity
android:name="com.pentabit.pentabitessentials.ads_manager.activities.CPAdActivity"
android:exported=
<activity
android:name="com.ironsource.sdk.controller.ControllerActivity"
android:configChanges="orientation|screenSize"
android:hardwareAccelerated="true"
/>
<activity
android:name="com.ironsource.sdk.controller.InterstitialActivity"
android:configChanges="orientation|screenSize"
android:hardwareAccelerated="true"
android:theme="@android:style/Theme.Translucent" />
<activity
android:name="com.ironsource.sdk.controller.OpenUrlActivity"
android:configChanges="orientation|screenSize"
android:hardwareAccelerated="true"
android:theme="@android:style/Theme.Translucent" />
<activity
android:name="com.ironsource.mediationsdk.testSuite.TestSuiteActivity"
android:configChanges="orientation|screenSize"
android:hardwareAccelerated="true"
android:theme="@android:style/Theme.NoTitleBar" />
<provider
android:name="com.ironsource.lifecycle.IronsourceLifecycleProvider"
android:authorities="${applicationId}.IronsourceLifecycleProvider" />
<receiver
android:name="com.adjust.sdk.AdjustReferrerReceiver"
android:permission="android.permission.INSTALL_PACKAGES"
android:exported="true"
>
<intent-filter>
<action android:name="com.android.vending.INSTALL_REFERRER" />
</intent-filter>
</receiver>
<meta-data
android:name="com.google.android.gms.ads.APPLICATION_ID"
android:value="YOUR_ADMOB_APP_ID" />
ProGuard Rules
If you have enabled minify in your app-level build.gradle file, add the following ProGuard rules to your app-level proguard-rules.pro file.
-keepattributes Signature
-keepattributes Annotation
-keep class com.google.android.gms.common.GooglePlayServicesUtil {*;}
-keep class com.google.android.gms.ads.identifier.AdvertisingIdClient {*;}
-keep class com.google.android.gms.ads.identifier.AdvertisingIdClient$Info
{*;}
# Support for Google Play Services
#
http://developer.android.com/google/play-services/setup.html
-keep public class com.google.android.gms.common.internal.safeparcel.SafeParcelable {
public static final * NULL;
}
-keepnames @com.google.android.gms.common.annotation.KeepName class *
-keepclassmembernames class * {
@com.google.android.gms.common.annotation.KeepName *;
}
-keepnames class * implements android.os.Parcelable {
public static final ** CREATOR;
}
# For AdMob
-keep class com.google.android.gms.ads.** { *; }
-dontwarn com.google.android.gms.ads.**
# For mediation adapters
-keep class com.google.android.gms.ads.mediation.** { *; }
-dontwarn com.google.android.gms.ads.mediation.**
-keep class com.facebook.** { *; }
-keep class com.facebook.imagepipeline.image.EncodedImage { *; }
-keep public class com.facebook.imagAppsKitSDKUtils.** {
public *;
}
# Preserve AdMob Mediation libraries
-keep class com.google.ads.mediation.unity.** { *; }
-keep class com.google.ads.mediation.vungle.** { *; }
-keep class com.google.ads.mediation.facebook.** { *; }
-keep class com.google.ads.mediation.applovin.** { *; }
-keep class com.bytedance.sdk.openadsdk.** { *; }
# Your other mediation adapter classes for adMob mediation
-keep public class com.google.android.gms.ads.** {
public *;
}
-keep public class com.google.ads.** {
public *;
}
-keep class com.chartboost.heliumsdk.** { *; }
-keep class com.chartboost.mediation.** { *; }
-keep,includedescriptorclasses class kotlinx.serialization.** {
*;
}
-keep,includedescriptorclasses @kotlinx.serialization.Serializable class * {
*;
}
-keepclassmembers class kotlinx.serialization.internal.** {
*;
}
# For Google Mobile Ads SDK and Firebase SDK
-keep class com.google.android.gms.** { *; }
-keep class com.google.firebase.** { *; }
-dontwarn com.google.android.gms.**
-dontwarn com.google.firebase.**
#for Gson
-keep class com.google.gson.** { *; }
-keep class com.google.gson.reflect.TypeToken
-keep class * extends com.google.gson.reflect.TypeToken
-keep public class * implements java.lang.reflect.Type
#Retrofit
-dontwarn retrofit2.**
-dontwarn com.squareup.okhttp3.**
-keep class retrofit2.** { *; }
-keep interface retrofit2.** { *; }
-keepclasseswithmembers class * {
@retrofit2.http.* <methods>;
}
-keepclassmembers class ** {
@retrofit2.http.* <methods>;
}
# OkHttp3
-dontwarn okhttp3.**
-dontwarn okio.**
-dontwarn javax.annotation.**
-dontwarn org.conscrypt.**
-keep class okhttp3.** { *; }
-keep interface okhttp3.** { *; }
-keep class okhttp3.internal.** { *; }
-keep class okhttp3.internal.http2.** { *; }
Initialize SDK
The Apps Kit SDK needs to be initialized, using the following code:
Extend your Application class with AppsKitSDKApplication as
public class MyApplication extends
AppsKitSDKApplication {
// You other methods
@Override
public void onCreate() {
super.onCreate();
}
@Override
protected int fetchFirebaseDefaults() {
return R.xml.remote_config_defaults;
}
@Override
protected boolean isTestMode() {
return BuildConfig.DEBUG;
}
@Override
protected boolean isDevMode() {
return BuildConfig.DEBUG;
}
@Override
protected void onConfigsReadyToUse(FirebaseRemoteConfig remoteConfig) {
}
@NonNull
@Override
protected String setAKSDefaultConfigs() {
return "CONFIG you find on on
portal";
}}
- fetchFirebaseDefaults(): Returns the ID of your remote_config_defaults file.
- isTestMode():
Returns true if you are in Test Mode.
 Note:
Note:
In Test Mode, you will see test ads.
- isDevMode():
Returns true if you are in Development Mode.
Note:
In Development Mode, dev configurations will be used.
- onConfigsReadyToUse (remoteConfig): Provides an object of remoteConfig. If you are using remote configs in your app other than AKS_CONFIGS_DEV and AKS_CONFIGS_LIVE, you can fetch your remote configs from this remoteConfig object.
- setAKSDefaultConfigs():
Returns your default configurations.
Note:
Ensure to return the value for "configs" from the config JSON generated from the AKS portal.
Extend your all activities from AppsKitSDKBaseActivity as
public class MainActivity extends
AppsKitSDKBaseActivity {
// Your code here
}
Extend your all fragments from AppsKitSDKBaseFragment as
public class YourFragment extends
AppsKitSDKBaseFragment {
// Your code here
}
User Consents Management
In the first activity of your app (Splash Activity), request user consent using the Google UMP SDK. Update the user consent status in the AppsKit SDK based on the received consent. Use the following code to update the user consent status in the AppsKit SDK:
AppsKitSDKAdsManager.INSTANCE.isUserConsentsProvided(boolean isUserConsents);
- isUserConsents: If user has provided the consents pass true
If you set this to false, the Apps Kit SDK will not serve ads. Once you have updated the user consent status in the Apps Kit SDK, you can start requesting ads.
Note:
User consent is initially set to false by default, and the Apps Kit SDK will not serve
ads until consent is explicitly updated.
Initialize Ads
Note:
It is mandatory to initialize in your application onCreate method.
AppsKitSDKAdsManager.INSTANCE.initializeAds(YOUR_IRON_SOURCE_APP_KEY,
YOUR_MAX_SDK_KEY,YOUR_HELIUM_APP_ID,YOUR_HELIUM_SIGNATURES,
isChildDirected,
isSubjectToGDPR, userHasGivenConsent, isCCPAConsent
);
- YOUR_IRON_SOURCE_APP_KEY:
Pass the ironSource App key for your app.
Note:
This could be null or empty string.
- YOUR_MAX_SDK_KEY:
Pass the AppLovin MAX SDK key for your app.
Note:
This could be null or empty string.
- YOUR_HELIUM_APP_ID:
Pass the Helium app ID for your app.
Note:
This could be null or empty string.
- YOUR_HELIUM_SIGNATURE:
Pass the Helium signature for your app.
Note:
This could be null or empty string.
- isChildDirected: If your app is child directed pass true.
- isSubjectToGDPR: If your app is subject to GDPR pass true.
- userHasGivenConsent: If User consents are provided pass true.
- isCCPAConsent: If CCPA Consents provided pass true.
Interstitial Ad
Load Interstitial Ad
Showing interstitial ads requires loading it beforehand. Use the following method to load an interstitial ad:
AppsKitSDKAdsManager.INSTANCE.loadInterstitial(Activity
activity, String
placeholder, AdsCallback callback);
- placeholder: The placeholder which you added on the portal for that screen if you pass an empty or invalid placeholder ad will not be loaded.
- activity: Reference of the Activity
- callback: callback to update weather ad is loaded or fail to loaded
Or
 Note:
Note:
Check AKS events & placeholder binding
For Activity:
AppsKitSDKAdsManager.INSTANCE.loadInterstitial(AppsKitSDKBaseActivity
activity, AdsCallback
callback);
- activity: Reference of the AppsKitSDKBaseActivity
- callback: callback to update weather ad is loaded or fail to loaded
For Fragment:
AppsKitSDKAdsManager.INSTANCE.loadInterstitial(AppsKitSDKBaseFragment
fragment, AdsCallback
callback);
- fragment: Reference of the AppsKitSDKBaseFragment
- callback: callback to update weather ad is loaded or fail to loaded
Show Interstitial Ad
Next, add the following lines of code to display an interstitial ad in your app:
AppsKitSDKAdsManager.INSTANCE.showInterstitial(Activity activity,
String
placeholder);
OR
AppsKitSDKAdsManager.INSTANCE.showInterstitial(Activity activity,
String
placeholder,AdsCallback callback);
- placeholder: The placeholder which you added on the portal for that screen if you pass an empty or invalid placeholder, ad will not be displayed.
- activity: Reference to the Activity.
- callback: callback to update weather ad is failed to show, shown or dismissed
Or
Note:
Check AKS events & placeholder binding
For Activity:
AppsKitSDKAdsManager.INSTANCE.showInterstitial(AppsKitSDKBaseActivity
activity, AdsCallback
callback);
OR
AppsKitSDKAdsManager.INSTANCE.showInterstitial(AppsKitSDKBaseActivity
activity);
- activity: Reference of the AppsKitSDKBaseActivity
- callback: callback to update weather ad is failed to show, shown or dismissed
For Fragment:
AppsKitSDKAdsManager.INSTANCE.showInterstitial(AppsKitSDKBaseFragment
fragment, AdsCallback callback);
OR
AppsKitSDKAdsManager.INSTANCE.showInterstitial(AppsKitSDKBaseFragment
fragment);
- fragment: Reference of the AppsKitSDKBaseFragment
- callback: callback to update weather ad is failed to show, shown or dismissed
Load and Show Interstitial Ad
If you want to load and show ads at the same time use the following method.
AppsKitSDKAdsManager.INSTANCE.
showInterstitialloadAndShowInterstitialAd(Activity activity,
String
placeholder);
OR
AppsKitSDKAdsManager.INSTANCE.
showInterstitialloadAndShowInterstitialAd(Activity activity,
String
placeholder);
- placeholder: The placeholder which you added on the portal for that screen if you pass an empty or invalid placeholder, ad will not be displayed.
- activity: Reference to the Activity.
- showProgressDialog: Pass true if you want to show a loading dialog while the ad is loading.
Or
Note:
Check AKS events & placeholder binding
For Activity:
AppsKitSDKAdsManager.INSTANCE.showInterstitialloadAndShowInterstitialAd(AppsKitSDKBaseActivity
activity, AdsCallback callback);
- activity: Reference of the AppsKitSDKBaseActivity
- callback: callback to update weather ad is failed to show, shown or dismissed
For Fragment:
AppsKitSDKAdsManager.INSTANCE.
showInterstitialloadAndShowInterstitialAd(AppsKitSDKBaseFragment
fragment, AdsCallback callback);
- fragment: Reference of the AppsKitSDKBaseFragment
- callback: callback to update weather ad is failed to show, shown or dismissed
Interstitial Callbacks
AdsCallback:
@Override
public void onFailedToLoad() {
// Triggered when Ad failed to Load
}
@Override
public void onLoaded() {
// Triggered when Ad is Loaded
}
@Override
public void onAdShown() {
// Triggered when Ad is showing
}
@Override
public void onAdDismissed() {
// Triggered when Ad is dismissed
}
@Override
public void onAdFailedToShow() {
// Triggered when Ad failed to show
}
Rewarded Callbacks
You have two types of callbacks in rewarded ads depending on what method you are using to call ads:
RewardedAdCallbacks
@Override
public void onRewardedCompleted()
{
// Triggered when Ad is dismissed and rewarded
}
@Override
public void onAdRewarded() {
// Triggered when Ad is rewarded
}
@Override
public void onAdDismissed() {
// Triggered when Ad is dismissed
}
@Override
public void onRewardedFailedToShow()
{
// Triggered when Ad failed to show
}
@Override
public void onRewardedLoaded() {
// Triggered when Ad is Loaded
}
@Override
public void onLoadFailure() {
// Triggered when Ad failed to load
}
AdsCallback
@Override
public void onFailedToLoad() {
// Triggered when Ad failed to Load
}
@Override
public void onLoaded() {
// Triggered when Ad is Loaded
}
@Override
public void onAdShown() {
// Triggered when Ad is showing
}
@Override
public void onAdDismissed() {
// Triggered when Ad is dismissed
}
@Override
public void onAdFailedToShow() {
// Triggered when Ad failed to show
}
RewardedLoadAndShowCallback
@Override
public void onAdFailed() {
// Triggered when Ad failed to load/show
}
@Override
public void onAdRewarded() {
// Triggered when Ad is dismissed and rewarded
}
Rewarded Ad
Load Rewarded Ad
Showing Rewarded ads requires loading them beforehand. Use the following method to load a rewarded ad:
AppsKitSDKAdsManager.INSTANCE.loadRewarded(Activity activity, @NonNull
RewardedAdCallbacks callback, String placeholder);
- placeholder: The placeholder which you added on the portal for that screen if you pass an empty or invalid placeholder, ad will not be loaded
- activity: Reference to the Activity.
- callback: callback to update weather ad is loaded or fail to loaded
Or
Note:
Check AKS events & placeholder binding
For Activity:
AppsKitSDKAdsManager.INSTANCE.loadRewarded(AppsKitSDKBaseActivity activity,
RewardedAdCallbacks callback);
- activity: Reference of the AppsKitSDKBaseActivity
- callback: callback to update weather ad is loaded or fail to loaded
For Fragment:
AppsKitSDKAdsManager.INSTANCE.loadRewarded(AppsKitSDKBaseFragment
fragment, RewardedAdCallbacks callback);
- fragment: Reference of the AppsKitSDKBaseFragment
- callback: callback to update weather ad is loaded or fail to loaded
Show Rewarded Ad
Now add the following lines of code to show a rewarded ad in your app:
AppsKitSDKAdsManager.INSTANCE.showRewarded(Activity activity, @NonNull String
placeholder, @NonNull RewardedAdCallbacks callbacks);
- placeholder: The placeholder which you added on the portal for that screen if you pass an empty or invalid placeholder, ad will not be displayed.
- activity: Reference to the Activity.
- callback: callback to update weather rewarded ad is complete or fail to show
Or
Note:
Check AKS events & placeholder binding
AppsKitSDKAdsManager.INSTANCE.showRewarded(AppsKitSDKBaseActivity activity,
RewardedAdCallbacks callback);
For Activity:
- activity: Reference of the AppsKitSDKBaseActivity
- callback: callback to update weather rewarded ad is complete or fail to show
For Fragment:
AppsKitSDKAdsManager.INSTANCE.showRewarded(AppsKitSDKBaseFragment
fragment, RewardedAdCallbacks callback);
- fragment: Reference of the AppsKitSDKBaseFragment
- callback: callback to update weather rewarded ad is complete or fail to show
Load And Show Rewarded Ad
AppsKitSDKAdsManager.INSTANCE.loadAndShowRewardedAd(Activity activity,
@NonNull RewardedLoadAndShowCallback callbacks, String
placeholder);
- placeholder: The placeholder which you added on the portal for that screen if you pass an empty or invalid placeholder, ad will not be displayed.
- activity: Reference to the Activity.
- callback: callback to update weather rewarded ad is complete or fail to show.
Or
Note:
Check AKS events & placeholder binding
For Activity:
AppsKitSDKAdsManager.INSTANCE.loadAndShowRewardedAd(AppsKitSDKBaseActivity
activity, RewardedLoadAndShowCallback callback);
- activity: Reference of the AppsKitSDKBaseActivity
- callback: callback to update weather rewarded ad is complete or fail to show
For Fragment:
AppsKitSDKAdsManager.INSTANCE.loadAndShowRewardedAd(AppsKitSDKBaseFragment
fragment, RewardedLoadAndShowCallback callback);
- fragment: Reference of the AppsKitSDKBaseFragment
- callback: callback to update weather rewarded ad is complete or fail to show
AppOpen Ad
AppsKitSDK automatically handles the App Open Ad at the application level when you extend your Application class from AppsKitSDKApplication
In your first Activity, such as the Splash Activity, call this code in your onCreate method:
((AppsKitSDKApplication) getApplication()).requestSplashAppOpenAd
(AppOpenAdCallbacks callback,int timeOut);
- callback: Callback for the state of the App Open Ad.
- timeout: Timeout in seconds for AppOpen Ad on Splash screen.
AppsKitSDK before destroying leaving the splash screen you need to disable the callbacks of App Open Ad using:
((AppsKitSDKApplication) getApplication()).disableAppOpenSplashCallback();
Custom Implementation:
Load AppOpen Ad:
AppsKitSDKAdsManager.INSTANCE.loadAppOpen(Application
application,AppOpenAdCallbacks callback);
- application: Reference of the Application.
- callback: callback to update the state of AppOpen.
Show AppOpen Ad:
AppsKitSDKAdsManager.INSTANCE.showAppOpen(Activity activity,AppOpenAdCallbacks
callback);
- activity: Reference of the Application.
- callback: callback to update the state of AppOpen.
Note:
You can switch between the custom and AKS Application Level AppOpen implementation
from AKS Portal, in Ad Display Options -> AppOpen -> Application Level ad handling
Banner Ad
Show Banner Ad
To display a banner ad, add the following lines of code:
AppsKitSDKAdsManager.INSTANCE.showBanner(Activity activity,FrameLayout
layout,String placeholder,BannerCallback
callback);
- placeholder: The placeholder which you added on the portal for that screen if you pass an empty or invalid placeholder, ad will not be displayed.
- activity: Reference of the Activity
- callback: callback to update on states of banner
- layout: layout in which you want to show banner ad
Or
Note:
Check AKS events & placeholder binding
For Activity:
AppsKitSDKAdsManager.INSTANCE.showBanner(AppsKitSDKBaseActivity
activity,FrameLayout layout,BannerCallback
callback);
- activity: Reference of the AppsKitSDKBaseActivity
- callback: callback to update on states of banner
- layout: layout in which you want to show banner ad
For Fragment:
AppsKitSDKAdsManager.INSTANCE.showBanner(AppsKitSDKBaseFragment
fragment,FrameLayout layout,BannerCallback
callback);
- fragment: Reference of the AppsKitSDKBaseFragment
- callback: callback to update on states of banner
- layout: layout in which you want to show banner ad
Native Ad
Show Native Ad
To display a native ad, add the following lines of code:
AdsManagerCompanion.INSTANCE.showNative(
Activity activity,
FrameLayout frameLayout,
String placeholder,
Boolean isShowInScrollView,
NativeCallback callback
);
OR
// In case you want to use your custom design of native Ad pass your
custom layout in res
AdsManagerCompanion.INSTANCE.showNative(
Activity activity,
FrameLayout frameLayout,
String placeholder,
@LayoutRes Int res,
Boolean isShowInScrollView,
NativeCallback callback);
- placeholder: The placeholder which you added on the portal for that screen if you pass an empty or invalid placeholder, ad will not be displayed.
- activity: Reference of the Activity
- frameLayout: The layout in which you want to display the native ad.
- isShowInScrollView: If you want to show ads in a scrollable view (such as RecyclerView or ScrollView) and display more than one ad, set this to true.
- res: The ID of your custom native ad view if you want to display a customized native ad.
- callback: callback to update the state of native ad
Or
Note:
Check AKS events & placeholder binding
For Activity:
AdsManagerCompanion.INSTANCE.showNative(
AppsKitSDKBaseActivity activity,
FrameLayout frameLayout,
Boolean isShowInScrollView,
NativeCallback callback
);
OR
// In case you want to use your custom design of native Ad pass your
custom layout in res
AdsManagerCompanion.INSTANCE.showNative(
AppsKitSDKBaseActivity activity,
FrameLayout frameLayout,
@LayoutRes Int res,
Boolean isShowInScrollView,
NativeCallback callback);
- activity: Reference of the AppsKitSDKBaseActivity
- frameLayout: layout in which you want to show Native ad
- isShowInScrollView: If you want to show ads in a scrollable view (such as RecyclerView or ScrollView) and display more than one ad, set this to true.
- res: id of your custom native adView if you want to show your customized native ad
- callback: callback to update the state of native ad
For Fragment:
AdsManagerCompanion.INSTANCE.showNative(
AppsKitSDKBaseFragment fragment,
FrameLayout frameLayout,
Boolean isShowInScrollView,
NativeCallback callback);
OR
// In case you want to use your custom design of native Ad pass your
custom layout in res
AdsManagerCompanion.INSTANCE.showNative(
AppsKitSDKBaseFragment fragment,
FrameLayout frameLayout,
@LayoutRes Int res,
Boolean isShowInScrollView,
NativeCallback callback);
- fragment: Reference of the AppsKitSDKBaseFragment
- frameLayout: layout in which you want to show Native ad
- isShowInScrollView: If you want to show ads in a scrollable view (such as RecyclerView or ScrollView) and display more than one ad, set this to true.
- res: id of your custom native adView if you want to show your customized native ad
- callback: callback to update the state of native ad
Note:
If you are using custom layouts for Native Ads, ensure that the IDs of your views
match the following:
- App Icon:ad_app_icon
- Title:ad_headline
- Advertiser:ad_advertiser
- Rating Bar:ad_stars
- Ad Body:ad_body
- Media View:ad_media
- Pricing:ad_price
- Store Name:ad_store
- Action Button:ad_call_to_action
Manage Remove Ads from SDK
The Apps Kit SDK manages ad availability based on the "Remove Ads" status. If you want to stop ads after a "Remove Ads" purchase, use the following code:
AppsKitSDK.getInstance().setRemoveAdsStatus(boolean isRemoveAdsPurchased);
Note:
Once you set the "Remove Ads" status, the SDK will manage ad availability based on the
last provided status, unless the app is uninstalled and reinstalled.
Feature Promotion:
When a feature promotion is clicked, a callback is received in AppsKitSDKBaseActivity as follows. You need to navigate the user to the respective screen based on the targetScreen.
@Override
public void onFeaturePromotionClicked(String targetScreen) {
}
- targetScreen: The target screen associated with the feature promotion that was clicked.
If you want to stop or disable specific feature promotions based on certain actions or scenarios, you can disable those feature promotions as follows:
AdsManagerCompanion.setFeaturesAvailable(List<String>
disableFeaturePromotions)
disableFeaturePromotions: The list of targetScreens for which you want to disable feature promotions.
- Example: If you are promoting subscriptions using Feature Promotions through AKS and want to disable the subscription feature promotion after users subscribe, you would pass a list of strings containing the targetScreen for your subscription screen.
Advance AppsKit Control:
Internet Connectivity
To manage internet connectivity, you can override the following methods in your activity, inherited from AppsKitSDKBaseActivity:
@Keep
protected View getSnackBarView()
{
return binding.snackbarContainer;
}
@Keep
protected void onInternetConnectivityChange(Boolean isInternetAvailable){
}
- getSnackBarView(): Return your view to display the Snackbar, such as a CoordinatorLayout.
- onInternetConnectivityChange (Boolean isInternetAvailable): Update based on whether internet is available or not.
You can also disable internet connectivity using the method below: (By default, internet connectivity is enabled.)
showInternetConnectivity(boolean enableInternetConnectivity)
AKS Events & Placeholder Binding
If you have extended your activity from AppsKitSDKBaseActivity, your fragment from AppsKitSDKBaseFragment you need to set the screenId and screenName by overriding the following method in these classes
public Pair<Integer, String> setScreenNameAndId() {
return new
Pair<>(YOUR_SCREEN_ID,YOUR_SCREEN_NAME);
}
Your placeholder and screen level events will be auto managed,
Note:
You need to create the similar placeholders on AKS portal as well.
i.e;
For
MainActivity YOUR_SCREEN_ID = 1 and YOUR_SCREEN_NAME =
Home
you should create a placeholder as
1_Home on AKS portal to manage Ads on that screen. and
firebase event for that screen will be triggered as e_1_Home_SCR
Sending Events on Firebase
AppsKitSDK makes it easy to send events to Firebase. You can send an event to Firebase using the following code:
AppsKitSDKLogManager.getInstance().log(Context context , String event );
- context: Reference to the context.
- event: The event you want
to fire.
Note:
Maximum event length is 60 characters.
To create easy-to-understand and meaningful events, AppsKitSDK provides the following method in AppsKitSDKBaseActivity
sendAKSEvent(AppsKitSDKEventType eventType, String name)
- eventType: Specify the event type, which could be AppsKitSDKEventType.SCREEN, AppsKitSDKEventType.BUTTON, AppsKitSDKEventType.TAB, etc.
- eventName: Name of your event. This can be your screen, tab, button, or any other specific view name.
Ensure you set the screenNameAndId before using the sendAKSEvent(AppsKitSDKEventType eventType,String name) method to send events in your Activity.
public class MainActivity extends
AppsKitSDKBaseActivity{
…….
int SCREEN_ID=YOUR_SCREEN_ID;
String SCREEN_NAME = YOUR_SCREEN_NAME;
@Override
protected void onCreate(Bundle
savedInstanceState) {
super.onCreate(savedInstanceState);
// Your Code
binding.YOUR_VIEW.setOnClickListener<v -> {
sendAKSEvent(AppsKitSDKEventType.BUTTON,”YOUR_VUEW_NAME”)
}
}
@Override
public Pair<Integer, String> setScreenNameAndId() {
return new Pair<>(SCREEN_ID,SCREEN_NAME);
}
// Your Code
………..
}
You need to override this method and send screenName and screenId as a Pair.
Note:
If you don’t set the setScreenNameAndId, AKS
will not fire events on Firebase.
With reference to the above session, assume you have set YOUR_SCREEN_ID = 1 and
YOUR_SCREEN_NAME = Home. You can find the Firebase events
for that screen asfollows:
e_1_SCR_Home
e_1_BTN_YOUR_BUTTON_NAME:
e_1_TAB_YOUR_TAB_NAME
and so on.
Local Notifications
To keep users engaged, Apps Kit SDK allows you to create notifications from your app. Create a broadcast receiver by extending AppsKitSDKLocalNotificationBroadcastReceiver as shown below:
public class MyLocalNotificationBroadcastReceiver extends
AppsKitSDKLocalNotificationBroadCastReceiver
{
@Override
protected void checkNotifications() {
addNotificationInQueue(new NotificationModel(String
notificationModelId,
String title, String description, Integer icon, int
notificationId, String targetScreen
));
// if you want to add more add more notifications using
addNotificationInQueue()
NOTE: The Notifications of same notificationModelId will not be added more
then once until that notification is fired, even you add using
addNotificationInQueue()
}
public static void scheduleLocalNotifications(Context context) {
long intervalMillis = getTimeIntervalInMilliSeconds();
// Your Code to trigger this broadCastReceiver on specific time interval
i.e.
intervalMillis
}
}
- notificationModelId: Unique Id for notification Model
- title: Title of notification
- description: Description of notification
- icon: Icon of Notification
- notificationId: Unique Id for notification
- targetScreen: Add your Fully Qualified Class Name as target screen i.e; com.example.MainActivity
Then call your scheduleLocalNotifications from you Application class to trigger broadcast receiver when need to fire notification
Auto Update App
Apps Kit SDK facilitates enabling auto updates for your app if a new version has been released on the Google Play Store. You need to override the following method:
enableAppAutoUpdate()
In your activity, extend from AppsKitSDKBaseActivity, and return true on the screen where you want to display the update screen.
Testing and Debugging
If console logs are enabled from the AppsKitSDK portal, you’ll receive console logs under the key PTB_LOG. You can use these logs to debug any issues.
AppsKitSDK Framework Documentation
iOS Integration Guide
Technical Requirements
- iOS 13.0+
- Swift 5.0+
- Xcode 13.0+
Prerequisites
CRITICAL: The SDK will not function without the following prerequisites properly configured:
- Firebase Setup (Required):
- Create a Firebase project in the Firebase Console.
- Add your iOS app to the Firebase project.
- Download and integrate the GoogleService-Info.plist
file.
Resources: - Firebase iOS Getting Started Guide
- Add Firebase to your Apple project
- AppsKitSDK_Configs_Defaults.plist (Required):
Add a configuration file named AppsKitSDK_Configs_Defaults.plist to your application. This file provides default configurations for the SDK to ensure functionality if RemoteConfig data is unavailable. The file should contain the following keys:
<?xml version="1.0" encoding="UTF-8"?>
<!DOCTYPE plist PUBLIC "-//Apple//DTD PLIST 1.0//EN"
"http://www.apple.com/DTDs/PropertyList-1.0.dtd">
<plist version="1.0">
<dict>
<key>AKS_IOS_CONFIG_LIVE</key>
<string>Your Key From the
portal</string>
<key>AKS_IOS_CONFIG_DEV</key>
<string>Your Key From the
portal</string>
</dict>
</plist>
Place this file in your app's main bundle to allow the SDK to use
default values for critical configurations if needed.
Failure to complete ANY of these
prerequisites will result in SDK initialization failure and non-functionality. Please verify all
components are properly configured before proceeding with SDK integration.
Integration Guide
Downloading the SDK
- Log in to the Apps Kit SDK Portal with your developer account.
- Navigate to the Downloads section.
- Download the latest version of the SDK: AppsKitSDK_v:x.x.xx.zip.
- Unzip the downloaded file to access the framework files.
Adding the Framework to Your Xcode Project
- Open your iOS project in Xcode.
- Drag and drop the AppsKitSDK.framework file into your project's Frameworks folder in the Project Navigator.
- Ensure the framework is added to your app target under General > Frameworks, Libraries, and Embedded Content.
- Set the Embed option for AppsKitSDK.framework to Embed & Sign.
Installation
CocoaPods Integration
To integrate the core dependencies for ad network and analytics into your project, use the following CocoaPods configuration:
# Core dependencies for ad network integration
pod
'Firebase/RemoteConfig' #
Firebase Remote Config for dynamic ad settings
pod
'Google-Mobile-Ads-SDK' #
Google AdMob integration
pod
'FirebaseAnalytics' #
Analytics tracking
pod
'AppsFlyerFramework' #
AppsFlyer attribution
pod
'AppsFlyer-AdRevenue' #
AppsFlyer revenue tracking
pod 'Adjust', '~>
4.38.1' #
Adjust attribution
pod
'AppLovinSDK' #
AppLovin ad network
pod
'IronSourceSDK' #
IronSource ad network
Important Notes
- Ad Mediation Pods:
If you are using mediation with any of these ad platforms (e.g., Google AdMob, AppLovin, or IronSource), make sure to include the required mediation adapter pods. Mediation adapters allow these platforms to serve ads from additional networks.
Example for AdMob Mediation:
pod 'GoogleMobileAdsMediationAppLovin' #
Mediation adapter for AppLovin
pod 'GoogleMobileAdsMediationIronSource' # Mediation
adapter for IronSource
pod 'GoogleMobileAdsMediationFacebook' #
Mediation adapter for Meta Audience Network
- AppsKitSDK Handling:
Once the dependencies are installed, AppsKitSDK (AKS) will handle the setup and configuration for these ad networks and their mediation layers. You don't need to perform manual initialization for these platforms in your app. Just ensure the required pods are added.
Installation Instructions
- Add the above dependencies to your Podfile.
- Run the following commands in your project directory:
pod install
- Open the .xcworkspace file and build your project to ensure all dependencies are integrated properly.
SDK Initialization
- Open your app's AppDelegate.swift file.
- Import the necessary modules and initialize AppsKitSDK as described in the Core Implementation section below.
Core Implementation
Important:
Do not initialize Firebase manually in
the application. The AppsKitSDK will take care of any required Firebase initialization.
AppDelegate Setup
import UIKit
import AppsKitSDK
import Firebase
import GoogleMobileAds
import AppsFlyerLib
import Adjust
import AppLovinSDK
import IronSource
/**
The AppDelegate class serves as the main entry point for the iOS application.
It initializes and configures ad networks and other essential SDKs.
Inherits:
- ASKAppDelegate: Provides default behaviors for AppsKitSDK configuration.
- ASKAdsConfigurable: Protocol to customize ad settings.
*/
@main
class AppDelegate: AKSAppDelegate, AKSAdsConfigurable {
/**
Enables or disables network connectivity monitoring.
- Returns: A `Bool` indicating whether network monitoring is enabled.
*/
func configureInternetStatusEnabled( ) -> Bool
{
return true
}
/**
Enables or disables test ads for debugging purposes.
- Returns: A `Bool` indicating whether test ads are enabled.
*/
func configureTestMode( ) -> Bool {
true
}
/**
Enables or disables development mode.
- Returns: A `Bool` indicating whether development mode is enabled.
*/
func configureDevMode( ) -> Bool {
true
}
/**
Called after the application was launched.
- Parameters:
- application: The singleton app object.
- launchOptions: A dictionary containing launch options.
- Returns: A `Bool` indicating whether the launch was successful.
*/
override func application(
_ application: UIApplication,
didFinishLaunchingWithOptions launchOptions:
[UIApplication.LaunchOptionsKey: Any]?
) -> Bool {
self.delegate = self
let _ = super.application(application,
didFinishLaunchingWithOptions: launchOptions)
// Initialize ad networks with configuration
initializeAdsManager( )
return true
}
/**
Configures and initializes the AKSAdsManager with ad network keys and user
settings.
*/
private func initializeAdsManager( ) {
ASKAdsManager.shared.initialize(
appLovinSDKKey: "yourAppLovinSDKKey",
ironSourceAppKey: "yourIronSourceAppKey",
userConsent:
true, // GDPR consent
status
ageRestricted:
false, // Age restriction flag
doNotSell:
false //
CCPA compliance flag
)
AKSAdsManager.shared.setCanShowAds(canShowAds: true)
}
}
- isTestMode(): Return true if you are in Test Mode.
Note:
In Test Mode, You will see test ads.
- isDevMode(): Returns true if you are in Development Mode.
Note:
In Development Mode, dev configurations will be used.
- appLovinSDKKey: Pass your AppLovin SDK key for integration with the AppLovin ad network.
- ironSourceAppKey: Pass your IronSource App key for integration with the IronSource ad network.
- userConsent: Pass true if GDPR consent has been provided by the user.
- ageRestricted: Pass true if the app is intended for users under 13 years of age (COPPA compliance).
- doNotSell: Pass true if the app complies with CCPA (California Consumer Privacy Act) regulations.
SceneDelegate Configuration
/**
The SceneDelegate class handles scene lifecycle events such as activation and
backgrounding.
Inherits:
- AKSSeneDelegate: Provides default behaviors for AppsKitSDK configuration.
*/
class SceneDelegate: AKSSeneDelegate {
/**
Called when the scene becomes active.
- Parameter scene: The UIScene instance.
*/
override func sceneDidBecomeActive(_ scene: UIScene) {
super.sceneDidBecomeActive(scene)
}
/**
Called when the scene moves to the background.
- Parameter scene: The UIScene instance.
*/
override func sceneDidEnterBackground(_ scene: UIScene)
{
super.sceneDidEnterBackground(scene)
}
}
Using Remote Config in Your Application
This guide explains how to leverage Remote Config using FirebaseRemoteConfig and AppsKitSDK in your application.
Prerequisites
- Ensure AppsKitSDK is integrated into your project.
- Confirm that Firebase is properly set up. Note that the SDK will handle Firebase initialization; you don't need to initialize it manually.
Importing Required Modules
To work with Remote Config, ensure you import the necessary modules:
import FirebaseRemoteConfig
import AppsKitSDK
Accessing Remote Config
AppsKitSDK provides access to FirebaseRemoteConfig via its FirebaseManager. To use it:
private let remoteConfig = AKSFirebaseManager.shared.remoteConfig
- remoteConfig is an instance of FirebaseRemoteConfig that allows you to fetch and apply configurations.
Notes
- No Firebase Initialization Needed: The AppsKitSDK handles Firebase initialization, so you don't need to include any additional Firebase setup code.
- Testing Remote Config: Use Firebase's Remote Config dashboard to set values.
App Open Ads
1. Loading an App Open Ad
To load an app open ad, use the loadAppOpenAd method and provide the necessary callbacks via a delegate conforming to the AppOpenDelegate protocol:
AKSAdsManager.shared.loadAppOpenAd(callbacks: AppOpenDelegate)
2. Showing an App Open Ad
Once an ad is loaded, you can display it by calling:
AKSAdsManager.shared.showAppOpenAd( )
AppOpenDelegate Protocol
The AppOpenDelegate protocol defines methods to handle various events during the app open ad lifecycle. Implement this protocol to handle these events in your app:
Methods:
- func onAdFailToShow( )
- Called when the ad fails to display.
- func onAdShown( )
- Called when the ad is successfully displayed.
- func onDismiss( )
- Called when the ad is dismissed by the user.
- func onLoadedAppOpen( )
- Called when the app open ad is successfully loaded.
- func onFailedToLoadAppOpen( )
- Called when the app open ad fails to load.
AppKitSDKBaseViewController
To use the SDK's simplified ad implementation (without placeholders), your view controller must inherit from AppKitSDKBaseViewController. This is a required first step before implementing any ad functionality.
class YourViewController: AppKitSDKBaseViewController {
override func loadView( ) {
super.loadView()
screenIdAndValue = (1 /*ID*/, "" /*Place Holder*/)
}
}
Key points:
- Inheritance from AppKitSDKBaseViewController is mandatory for placeholder-free methods
- Override loadView( ) to set the screen ID
- The screenIdAndValue tuple must be set with:
- First parameter: Screen ID (Integer)
- Second parameter: Empty string when using placeholder-free methods
Interstitial Ads
Displaying Interstitial Ads
To manage and display interstitial ads, you can use one of the following methods based on your requirements.
Load and Show Interstitial Ad
With placeholder:
AKSAdsManager.shared.loadAndShowInterstitialAd(
placeholder: "interstitial-placement-id",
viewController: self,
interstitialCallBack: self
)
Without placeholder (requires AppKitSDKBaseViewController):
AKSAdsManager.shared.loadAndShowInterstitialAd(
viewController: self,
interstitialCallBack: self
)
Show Interstitial Ad
With placeholder:
AKSAdsManager.shared.showInterstitialAd(
placeholder: "interstitial-placement-id",
viewController: self,
interstitialCallBack: self
)
Without placeholder (requires AppKitSDKBaseViewController):
AKSAdsManager.shared.showInterstitialAd(
viewController: self,
interstitialCallBack: self
)
Load Interstitial Ad
With placeholder:
AKSAdsManager.shared.loadInterstitialAd(
placeholder: "interstitial-placement-id",
viewController: self,
interstitialCallBack: self
)
Without placeholder (requires AppKitSDKBaseViewController):
AKSAdsManager.shared.loadInterstitialAd(
viewController: self,
interstitialCallBack: self
)
Parameters
- placeholder
A String representing the placement ID for the interstitial ad in your ad network.- Ensure this matches the ID configured in your ad provider's dashboard.
- viewController
The UIViewController where the interstitial ad will be shown.- Pass the view controller that should present the ad.
- interstitialCallBack
A delegate conforms to one or more interstitial ad protocols that handle events such as loading success, failure, display, and dismissal.
Interstitial Ad Delegate Protocols
The interstitial ad system uses three delegate protocols for handling different events:
1. InterstitialDelegate
Handles interstitial ad eligibility checks.
- isEligibleToShowDialog()
Called to verify whether the interstitial ad is eligible to show.- Use Case: Check if the conditions to show the ad are met.
- Callback Example:
func isEligibleToShowDialog( ) {
print("Checking if interstitial
ad is eligible to display.")
}
2. InterstitialShowDelegate
Handles events related to displaying interstitial ads.
- onAdShown()
Called when the interstitial ad is successfully shown.- Use Case: Pause background activity or log analytics.
- onAdFailedToShow()
Called when the interstitial ad fails to display.- Use Case: Handle fallback logic or log the failure event.
- onAdDismissed()
Called when the interstitial ad is dismissed by the user.- Use Case: Resume app activity or guide the user to the next step.
- onAdDismiss()
Alternate callback triggered when the interstitial ad is dismissed.- Use Case: Handle dismissal actions where an additional callback is required.
3. InterstitialLoadAndShowDelegate
Handles loading and displaying interstitial ads.
- onLoadedInterstitial()
Called when the interstitial ad is successfully loaded.- Use Case: Update the UI to indicate the ad is ready to display.
- onFailedToLoadInterstitial()
Called when the interstitial ad fails to load.- Use Case: Handle retry logic or show a placeholder instead of the ad.
Notes
- Ensure all required protocols are implemented in your class to handle callbacks effectively.
- Use the appropriate delegate methods to manage the interstitial ad lifecycle, including eligibility, loading, displaying, and dismissal.
Rewarded Ads
Rewarded ads allow users to watch a video or interact with an ad in exchange for rewards (e.g., in-game currency, bonuses). Use the methods below to load, show, or handle rewarded ads.
Load Rewarded Ad
With placeholder:
AKSAdsManager.shared.loadRewardedAd(
placeholder: "rewarded-placement-id",
rewardCallBack: self
)
Without placeholder (requires AppKitSDKBaseViewController):
AKSAdsManager.shared.loadRewardedAd(
viewController: self,
rewardCallBack: self
)
Show Rewarded Ad
With placeholder:
AKSAdsManager.shared.showRewardedAd(
placeholder: "rewarded-placement-id",
viewController: self,
rewardCallBack: self
)
Without placeholder (requires AppKitSDKBaseViewController):
AKSAdsManager.shared.showRewardedAd(
viewController: self,
rewardCallBack: self
)
Load and Show Rewarded Ad
With placeholder:
AKSAdsManager.shared.loadAndShowRewardedAd(
placeholder: "rewarded-placement-id",
viewController: self,
rewardCallback: self
)
Without placeholder (requires AppKitSDKBaseViewController):
AKSAdsManager.shared.loadAndShowRewardedAd(
viewController: self,
rewardCallback: self
)
Parameters
- placeholder
A String representing the placement ID for the rewarded ad in your ad network.- Ensure this matches the ID configured in your ad provider's dashboard.
- viewController
The UIViewController where the rewarded ad will be displayed.- Pass the view controller that should present the ad.
- rewardCallBack
A delegate conforming to the RewardedAdDelegate protocol, handling events related to rewarded ads, such as load success, load failure, display, and reward completion.
RewardedAdDelegate
The RewardedAdDelegate protocol defines methods to handle rewarded ad events:
- onRewardedCompleted()
Called when the rewarded ad is successfully completed, and the user is eligible for the reward.- Use Case: Deliver the reward to the user.
- Example:
func onRewardedCompleted( ) {
print("Rewarded ad completed.
User reward processed.")
}
- onRewardedFailedToShow()
Called when the rewarded ad fails to display.- Use Case: Handle fallback logic or log the failure.
- Example:
func onRewardedFailedToShow( ) {
print("Failed to display rewarded ad.")
}
- onRewardedLoaded()
Called when the rewarded ad is successfully loaded.- Use Case: Update the UI to indicate the ad is ready to show.
- Example:
func onRewardedLoaded(
) {
print("Rewarded ad successfully
loaded.")
}
- onRewardLoadFailure()
Called when the rewarded ad fails to load.- Use Case: Handle retry logic or show a placeholder.
- Example:
func onRewardLoadFailure( ) {
print("Failed to load rewarded
ad.")
}
- onRewardShow()
Called when the rewarded ad is shown.- Use Case: Log analytics or pause app activities.
- Example:
func onRewardShow( )
{
print("Rewarded ad is now
showing.")
}
- onRewardDismiss()
Called when the rewarded ad is dismissed.- Use Case: Resume app activities or guide the user to the next step.
- Example:
func onRewardDismiss(
) {
print("Rewarded ad
dismissed.")
}
Notes
- Implement all required methods in the RewardedAdDelegate protocol to handle rewarded ad events effectively.
- Ensure proper testing in your ad network’s test environment to verify ad behavior and reward delivery.
- Use rewarded ads strategically to enhance user experience without disrupting app engagement.
Banner Ads
To implement banner ads in your app, you have three methods available:
Load and Show Banner Ad
Display a banner ad with combined loading and showing:
AKSAdsManager.shared.loadAndShowBannerAd(
view: UIView( ),
viewController: self,
placeholder: "banner-placement-id",
bannerAdCallBack: self
)
Without placeholder (requires AppKitSDKBaseViewController):
AKSAdsManager.shared.loadAndShowBannerAd(
view: UIView( ),
viewController: self,
bannerAdCallBack: self
)
Show Banner Ad
Display a loaded banner ad:
AKSAdsManager.shared.showBannerAd(
view: UIView( ),
viewController: self,
placeholder: "banner-placement-id",
bannerAdCallBack: self
)
Without placeholder (requires AppKitSDKBaseViewController):
AKSAdsManager.shared.showBannerAd(
view: UIView( ),
viewController: self,
bannerAdCallBack: self
)
Load Banner Ad
Load a banner ad for later display:
AKSAdsManager.shared.loadBannerAd(
view: UIView( ),
viewController: self,
bannerAdCallBack: self,
placeholder: "banner-placement-id"
)
Without placeholder (requires AppKitSDKBaseViewController):
AKSAdsManager.shared.loadBannerAd(
view: UIView(),
viewController: self,
bannerAdCallBack: self
)
Parameters
- view
The UIView container for the banner ad.- Should be added to your view hierarchy
- Height will be 60 points or greater for adaptive banners
- Must have proper Auto Layout constraints
- viewController
The UIViewController responsible for displaying the banner ad.- Must be the current view controller showing the banner view
- Handles ad lifecycle and presentation
- placeholder
A String identifier for the banner ad placement.- Must match the placement ID from your ad network configuration
- Used to track and manage different ad placements in your app
- bannerAdCallBack
A delegate conforming to BannerAdsDelegate protocol.- Handles banner ad lifecycle events
- Height will be 60 points or greater for adaptive banners
- Provides loading, display, and failure callbacks
Delegate Implementation
Your view controller needs to conform to the BannerAdsDelegate protocol:
class YourViewController: UIViewController,
BannerAdsDelegate {
// Delegate methods implementation
}
Banner Ad Callbacks
Implement these methods in your delegate to handle all banner ad events:
- didLoadBannerAd()
Called when the banner ad is successfully loaded.- Use Case: Handle post-loading logic, such as showing loading indicators or preparing the UI.
- Example:
func didLoadBannerAd()
{
// Handle successful ad loading
}
- didFailToLoadBannerAd()
Called when the banner ad fails to load.- Use Case: Handle loading failures and implement fallback logic.
- Example:
func didFailToLoadBannerAd() {
// Handle ad loading failure
}
- isBannerAdShow()
Called when the banner ad is successfully displayed.- Use Case: Handle post-display logic or trigger analytics events.
- Example:
func isBannerAdShow()
{
// Handle successful ad display
}
- isBannerAdShowFailed()
Called when the banner ad fails to display.- Use Case: Handle display failures and implement fallback UI.
- Example:
func isBannerAdShowFailed() {
// Handle ad display failure
}
Native Ads
To implement native ads in your app, you have three methods available:
Load and Show Native Ad
With placeholder:
AKSAdsManager.shared.loadAndShowNativeAd(
view: UIView( ),
viewController: self,
nativeView: nil,
placeholder: "native-placement-id",
nativeAdCallBack: self
)
Without placeholder (requires AppKitSDKBaseViewController):
AKSAdsManager.shared.loadAndShowNativeAd(
view: UIView(),
viewController: self,
nativeView: nil,
nativeAdCallBack: self
)
Show Native Ad
With placeholder:
AKSAdsManager.shared.showNativeAd(
view: UIView(),
viewController: self,
nativeView: nil,
placeholder: "native-placement-id",
nativeAdCallBack: self
)
Without placeholder (requires AppKitSDKBaseViewController):
AKSAdsManager.shared.showNativeAd(
view: UIView(),
viewController: self,
nativeView: nil,
nativeAdCallBack: self
)
Load Native Ad
With placeholder:
AKSAdsManager.shared.loadNativeAd(
view: UIView(),
viewController: self,
nativeView: nil,
placeholder: "native-placement-id",
nativeAdCallBack: self
)
Without placeholder (requires AppKitSDKBaseViewController):
AKSAdsManager.shared.loadNativeAd(
view: UIView(),
viewController: self,
nativeView: nil,
nativeAdCallBack: self
)
Parameters
- view
The UIView container for the native ad.- Should be added to your view hierarchy
- Must have proper Auto Layout constraints
- viewController
The UIViewController responsible for displaying the native ad.- Must be the current view controller showing the native view
- Handles ad lifecycle and presentation
- nativeView
An optional custom view for the native ad.- Pass nil to use default native ad layout
- Custom view must conform to native ad requirements
- placeholder
A String identifier for the native ad placement.- Must match the placement ID from your ad network configuration
- Used to track and manage different ad placements in your app
- nativeAdCallBack
A delegate conforming to NativeAdsCallBackprotocol.- Handles native ad lifecycle events
- Provides loading, display, and interaction callbacks
Delegate Implementation
Your view controller needs to conform to the NativeAdsCallBack protocol:
class YourViewController: UIViewController,
NativeAdsCallBack {
// Delegate methods implementation
}
Native Ad Callbacks
Implement these methods in your delegate to handle all native ad events:
- didLoadNativeAd()
Called when the native ad is initially loaded.- Use Case: Handle initial ad loading success.
- Example:
func didLoadNativeAd()
{
// Handle successful ad loading
}
- didFailToLoadNativeAd()
Called when the native ad fails to load.- Use Case: Handle loading failures and implement fallback logic.
- Example:
func didFailToLoadNativeAd() {
// Handle ad loading failure
}
- didReceiveNativeAd()
Called when the native ad content is received.- Use Case: Handle ad content reception.
- Example:
func didReceiveNativeAd() {
// Handle ad content reception
}
- willPresentScreen()
Called before the native ad presents its screen.- Use Case: Prepare UI for ad presentation.
- Example:
func willPresentScreen() {
// Prepare for ad presentation
}
- willDismissScreen()
Called before the native ad dismisses its screen.- Use Case: Prepare UI for ad dismissal.
- Example:
func willDismissScreen() {
// Prepare for ad dismissal
}
- didDismissScreen()
Called after the native ad dismisses its screen.- Use Case: Handle post-dismissal cleanup.
- Example:
func didDismissScreen() {
// Handle post-dismissal tasks
}
- didFinishLoading()
Called when the native ad finishes loading completely.- Use Case: Handle final loading completion.
- Example:
func didFinishLoading() {
// Handle final loading completion
}
- isNativeAdShow()
Called when the native ad is successfully displayed.- Use Case: Handle successful ad display.
- Example:
func isNativeAdShow()
{
// Handle successful ad display
}
- isNativeAdShowFailed()
Called when the native ad fails to display.- Use Case: Handle display failures.
- Example:
func isNativeAdShowFailed() {
// Handle ad display failure
}
Notes
- Native ads blend into the app’s UI, ensuring a consistent look and feel. Customize the layout using the nativeView parameter for a tailored experience.
- Implement all required methods in the NativeAdsCallBack protocol to manage ad events effectively.
- Test native ads in both default and custom layouts to ensure they meet your design standards and work across various screen sizes.
Legal Compliance
// MARK: - Terms and Privacy Methods
/// Displays Terms of Use
func showTerms() {
AKSAdsManager.shared.showTermOfUse()
}
/// Displays Privacy Policy
func showPrivacy() {
AKSAdsManager.shared.showPrivacyPolicy()
}